How to turn a Webflow website into a PWA (with Push Notifications)
Mihai Ungureanu
June 23, 2025
Imagine turning your Webflow website into something more than just a site—an experience that feels like an app, one that users can install directly on their devices. No more relying on them to remember your URL or find your site through search engines. With a Progressive Web App (PWA), your website can live on their home screen, ready to open with a tap, just like a native app.
In this guide, we’ll show you how to transform your Webflow site into a PWA, complete with that app-like feel and easy installation. Whether you're looking to boost user engagement or simply enhance the mobile experience, this step-by-step process will help you achieve it without complicated coding. Ready to give your users the power to install your site? Let’s get started!
The No-Code Path
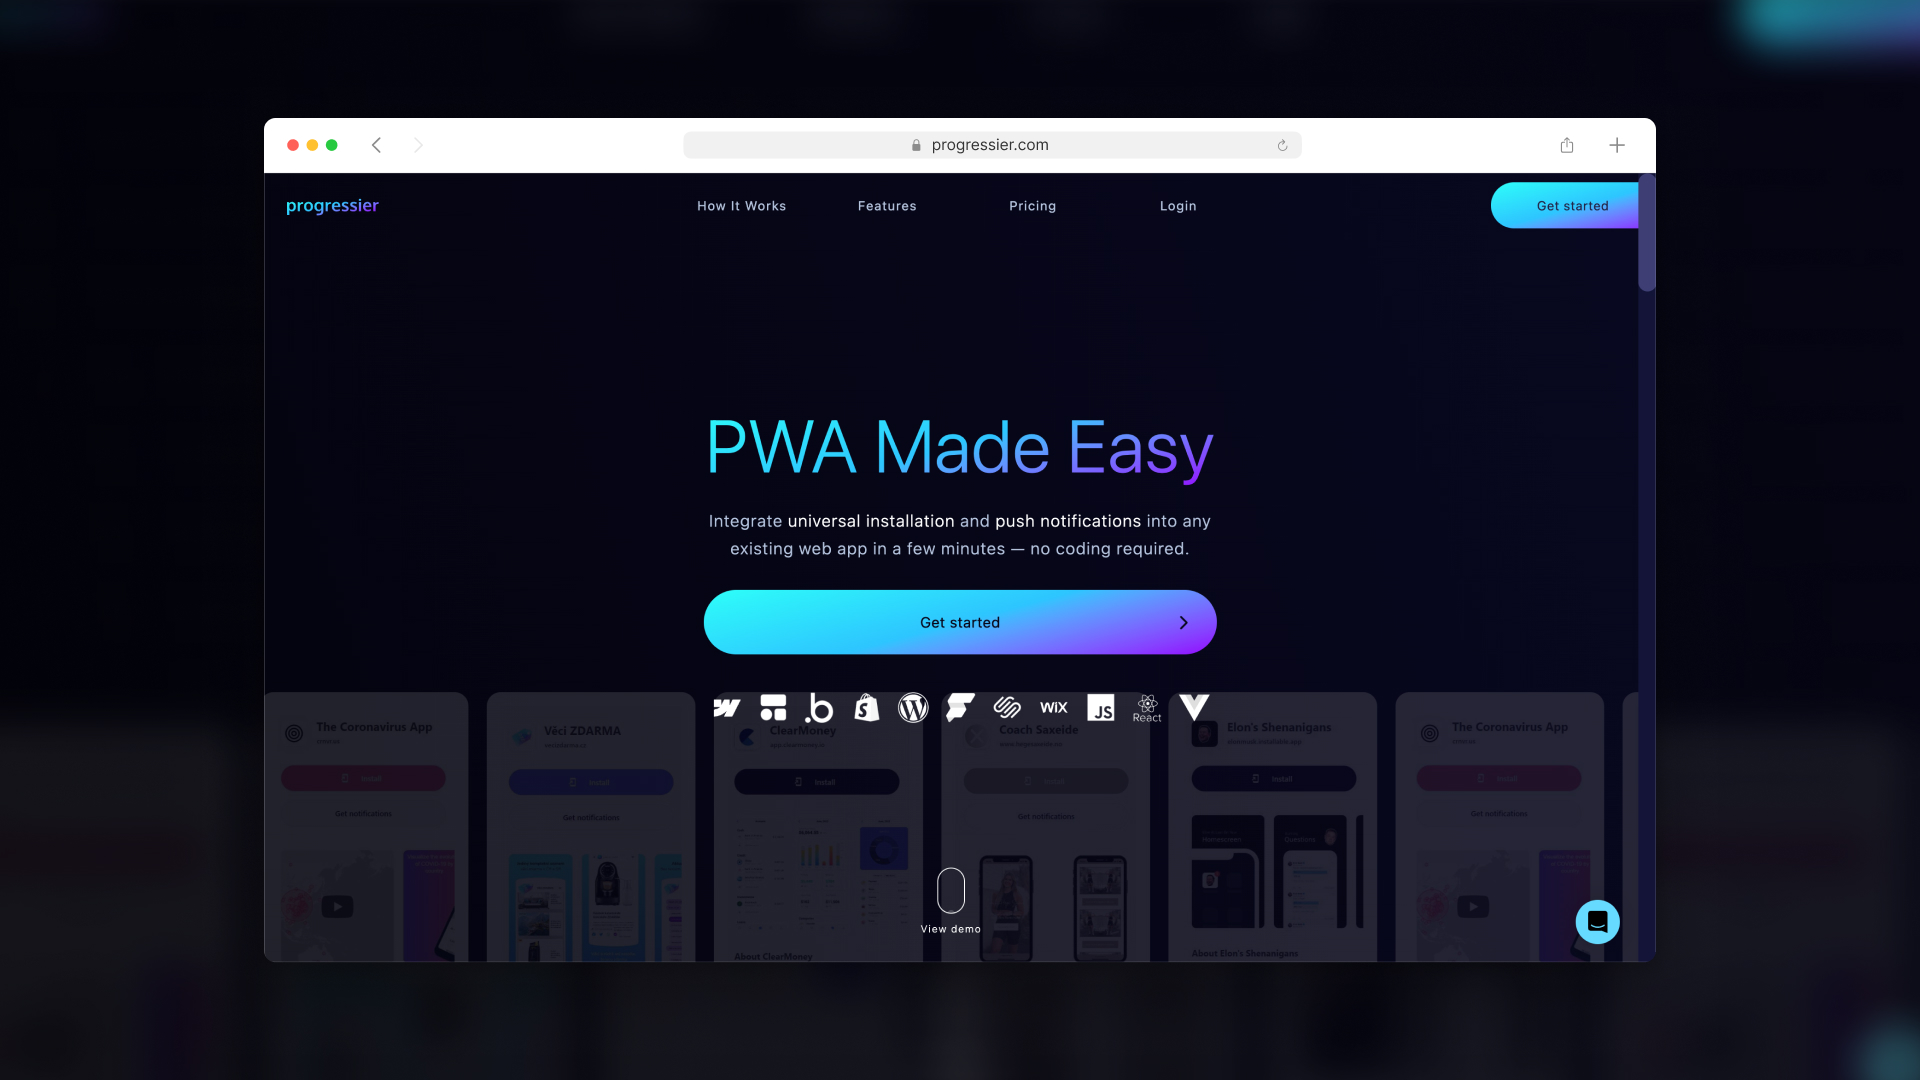
If you're looking for a fast, hassle-free way to convert your Webflow site into a PWA without worrying about all the advanced functionalities or coding, Progressier is a great option. It allows you to set up your PWA quickly, even without access to a developer.
The Custom Code Path
If you're a developer or have access to one, coding the PWA functionalities is the best way to go. This allows you to fully unlock advanced features like offline access, service workers, and personalized push notifications. With custom code, you can tailor the PWA experience to your exact needs, offering a more robust and optimized user experience than no-code solutions can provide.
Requirements
Cloudflare
We'll leverage Cloudflare Workers to set up a reverse proxy, allowing us to host key files like manifest.json and service workers under the same domain as your Webflow site. This ensures a seamless PWA integration while keeping everything centralized.
Setting Up a Reverse Proxy
The first step is to ensure your domain is managed by Cloudflare. You can either transfer an existing domain to Cloudflare or purchase a new one directly from their platform. This setup is crucial for enabling Cloudflare's reverse proxy capabilities, which will allow you to serve essential PWA files, such as the manifest.json and service workers, under the same domain as your Webflow site.
1. Webflow set-up
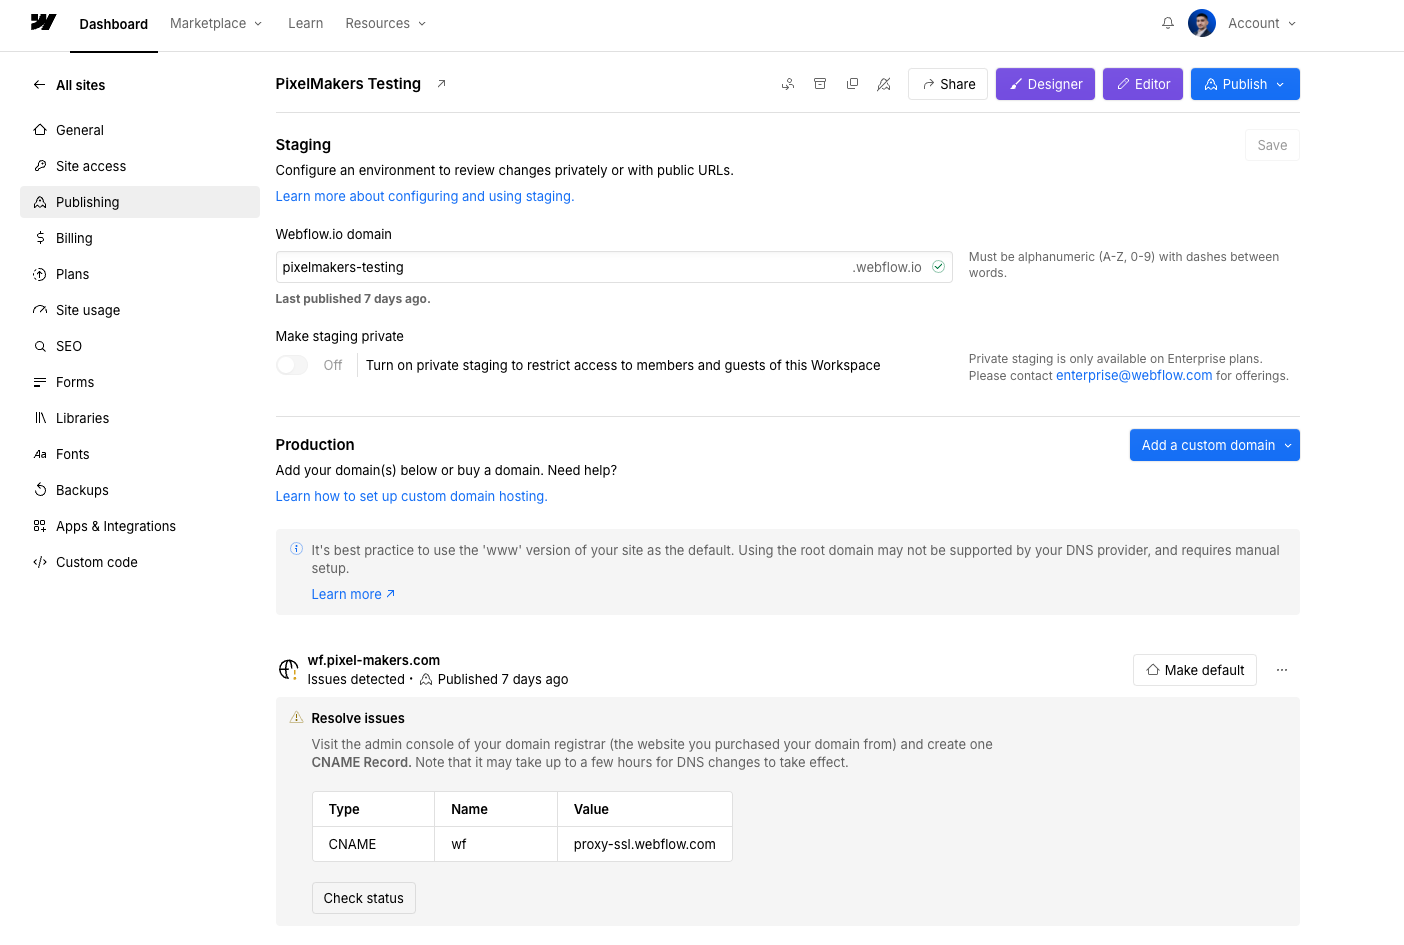
Start by purchasing a Webflow plan that supports custom domains. When adding your custom domain, use a subdomain like wf.[yourdomain].com. For example, in our case, we’ve set up wf.pixel-makers.com.
2. Configure DNS in Cloudflare
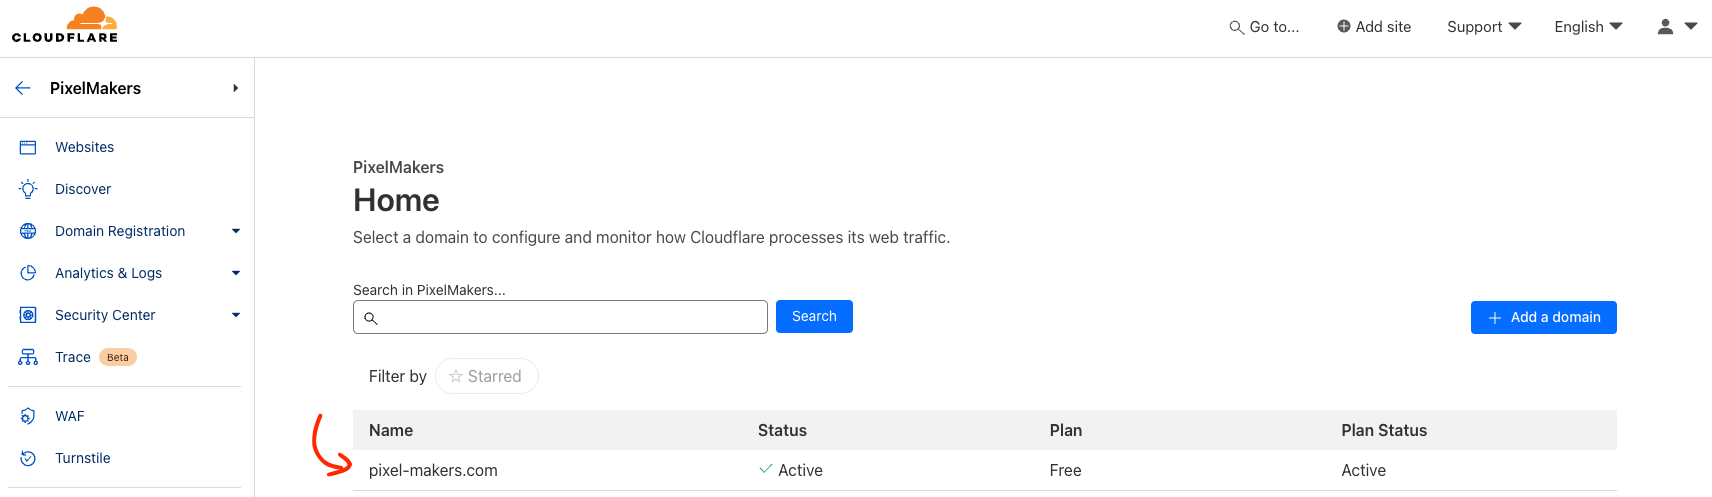
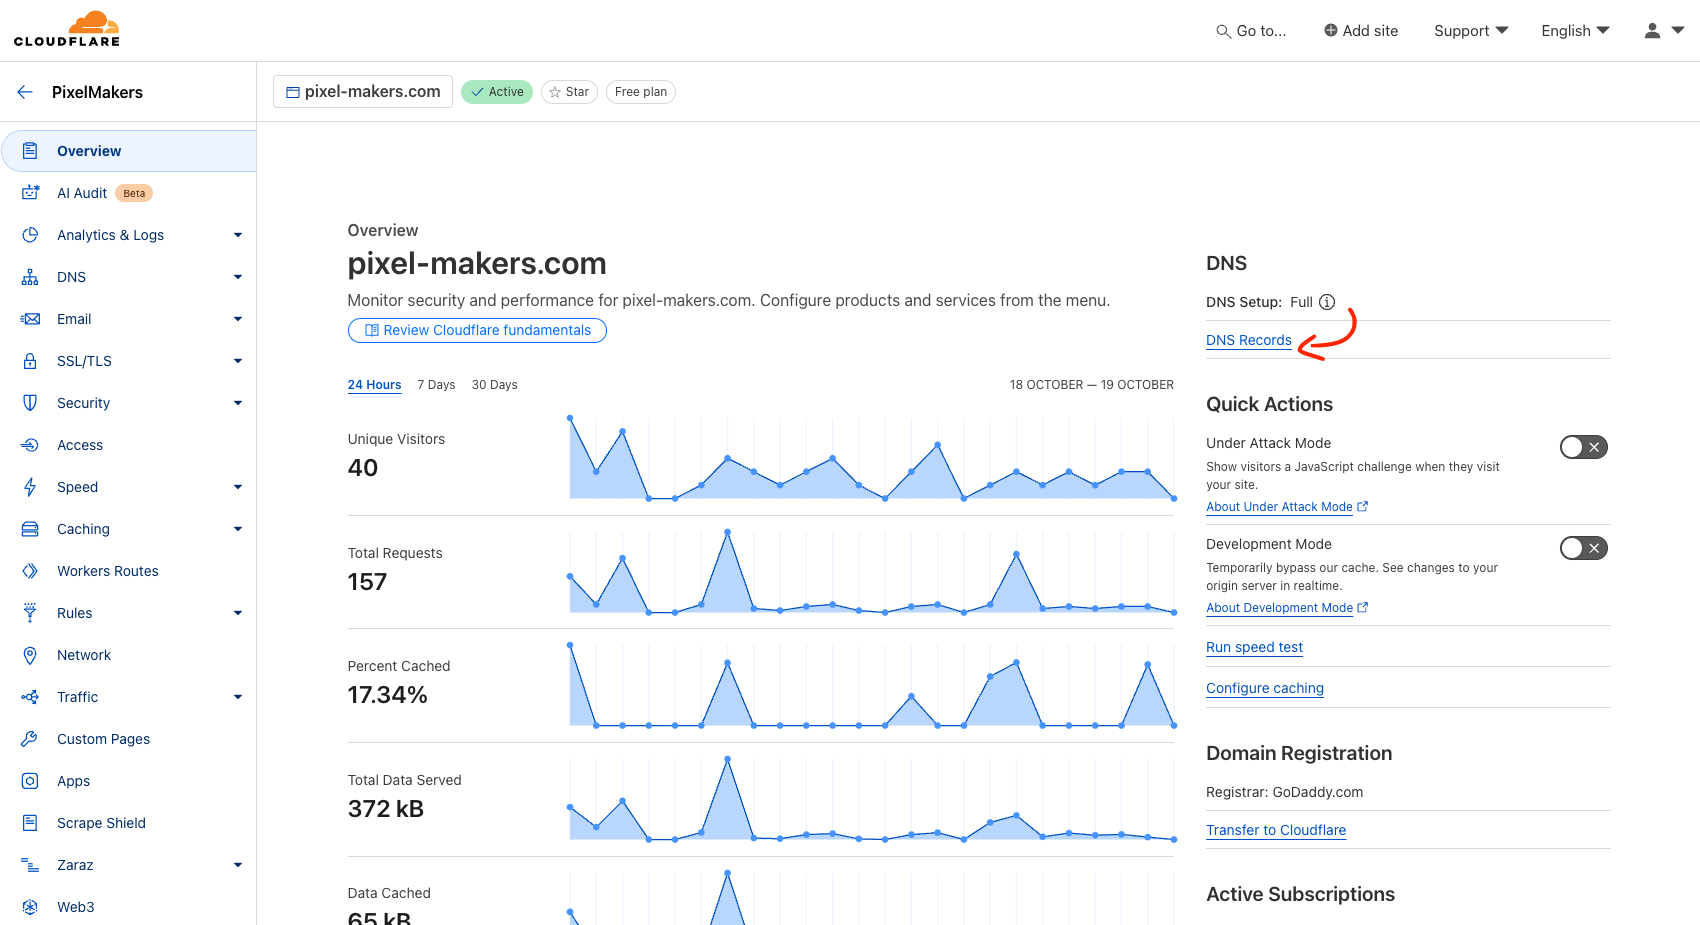
Navigate to Cloudflare and select your website under the "Websites" section. Then, go to DNS Records.
Click Add Record, choose CNAME, and set the name to wf. For the target, use proxy.webflow.com. Ensure that the proxy status is enabled, as this will route traffic through Cloudflare while keeping your Webflow site secure and optimized.


3. Set Up the Reverse Proxy
To create the reverse proxy, we’ve used hono.js and a modified version of the reverse proxy code from Finsweet’s tutorial (you can check it out here).
First, install the Wrangler CLI to manage Cloudflare Workers by following the guide here: Cloudflare Wrangler CLI Setup.
Next, follow the hono.js documentation to set up a new project: Hono Cloudflare Workers Guide.
Once your project is ready, add the following code to your index.ts file to configure the reverse proxy.
import { Hono } from "hono";
import { has_trailing_slash } from "./utils";
const app = new Hono();

const DOMAIN = "domain.com"; //replace with your domain name
const MAIN_ORIGIN = `https://${DOMAIN}`;
const WEBFLOW_SUBDOMAIN = "wf";
const FILES_SUBDOMAIN = "files";
const SUBDOMAINS = [] as string[];

app.get("*", async (c) => {
  const { hostname, pathname, search } = new URL(c.req.url);

  // Redirect from www to non-www
  if (hostname === "www." + DOMAIN) {
    const redirectUrl = `${MAIN_ORIGIN}${pathname}${search}`;
    return c.redirect(redirectUrl, 301);
  }

  // Proxy requests for manifest.json and sw.js to files.pixel-makers.com
  if (pathname === "/manifest.json" || pathname === "/sw.js") {
    const files_url = `https://${FILES_SUBDOMAIN}.${DOMAIN}${pathname}`;
    const response = await fetch(files_url);
    return response;
  }

  // Handle subdomain routing
  if (hostname !== DOMAIN) {
    const match = SUBDOMAINS.find((subdomain) =>
      hostname.startsWith(subdomain)
    );

    if (match) {
      const redirect_url =
        `${MAIN_ORIGIN}/${match}${pathname}${search}`.replace(
          /([^:]\/)\/+/g,
          "$1"
        );
      return c.redirect(redirect_url, 301);
    }

    // Proxy requests to Webflow subdomain
    if (hostname.startsWith(WEBFLOW_SUBDOMAIN)) {
      const webflow_url = `${MAIN_ORIGIN}${pathname}${search}`.replace(
        /([^:]\/)\/+/g,
        "$1"
      );
      return c.redirect(webflow_url, 301);
    }

    const standardRequest = new Request(c.req.url, {
      method: c.req.method,
      headers: c.req.raw.headers,
      body: c.req.raw.body,
    });

    return fetch(standardRequest);
  }

  const paths = pathname.split("/").filter(Boolean);

  // Handle trailing slashes
  if (paths.length && has_trailing_slash(pathname)) {
    const redirect_url = `${origin}/${paths.join("/")}${search}`;
    return c.redirect(redirect_url, 301);
  }

  // Match subdomains for proxying
  let matchPath = SUBDOMAINS.find((subdomain) => subdomain === paths[0]);

  if (matchPath) {
    const target_origin = `https://${matchPath}.${DOMAIN}`;
    const target_pathname = paths.slice(1).join("/");
    const target_url = `${target_origin}/${target_pathname}${search}`;

    const response = await fetch(target_url);

    // Handle 301 redirects
    if (response.redirected && response.url) {
      console.log("Redirecting to:", response.url);
      return c.redirect(response.url, 301);
    }

    // Return regular response
    return response;
  }

  // Default to Webflow subdomain if no match
  const webflow_origin = `https://${WEBFLOW_SUBDOMAIN}.${DOMAIN}`;
  const webflow_url = `${webflow_origin}${pathname}${search}`;

  const response = await fetch(webflow_url);

  // Handle 301 redirects
  if (response.redirected && response.url) {
    return c.redirect(response.url, 301);
  }

  return response;
});

export default app;
Create a new file called utils.ts and add the following code.
export const has_trailing_slash = (pathname: string) => /\/+$/.test(pathname);
In wrangler.toml, add the following code.
name = "test-reverse-proxy"
main = "src/index.ts"
compatibility_date = "2023-12-18"
You can replace “test-reverse-proxy” with a different name.
4. Deploy the Reverse Proxy
To deploy, run wrangler deploy in your terminal.
5. Add it to the domain
Go to Cloudflare → Workers & Pages → Your worker → Settings and add your custom domain.

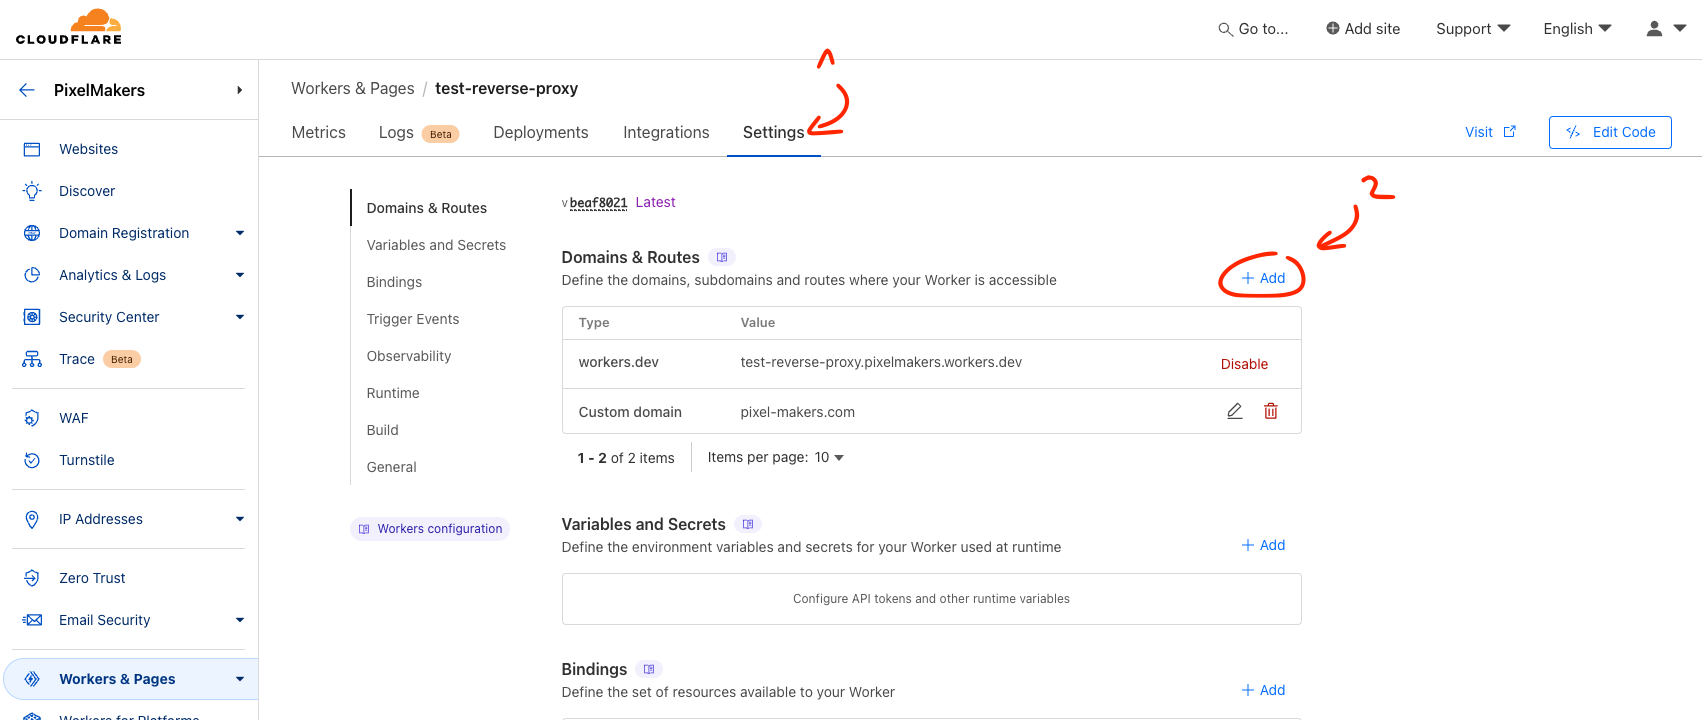
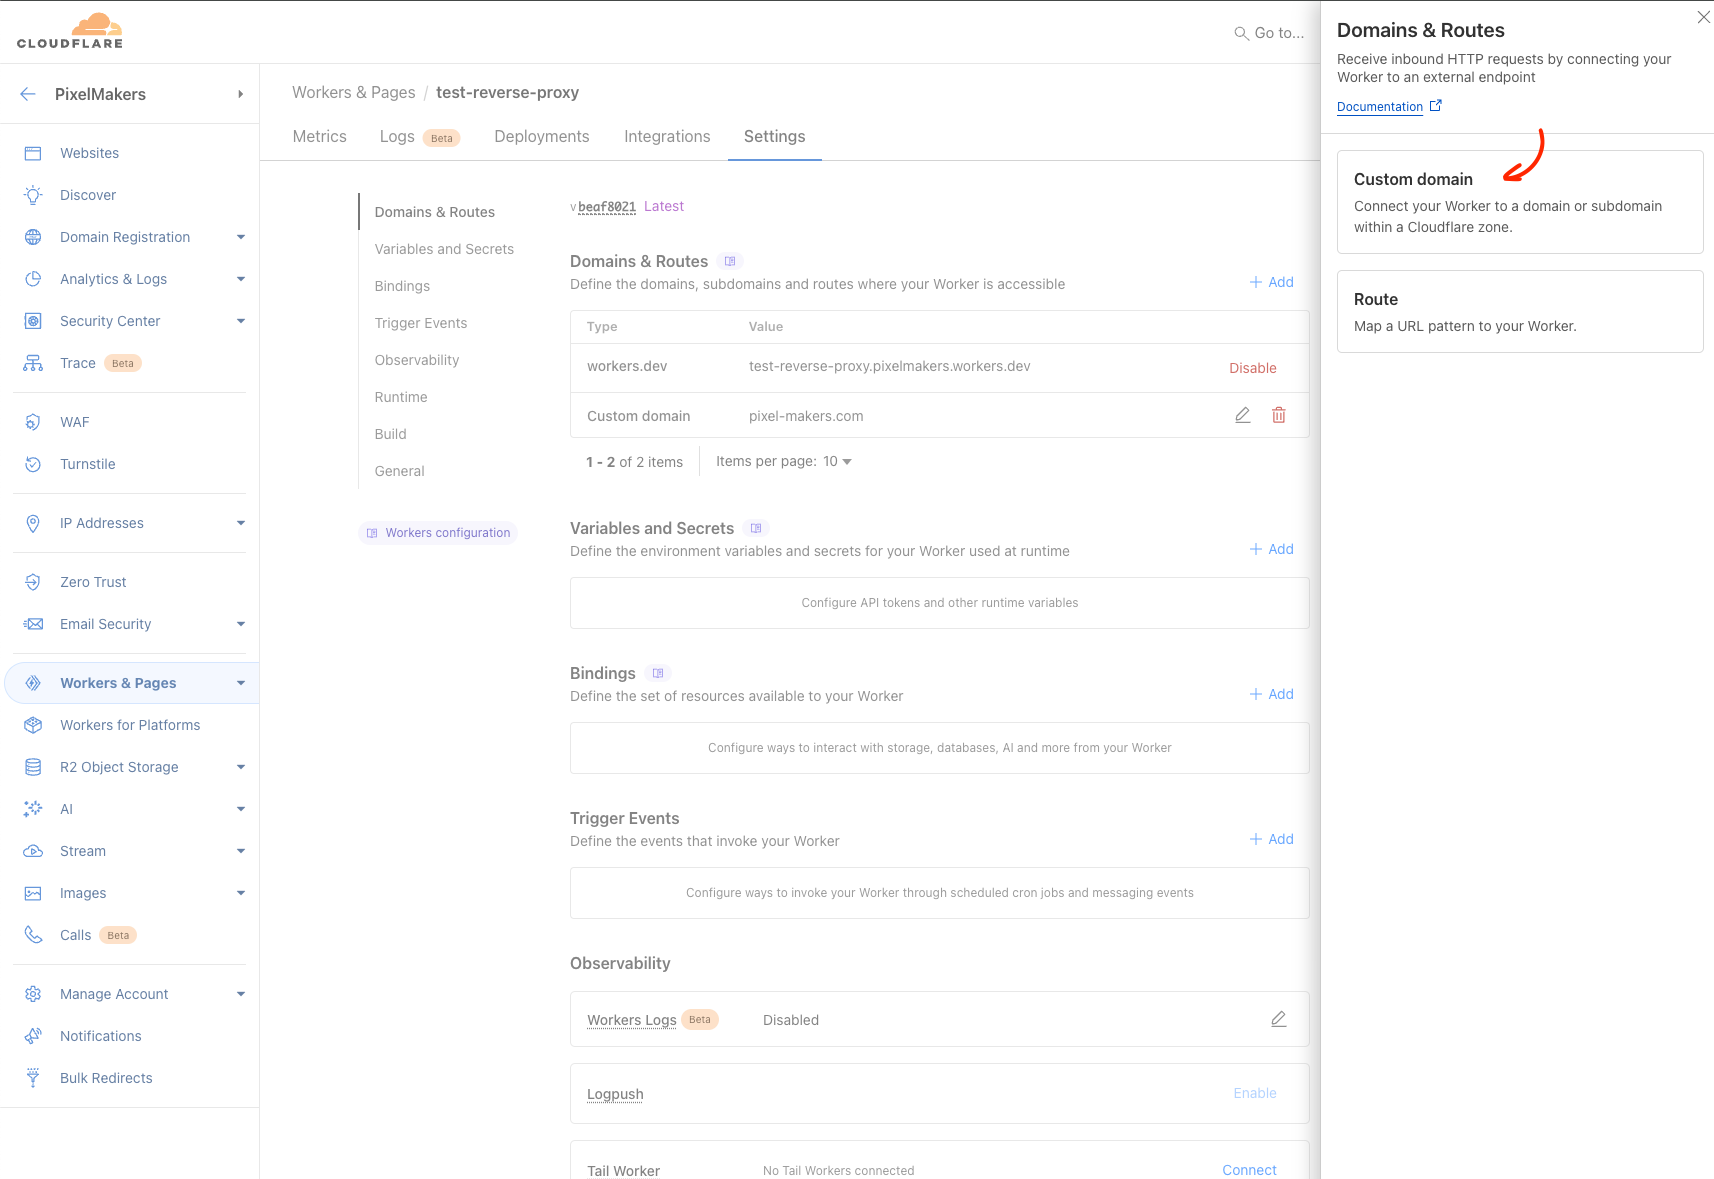

Once completed, visit your domain to check if it works. You should see your Webflow project.
Manifest & Service Worker
Before we continue, it’s important to understand 2 major web concepts: manifest and service workers.
Manifest.json
A manifest.json is a configuration file used in Progressive Web Apps (PWA) that provides essential information about the web app to the browser. This file helps the browser understand how the app should behave when installed on a user's device, including appearance and functionality aspects like icons, themes, and launch settings.
Key aspects of a manifest.json file include:
- App Name and Short Name: The full name of the app and a shorter version used in limited spaces (e.g., on the home screen).
"name": "My App""short_name": "App"
- Icons: Defines icons used when the app is installed on a device's home screen or desktop.
"icons": [{"src": "/icon.png", "sizes": "192x192", "type": "image/png"}]
- Start URL: Specifies the URL that the app should load when launched.
"start_url": "/index.html"
- Display Mode: Controls how the app is displayed, e.g., in fullscreen mode or as a standalone window without browser UI.
"display": "standalone"
- Background and Theme Colors: Customize the background color of the splash screen and the color of the browser's UI.
"background_color": "#ffffff""theme_color": "#0000ff"
- Orientation: Sets the default screen orientation (e.g., portrait or landscape) when the app is launched.
"orientation": "portrait"
- Description: A short description of what the app does.
"description": "An app that provides..."
- Scope: Defines the navigation scope of the app, meaning which URLs the app can navigate to.
"scope": "/app/"
This manifest.json file is crucial for turning a regular web app into a PWA that can be installed on a user’s device, offering a native app-like experience. Learn more on MDN.
Service Worker
A service worker is a JavaScript file that runs in the background of a web page, separate from the main browser thread. It acts as a proxy between the browser and the network, enabling key features of Progressive Web Apps (PWAs), such as offline support, background sync, and push notifications.
Here are some important aspects of a service worker:
1. Offline Support and Caching
- A service worker can intercept network requests and serve resources from a cache, allowing the app to work even when there is no internet connection or when the network is unreliable.
- It implements a cache-first or network-first strategy to determine whether resources should be fetched from the network or from the cache.
- For example, if a user visits a page when offline, the service worker can load previously cached assets, making the app feel like it's working normally.
self.addEventListener('fetch', function(event) {
  event.respondWith(
    caches.match(event.request).then(function(response) {
      return response || fetch(event.request);
    })
  );
});
2. Background Sync
- Service workers can handle background sync operations. This means that actions like sending data to a server can be deferred until the network is available again, improving user experience by syncing data in the background.
3. Push Notifications
- Service workers allow web apps to send push notifications to users, even when the app is not open in the browser. This keeps users engaged by notifying them about important updates, messages, or events.
4. Network Request Interception
- Service workers intercept network requests and can modify, redirect, or block them. This is useful for improving performance and for dealing with connectivity issues.
self.addEventListener('fetch', event => {
  // Handle network requests, cache them, or serve from cache
});
5. Running Independently from the Web Page
- Unlike regular JavaScript, a service worker runs independently from the web page itself. It only responds to events like network requests, push messages, or sync events, which allows it to handle tasks without needing the page to be open.
6. Lifecycle (Install, Activate, and Fetch)
- Service workers go through a specific lifecycle:
- Install: This is where the service worker is installed, and assets can be cached.
- Activate: This phase occurs after installation, where the service worker can clean up old caches or take control of the app.
- Fetch: This happens whenever a network request is made, allowing the service worker to decide whether to serve from cache or fetch from the network.
self.addEventListener('install', event => {
  // Cache files during install
});

self.addEventListener('activate', event => {
  // Activate and remove outdated caches
});

self.addEventListener('fetch', event => {
  // Intercept fetch requests
});
7. Security
- Service workers require HTTPS because they can intercept network requests, which could otherwise be a security risk.
Use Case Example in a PWA:
- Offline Capabilities: When a user visits a PWA, the service worker caches assets (HTML, CSS, JavaScript, images, etc.). If the user goes offline, the service worker serves the cached assets, allowing the app to function without an internet connection.
Want to learn more? You can read the docs from MDN.
Creating and Deploying PWA Files
To enable PWA functionality, we need to store both a manifest.json file and a service worker under the same domain as your Webflow site. To do this, we'll set up a Vite project with Vanilla TypeScript.
Start by running the following command in your terminal:
npm create vite@latest static-files -- --template vanilla-ts
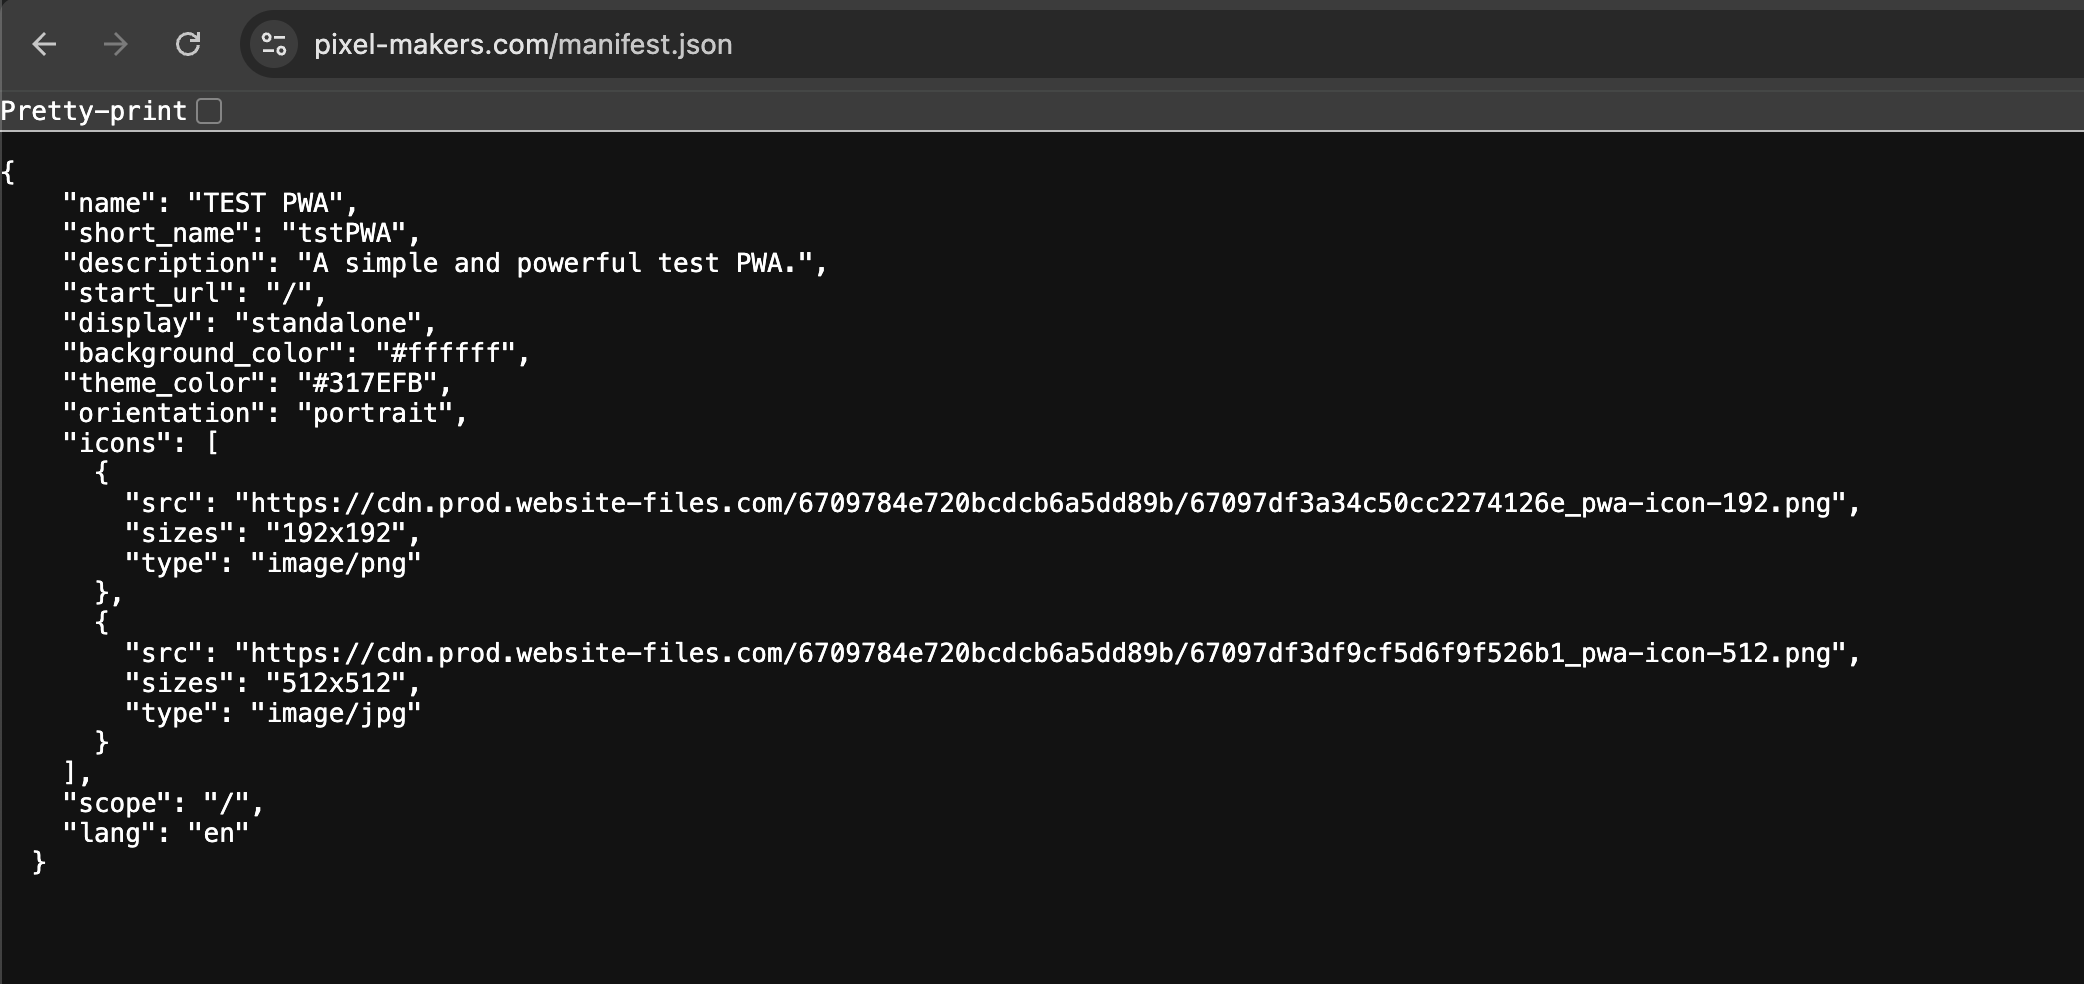
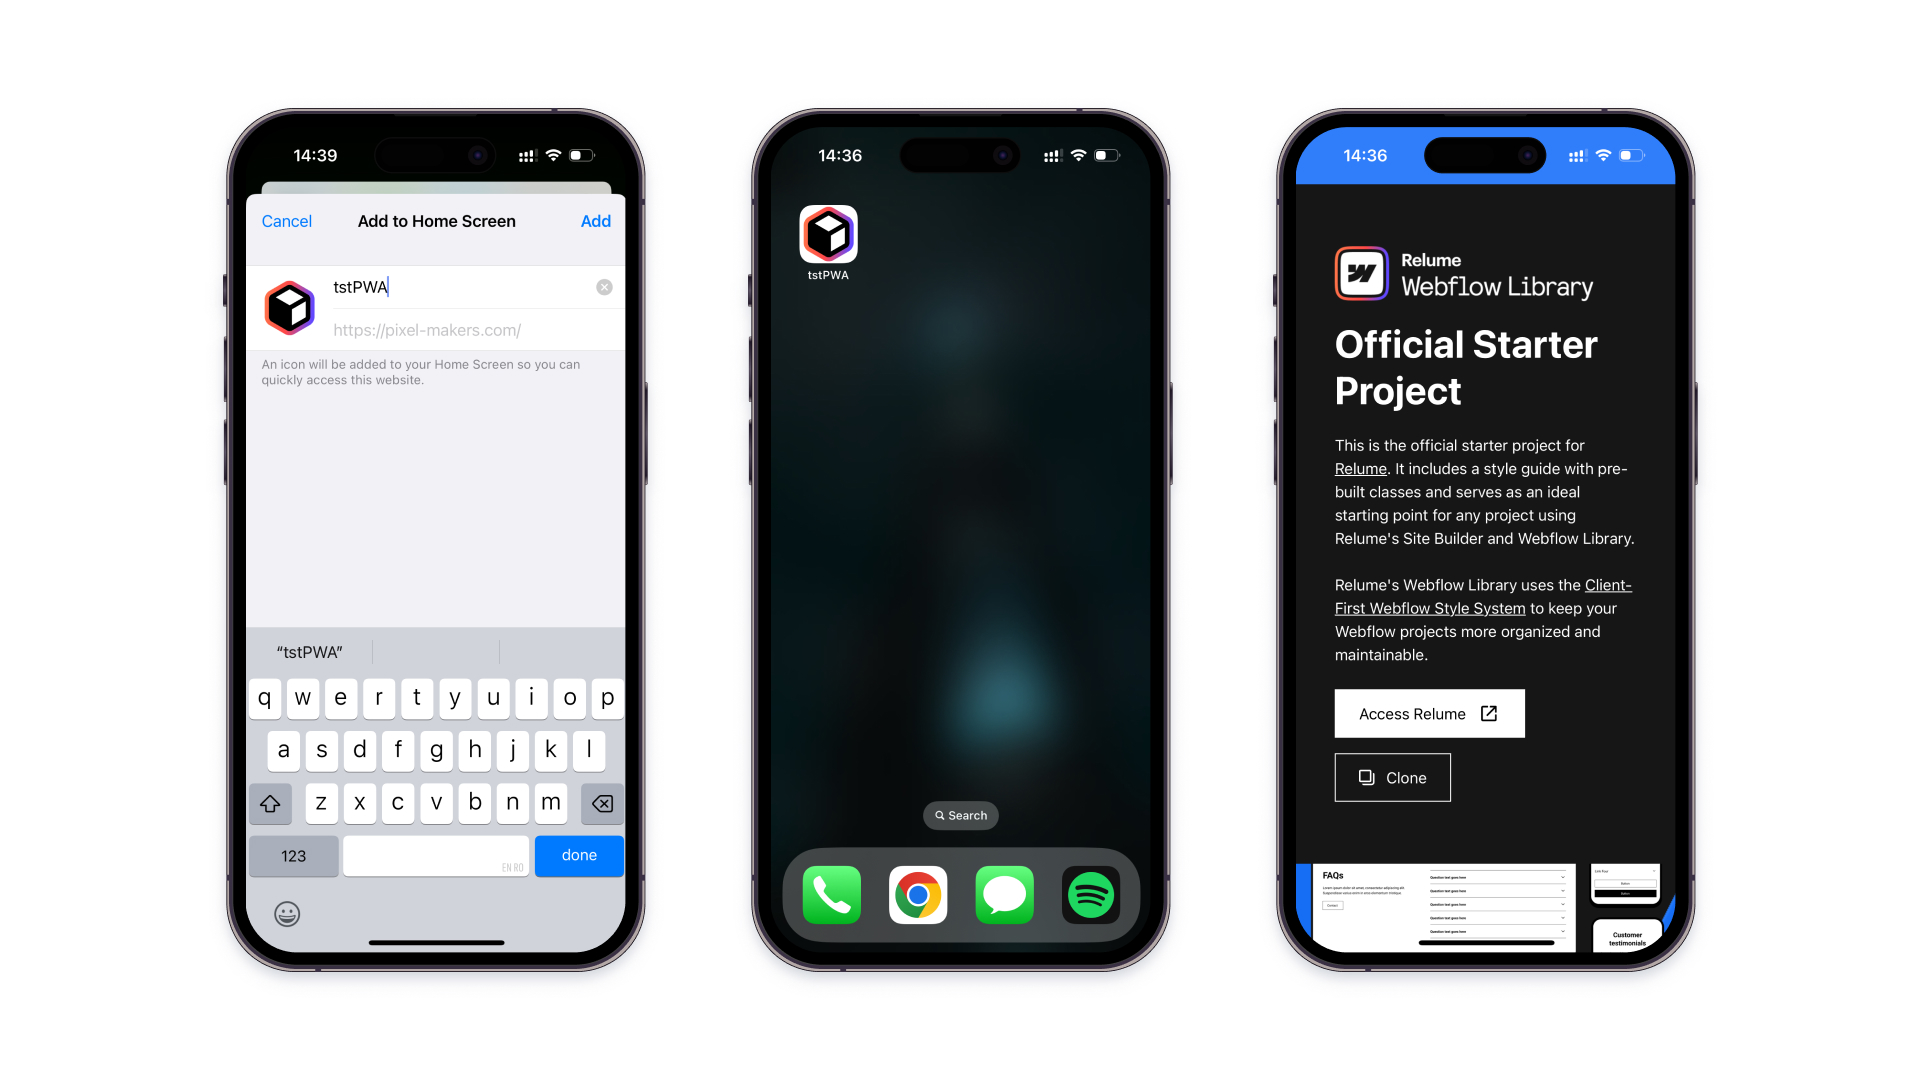
This will initialize a Vite project with Vanilla TypeScript. Inside the public folder of your newly created project, create a file named manifest.json and update its content with values specific to your project, such as app name, icons, and start URL. This will ensure your PWA is properly configured for installation and offline use.
{
    "name": "TEST PWA",
    "short_name": "tstPWA",
    "description": "A simple and powerful test PWA.",
    "start_url": "/",
    "display": "standalone",
    "background_color": "#ffffff",
    "theme_color": "#317EFB",
    "orientation": "portrait",
    "icons": [
      {
        "src": "https://cdn.prod.website-files.com/6709784e720bcdcb6a5dd89b/67097df3a34c50cc2274126e_pwa-icon-192.png",
        "sizes": "192x192",
        "type": "image/png"
      },
      {
        "src": "https://cdn.prod.website-files.com/6709784e720bcdcb6a5dd89b/67097df3df9cf5d6f9f526b1_pwa-icon-512.png",
        "sizes": "512x512",
        "type": "image/jpg"
      }
    ],
    "scope": "/",
    "lang": "en"
  }
In your Vite + TS project, navigate to the public folder and create a new file called sw.js. This will serve as your Service Worker file, responsible for handling background tasks such as caching assets, managing offline functionality, and enabling push notifications for your PWA.
const urlBase64ToUint8Array = (base64String) => {
  const padding = "=".repeat((4 - (base64String.length % 4)) % 4);
  const base64 = (base64String + padding)
    .replace(/\-/g, "+")
    .replace(/_/g, "/");

  const rawData = atob(base64);
  const outputArray = new Uint8Array(rawData.length);

  for (let i = 0; i < rawData.length; ++i) {
    outputArray[i] = rawData.charCodeAt(i);
  }

  return outputArray;
};

const saveSubscription = async (subscription) => {
  const response = await fetch("http://localhost:3001/save-subscription", {
    method: "post",
    headers: { "Content-type": "application/json" },
    body: JSON.stringify(subscription),
  });

  return response.json();
};

self.addEventListener("activate", async (e) => {
  const subscription = await self.registration.pushManager.subscribe({
    userVisibleOnly: true,
    applicationServerKey: urlBase64ToUint8Array("VAPID_PUBLIC_KEY"),
  });

  const response = await saveSubscription(subscription);
  console.log(response);
});

self.addEventListener("push", (e) => {
  self.registration.showNotification("Hello!", { body: e.data.text() });
});
Here's a breakdown of its purpose and how it works:
urlBase64ToUint8Array: Converts a Base64 URL-encoded string into aUint8Arrayfor use in the push subscription process.saveSubscription: Sends the subscription details to a server for storage.self.addEventListener("activate", async (e): Handles service worker activation, subscribes the user to push notifications, and saves the subscription to a server.self.addEventListener("push", (e): Handles incoming push messages and displays a notification to the user.
Generate VAPID Keys
To make the notification work, we need to generate VAPID (Voluntary Application Server Identification) keys. These are used for securely sending push notifications via web push protocols. One of the most common ways to generate VAPID keys is by using the web-push library in Node.js. Here are the steps for generating the keys:
1. Install the web-push Library
If you don't already have Node.js installed, you'll need to install it first. Once installed, you can use the web-push library to generate VAPID keys.
In your terminal, run:
npm install web-push -g
2. Generate VAPID Keys
After installing the library, you can generate VAPID keys by running the following command in your terminal:
web-push generate-vapid-keysThis will output a pair of VAPID keys, a public key and a private key, which you'll use for your push notifications. Save them as we will use them later. For now, replace the VAPID_PUBLIC_KEY from sw.js with the one generated at “Public Key”.
Example output:
Public Key:
BHcNjUHzm9a3n_Etp2Vkw9j5BMb7KYFVVb2Dg955BuAHPDwIrTeJklQ3h5bcKOJStTWsGxToUW2NtxKC7uPWb2Y

Private Key:
Fg9ILk2eyJ2oqcL_fDQnujIIsYpED6lt19fpdqMs8mg- The public key is sent to the client (browser) as part of the push subscription request.
- The private key is used by the server to sign the messages sent through the push service.
Deploy the files
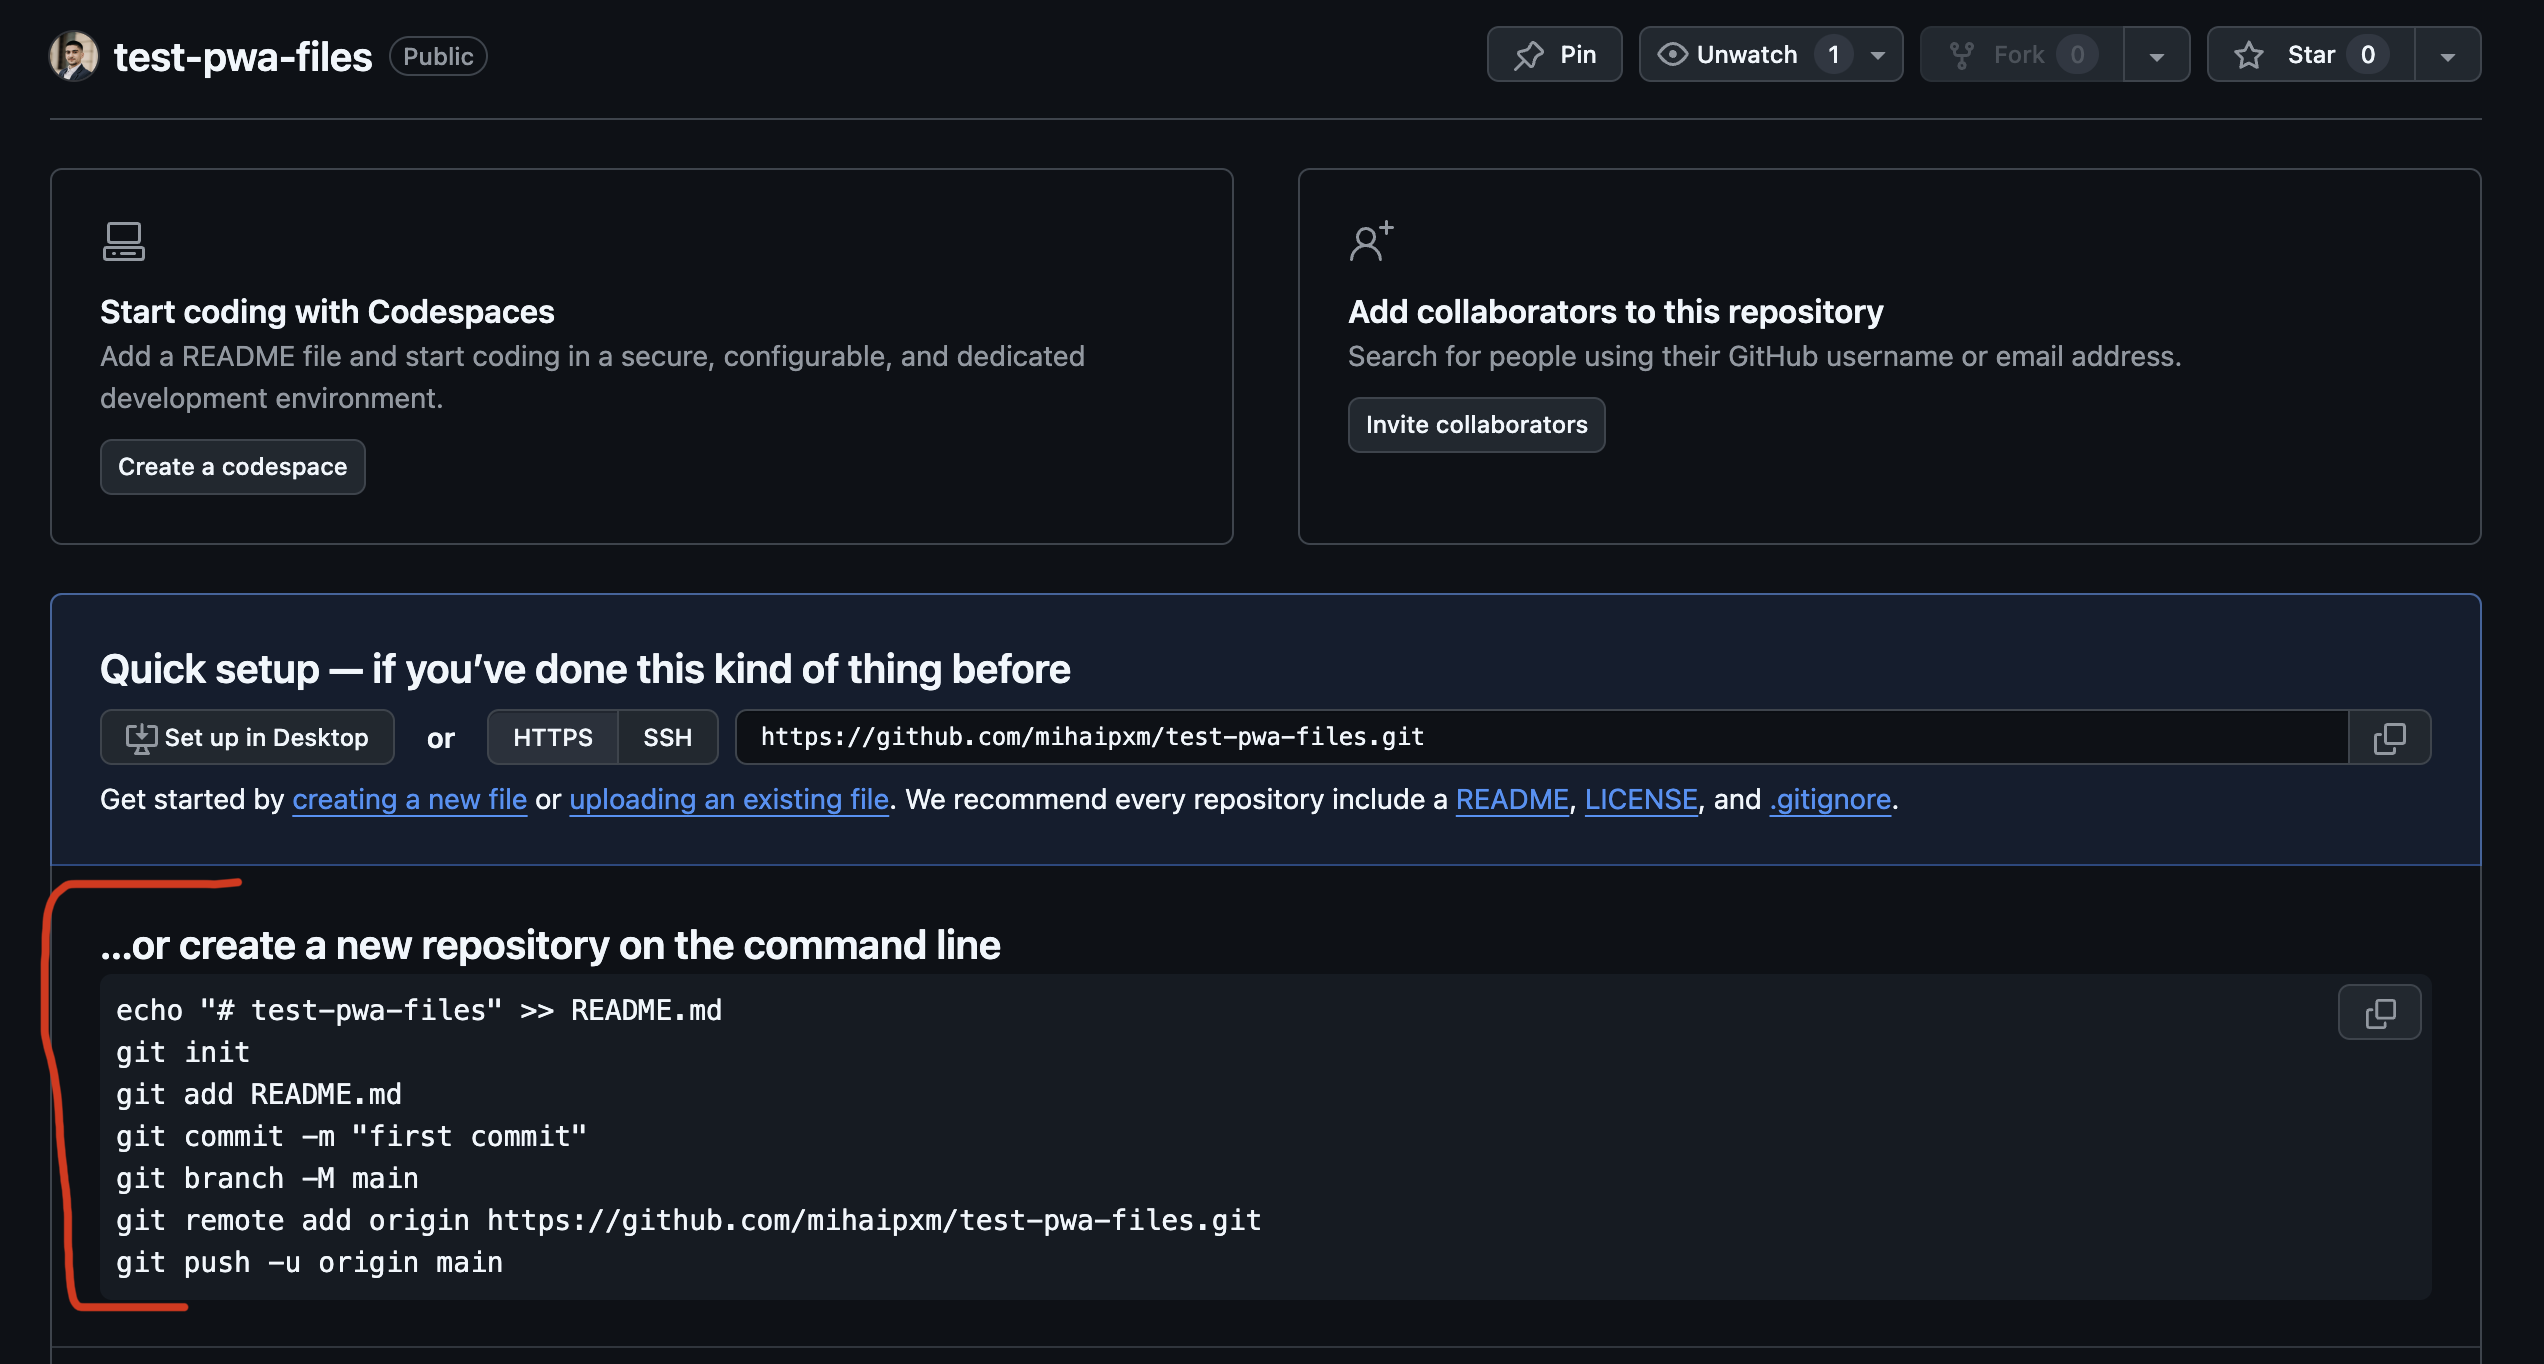
To deploy your files, first create a repository on GitHub by visiting GitHub and creating a new repository.
Once your repository is set up, open your terminal and run the following commands to add your files to GitHub:
git init
git add .
git commit -m "Initial commit"
git branch -M main
git remote add origin [your-repository-url]
git push -u origin main
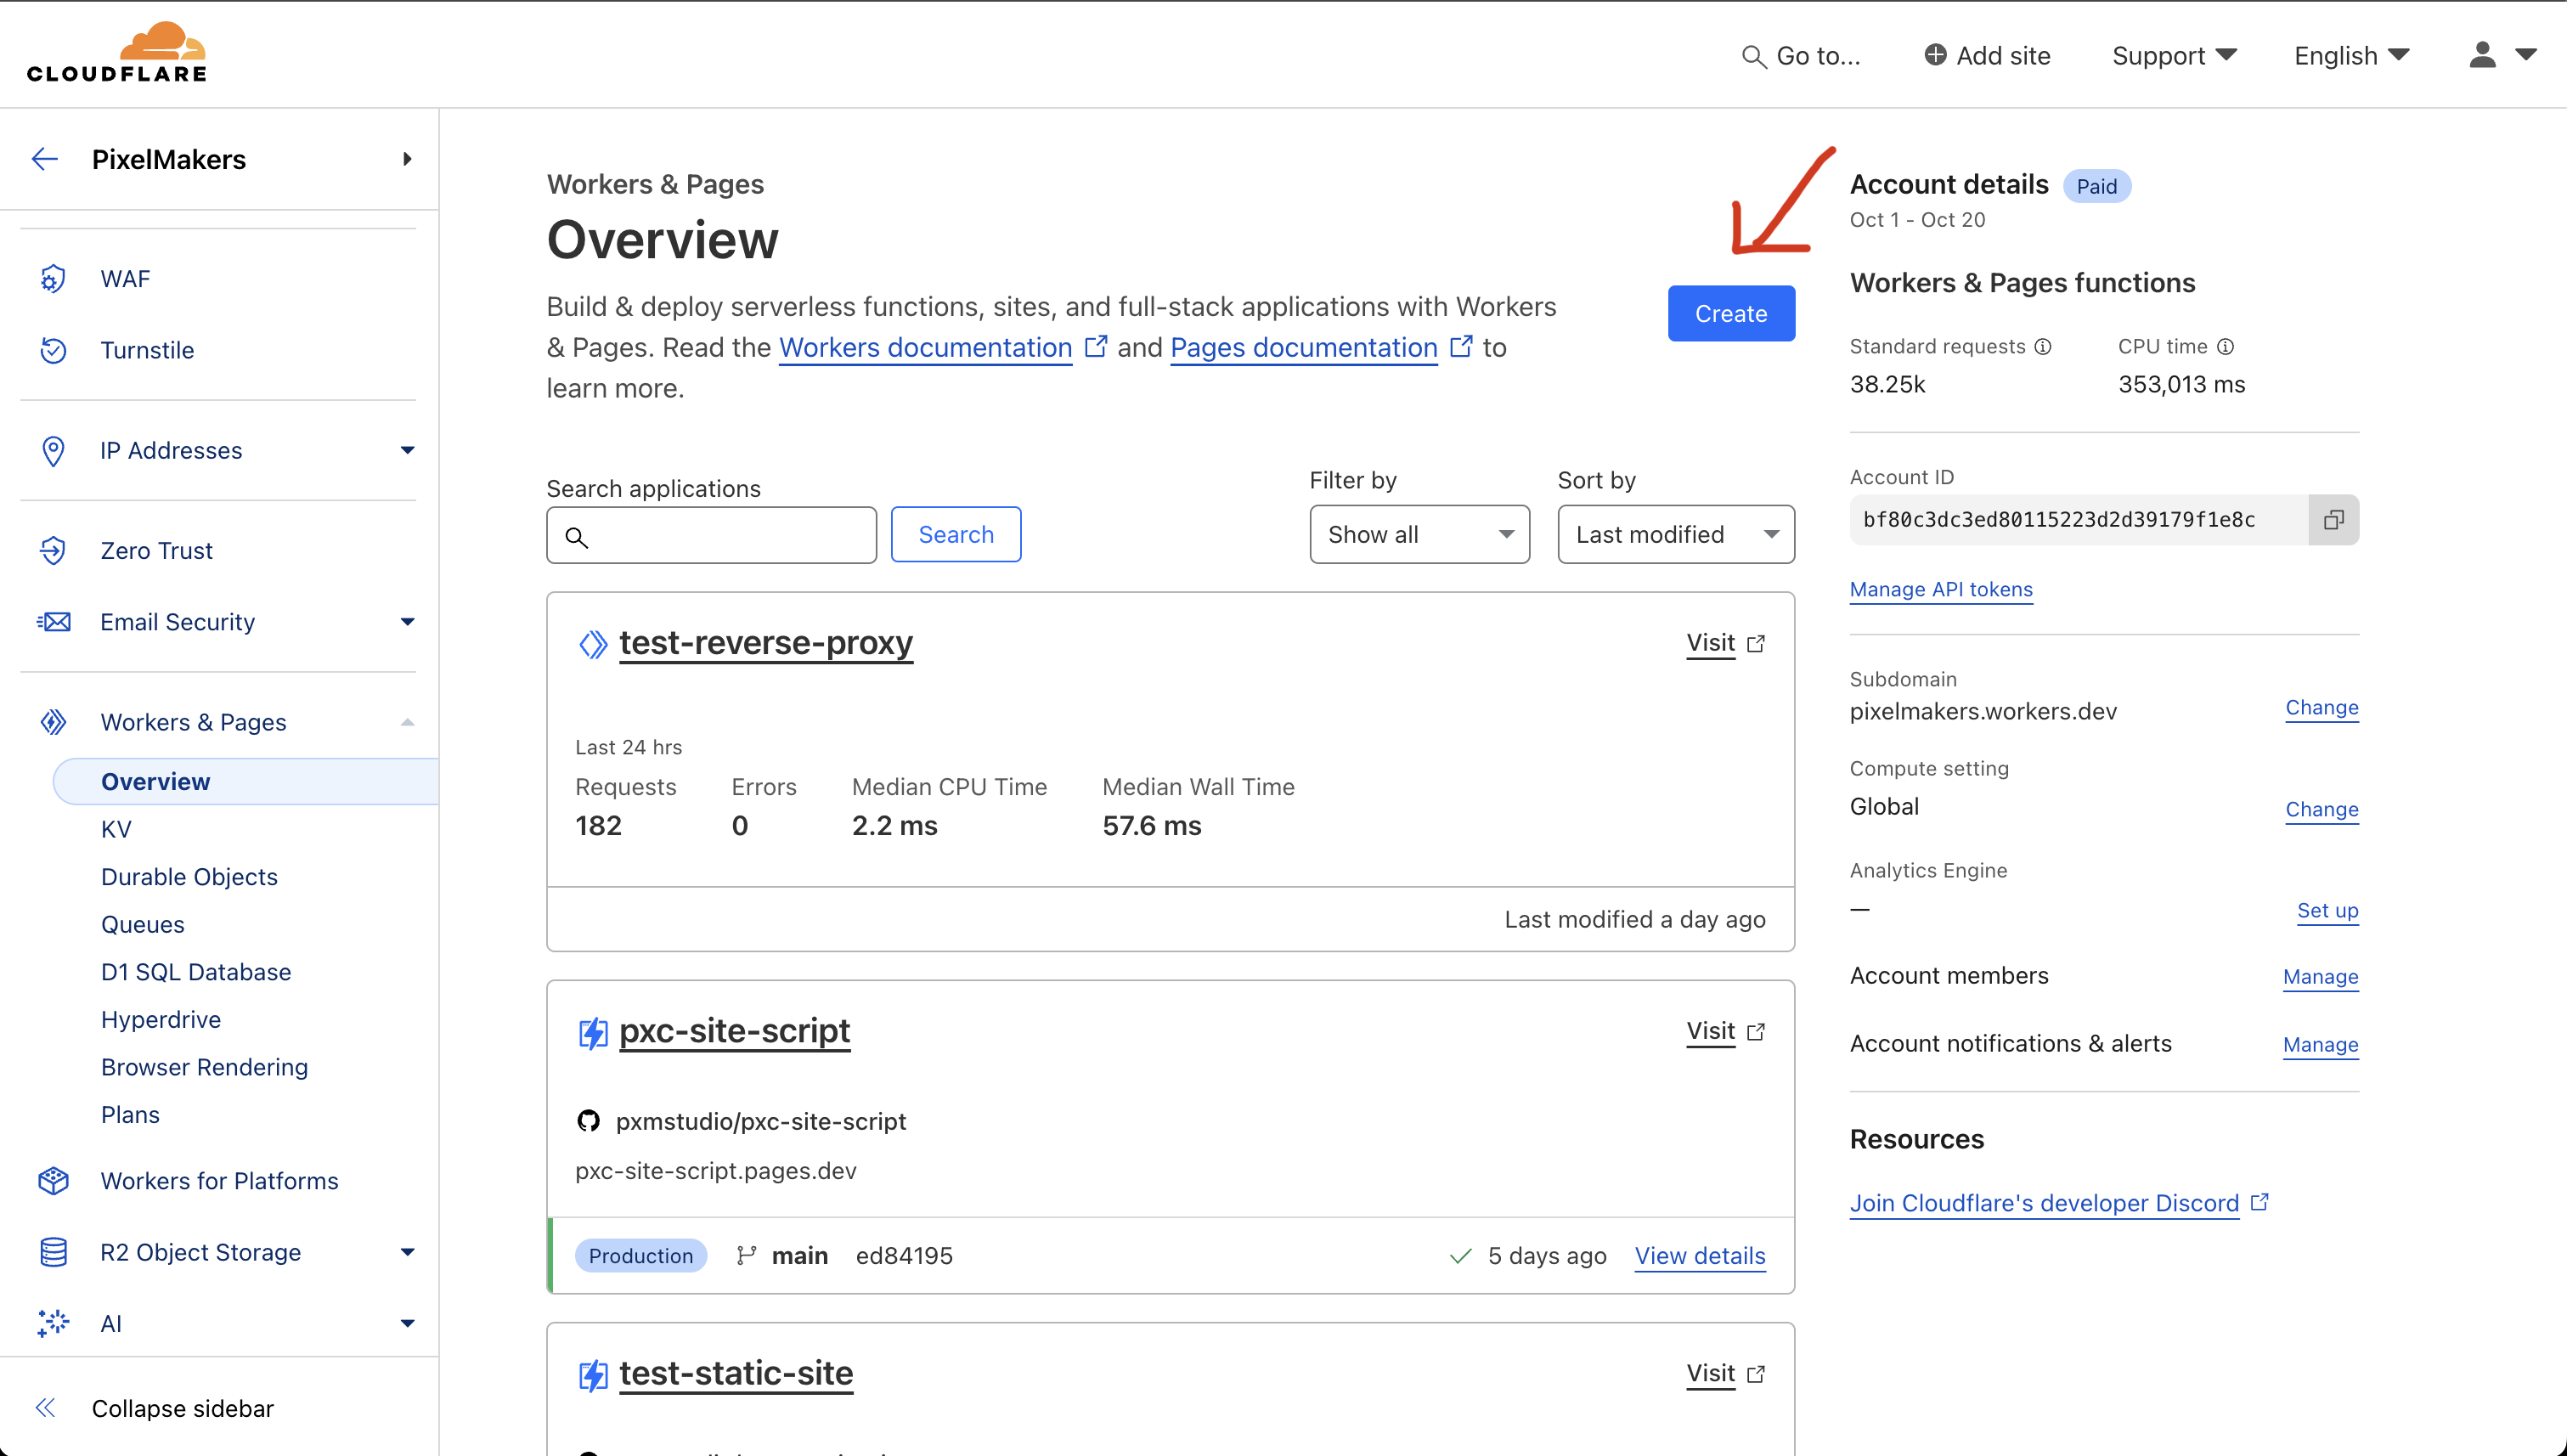
After pushing your files, head over to Cloudflare and navigate to Workers & Pages. Click Create and select your GitHub repository. When prompted, click Deploy.

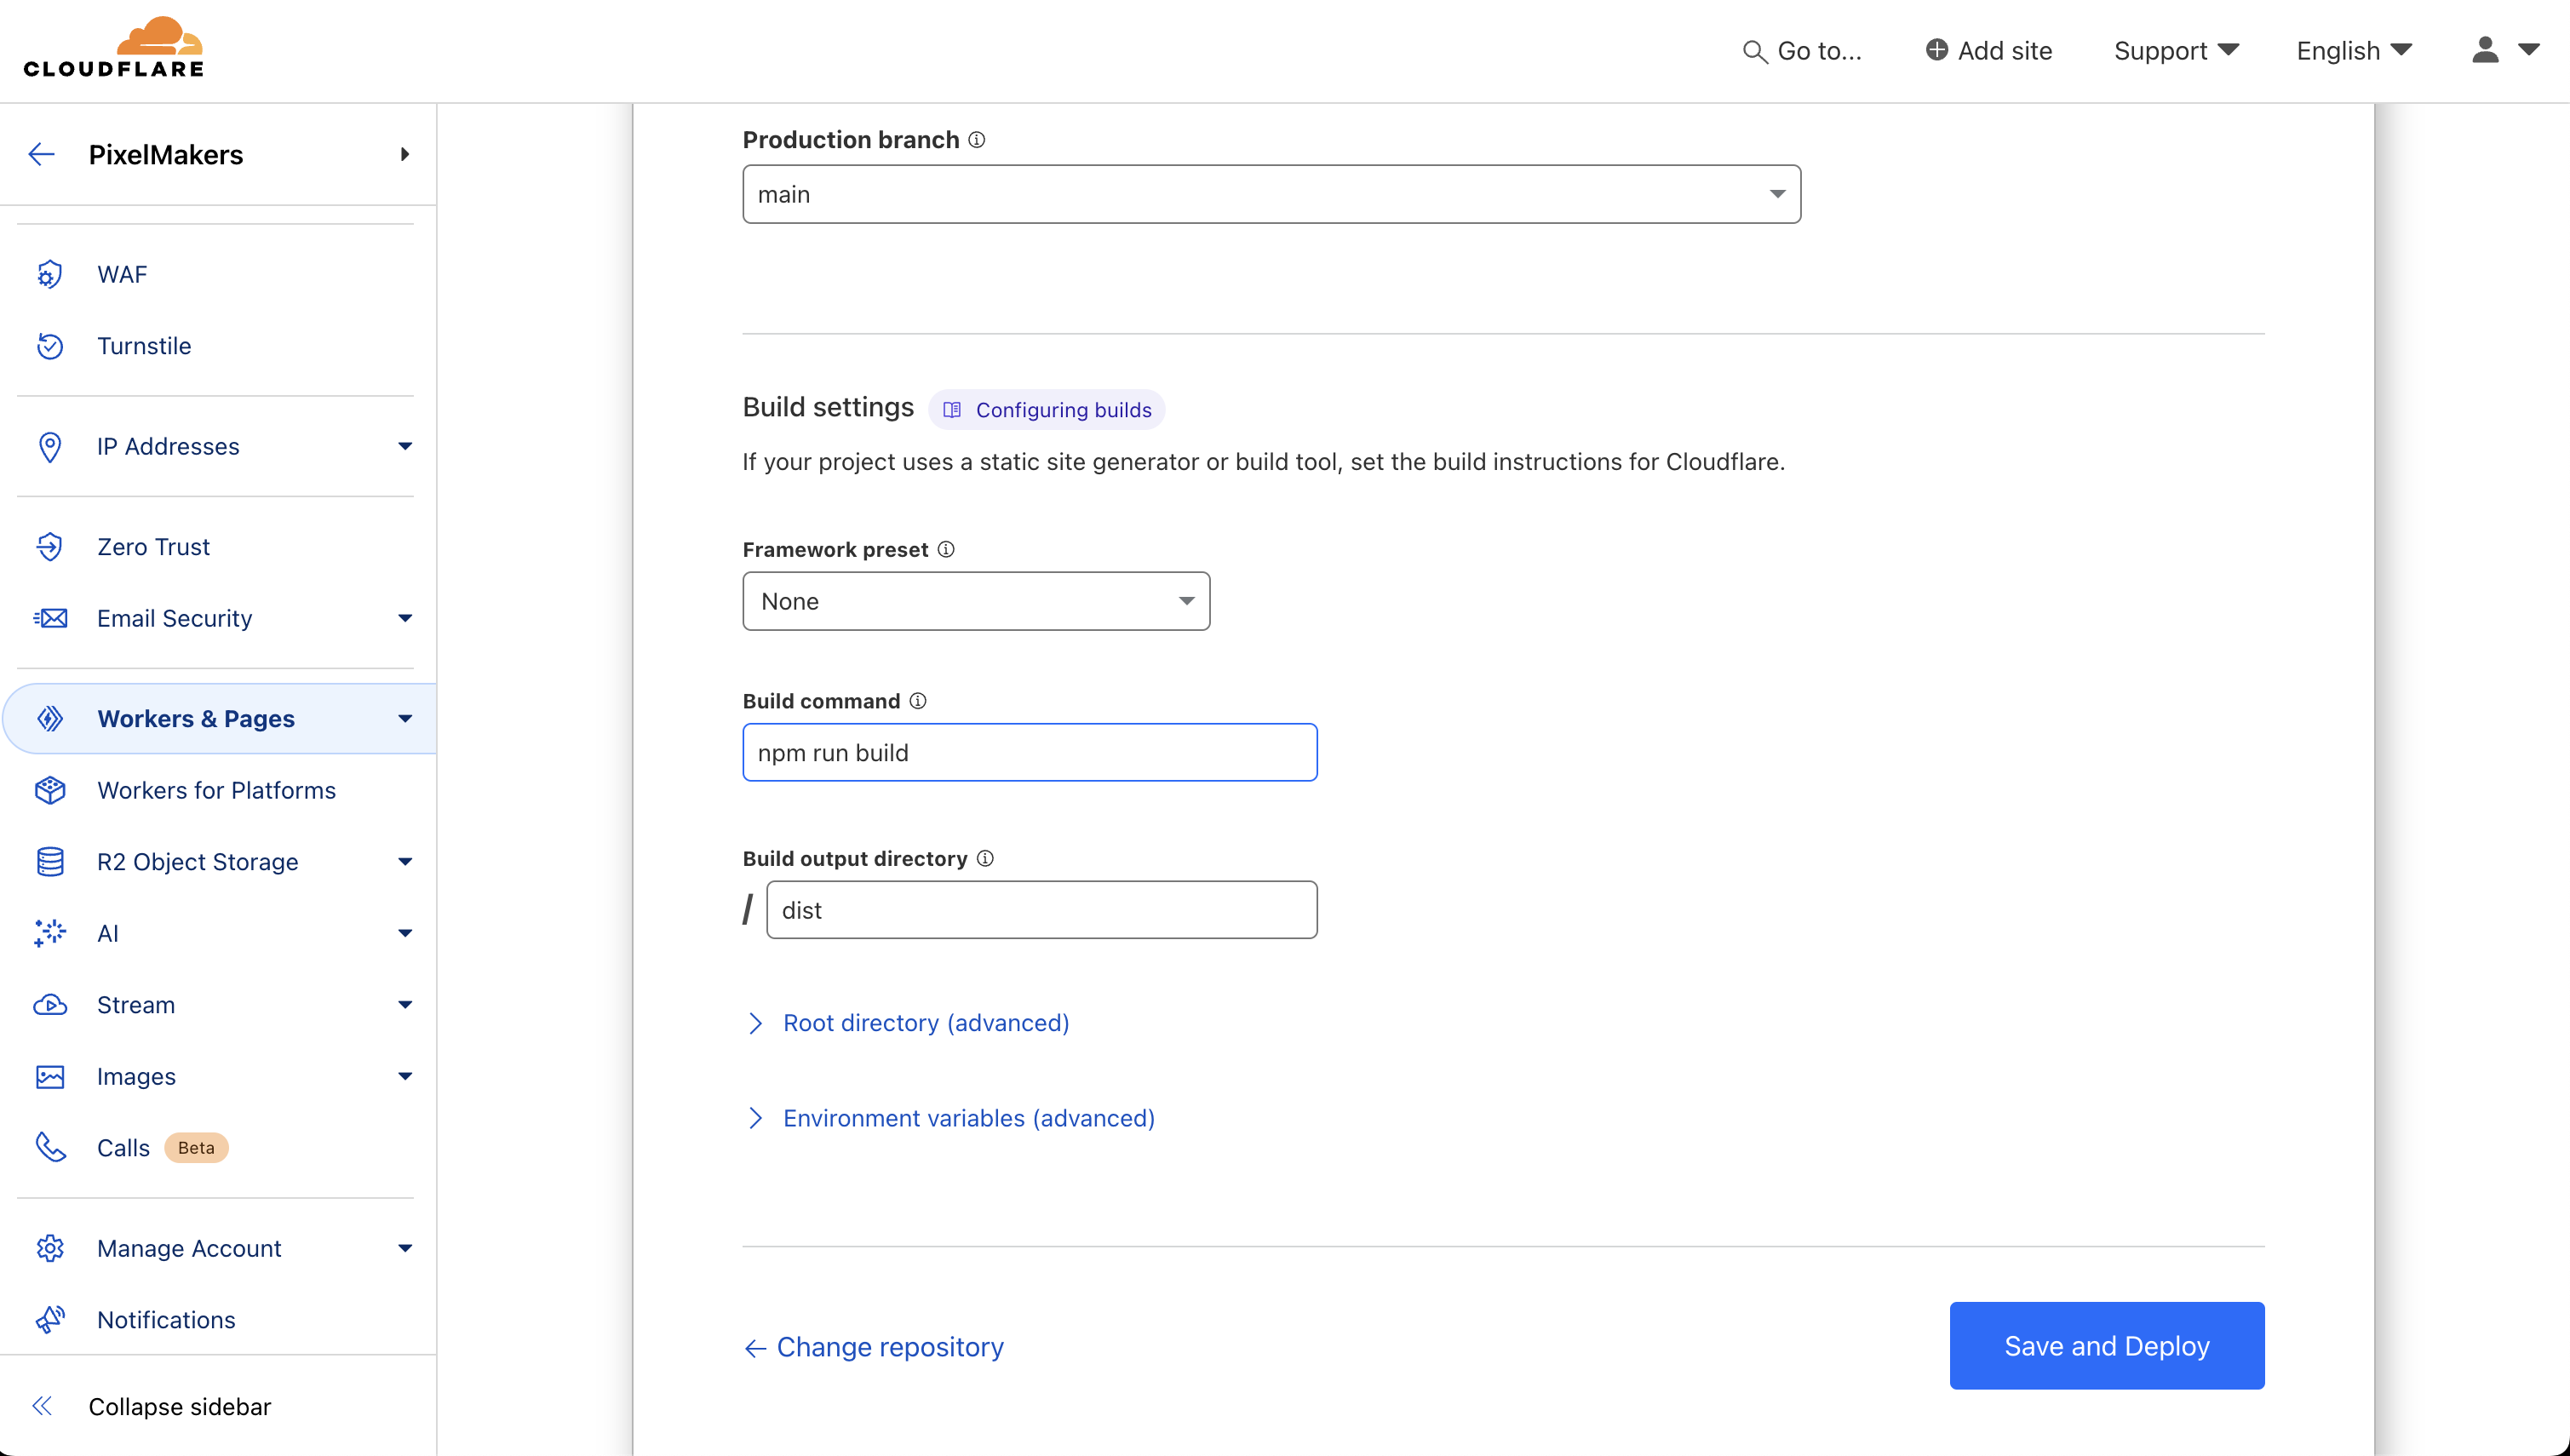
For the build command, use:
npm run build
Set the build output directory to "dist".
Finally, to link your files to a custom domain, go to your Cloudflare project, select Custom Domains, and set up a custom subdomain like files.[your-domain]. This will host your static PWA files under the proper domain structure.

That’s it. After saving and deploying, you should be able to access your manifest file at [your-domain]/manifest.json.
Configuring the back-end
Now let's set up the back-end for handling notifications.
1. Create a new folder
Start by creating a new folder to store your back-end code.
2. Add a package.json File
Inside this folder, create a package.json file with the following content to manage dependencies:
{
    "name": "server",
    "version": "1.0.0",
    "description": "",
    "main": "index.js",
    "scripts": {
      "test": "echo \"Error: no test specified\" && exit 1"
    },
    "author": "",
    "license": "ISC",
    "dependencies": {
      "cors": "^2.8.5",
      "express": "^4.18.2",
      "web-push": "^3.6.5"
    }
  }
Run the following command in your terminal to install the dependencies.
npm install
3. Create a file called app.js with the following code:
const express = require("express");
const app = express();
const webpush = require("web-push");
const cors = require("cors");

const port = 3001;

const apiKeys = {
  publicKey:
    "VAPID_PUBLIC_KEY",
  privateKey: "VAPID_PRIVATE_KEY",
};

webpush.setVapidDetails(
  "mailto:EMAIL", //replace this with a valid email
  apiKeys.publicKey,
  apiKeys.privateKey
);

app.use(cors());
app.use(express.json());

app.get("/", (req, res) => {
  res.send("Hello world");
});

const subDatabse = [];

app.post("/save-subscription", (req, res) => {
  subDatabse.push(req.body);

  console.log("db: ", subDatabse);

  res.json({ status: "Success", message: "Subscription saved!" });
});

app.get("/send-notification", (req, res) => {
  console.log(subDatabse);

  webpush.sendNotification(subDatabse[0], "Hello world");

  res.json({ statue: "Success", message: "Message sent to push service" });
});

app.listen(port, () => {
  console.log("Server running on port 3001!");
});
Make sure to replace the keys with the previously generated VAPID Keys.
To start the server, run the following command in your terminal.
npx nodemon app
Adding the Webflow custom code
In your Webflow project, go to Settings → Custom Code and add the following code. You can paste it either in the head or body section. Once done, save and publish the website to apply the changes.
<script>
const checkPermission = () => {
if (!("serviceWorker" in navigator)) {
throw new Error("No support for service worker!");
}
if (!("Notification" in window)) {
throw new Error("No support for notification API");
}
};
const registerSW = async () => {
const registration = await navigator.serviceWorker.register("/sw.js");
return registration;
};
const requestNotificationPermission = async () => {
const permission = await Notification.requestPermission();
if (permission !== "granted") {
throw new Error("Notification permission not granted.");
} else {
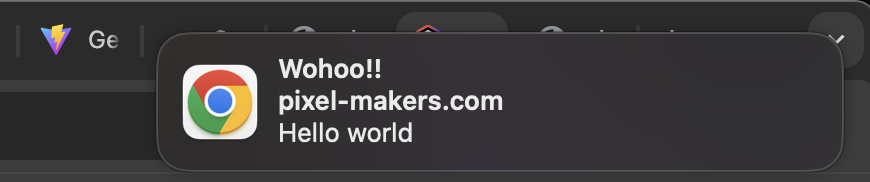
new Notification("Hello world!");
}
};
document.addEventListener("DOMContentLoaded", async () => {
checkPermission();
await registerSW();
requestNotificationPermission();
});
</script>
Let's break it down step by step:
1. checkPermission Function
const checkPermission = () => {
  if (!("serviceWorker" in navigator)) {
    throw new Error("No support for service worker!");
  }

  if (!("Notification" in window)) {
    throw new Error("No support for notification API");
  }
};
This function checks whether the current browser supports Service Workers and the Notification API. These are necessary to use features like background processing (via service workers) and sending notifications to the user.
"serviceWorker" in navigator: Checks if thenavigatorobject (which represents the user's browser) has aserviceWorkerproperty, meaning the browser supports service workers."Notification" in window: Checks if thewindowobject has aNotificationproperty, meaning the browser supports the Notification API.
If either of these features is missing, it throws an error to inform the user that their browser doesn't support them.
2. registerSW Function
const registerSW = async () => {
  const registration = await navigator.serviceWorker.register("/sw.js");

  return registration;
};
This asynchronous function registers a Service Worker for the web page. Service workers act as a proxy between the browser and the network, enabling offline capabilities and background processing.
navigator.serviceWorker.register("/sw.js"): This registers the service worker defined in thesw.jsfile (located at the root/of the site). The service worker can intercept network requests, cache assets, and manage background tasks.await: Since service worker registration is asynchronous, we useawaitto wait for the registration to complete before continuing. The registration object is returned and can be used to interact with the service worker if needed.
3. requestNotificationPermission Function
const requestNotificationPermission = async () => {
  const permission = await Notification.requestPermission();

  if (permission !== "granted") {
    throw new Error("Notification permission not granted.");
  } else {
    new Notification("Hello world!");
  }
};
This function asks the user for permission to send notifications using the Notification API.
Notification.requestPermission(): This prompts the user to allow or deny permission for the site to send notifications. It returns a promise that resolves to one of three possible values:"granted","denied", or"default".- If permission is not granted, an error is thrown.
- If permission is granted, a new notification is created with the message
"Hello world!".
4. DOMContentLoaded Event Listener
document.addEventListener("DOMContentLoaded", async () => {
  checkPermission();
  await registerSW();
  requestNotificationPermission();
});
This event listener ensures the code is executed once the DOM (Document Object Model) is fully loaded.
DOMContentLoaded: This event is fired when the initial HTML document has been completely loaded and parsed, without waiting for stylesheets, images, and other subresources to finish loading.- Inside the listener, the script does the following:
- Calls
checkPermission()to ensure the browser supports the necessary features. - Calls
registerSW()to register the service worker for the site. - Calls
requestNotificationPermission()to request notification permission and possibly show a notification if permission is granted.
- Calls
If you open the website now, a “Hello world!” notification should pop-up. If you don’t see it, check your system notifications and make sure chrome notifications are enabled.
To trigger a new notification, open http://localhost:3001/send-notification in a new tab.
Also, you should be able to see this button in the browser bar. This will allow you to install it as a PWA.
You should also be able to see the “Add to homescreen” or “install” option on mobile.
Next Steps: Where to Go from Here
- Set Up a Database: You can integrate a database solution like Cloudflare D1 or Supabase to manage your notifications. By configuring a trigger to fire when a new row is added to a specific table, you can send scalable, real-time notifications to all your subscribers. This approach also enables you to send personalized notifications based on user data.
- Enhance PWA Features: Consider expanding your PWA’s functionality by adding offline support. This will allow users to access key content even when they lose internet connectivity, creating a more reliable and seamless user experience.
These enhancements will make your PWA more robust and tailored to the needs of your users.
By turning your Webflow website into a PWA, you're not just creating a website—you're offering your users an app-like experience with the convenience of installation and real-time push notifications. Whether you choose the no-code route with tools like Progressier or opt for custom development with service workers and a reverse proxy, the benefits are clear. Enhanced engagement, offline access, and the ability to send personalized notifications are just a few of the ways a PWA can take your website to the next level.
---
Looking for help with your PWA or other Webflow Development?
Get in touch. Our expert team is ready to help.
---
Credits:
https://www.youtube.com/@akileshrao - PWA tutorials
https://www.youtube.com/@Finsweet - Reverse Proxy tutorial