How to build a gated blog in Webflow
Mihai Ungureanu
June 23, 2025
Creating gated content is a powerful way to monetize valuable insights, just like Medium does by offering premium articles to paying subscribers. If you’re looking to build a gated blog of your own, you’re in the right place! In this step-by-step guide, we’ll show you how to create a gated blog using Webflow for your front-end, Supabase for authentication and content management, Stripe for handling subscriptions, and SendGrid for sending passwordless login emails. The best part? You can use the free versions of most of these tools (except Webflow) to get started!
Walkthrough
Clonable
How we will use each tool:
Webflow
Webflow will serve as our visual design and front-end development platform, where we’ll build all the pages and components for the blog’s user interface (UI layer). Additionally, Webflow will host the custom JavaScript code that drives our app’s interactivity and functionality (logic layer).
Supabase
Supabase will handle user authentication and manage access to content. It will store and retrieve blog articles for subscribed users, acting as both the database and server layer of our application.
Stripe
Stripe will be used to process payments and manage user subscriptions. It will allow us to securely charge users for access to premium content and handle subscription updates or cancellations.
SendGrid
Since we are using passwordless authentication, SendGrid will be responsible for sending login emails to users. This will enable seamless, secure access without the need for traditional passwords.
User Stories
We've identified 8 key user stories that will shape the experience of our gated blog. These stories outline the main functionalities needed for both non-logged-in and logged-in users:
- As a non-logged-in user, I want to view summaries of each blog post, so I can decide if the content is valuable enough for me to subscribe.
- As a non-logged-in user, I want the ability to create an account, so I can access the platform and explore more content.
- As a non-logged-in user, I want to log in with my existing account, so I can continue where I left off.
- As a logged-in user (not subscribed), I want the option to purchase a subscription, so I can unlock full access to premium content.
- As a logged-in user (subscribed), I want to be able to read any full article, so I can enjoy the content I've subscribed to.
- As a logged-in user (subscribed), I want the ability to cancel my subscription, so I can manage my commitment when needed.
- As a logged-in user, I want to view my invoices and manage billing details, so I can keep track of payments and update billing information.
- As a logged-in user, I want to log out when I’m done, so I can securely leave the platform.
These user stories will guide the features we build, ensuring a seamless experience for both free users and paying subscribers.
Database structure
To support our gated blog, we will need two key tables in addition to the default users table provided by Supabase: the articles table and the profiles table. These tables will store essential information for managing content and user subscriptions.
Articles table
This table will store the blog content, linking each post to its corresponding entry in the Webflow CMS for synchronization.

Key columns include:
id(int) – Unique identifier for each articlecreated_at(timestamp) – Timestamp of when the article was addedwf_id(text) – Stores the Webflow ID for each post, keeping the database in sync with Webflow CMSwf_slug(text) – The slug used to retrieve the article body on the front-endbody(text) – The full content of the article
Profiles table
The profiles table extends the default user data with additional fields to manage subscriptions.
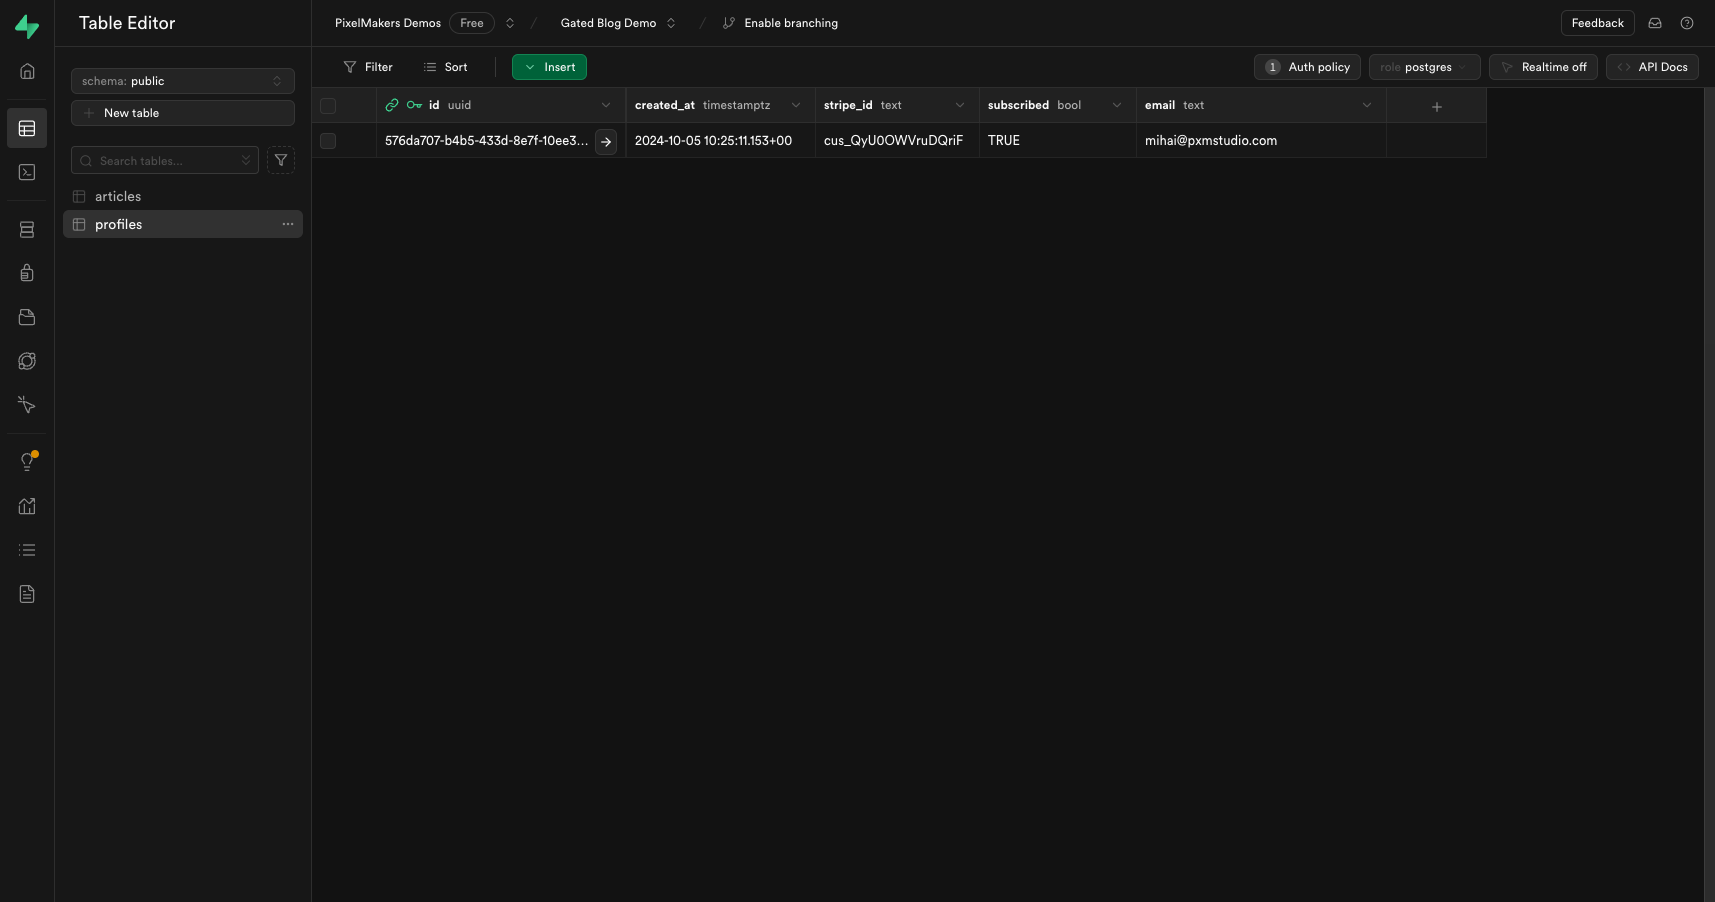
Key columns include:
id(uuid) – Matches the user’s unique ID from the Supabaseuserstablecreated_at(timestamp) – Timestamp of when the profile was createdstripe_id(text) – Stores the Stripe customer ID for billing purposessubscribed(boolean) – Indicates the user’s subscription status (true for active subscribers, false for non-subscribers)email(text) – The user’s email address
These two tables will form the backbone of our application, ensuring we can efficiently manage both the content and user subscriptions.
Server logic
To bring our gated blog to life, we’ll need to implement some essential server-side logic to automate key processes such as creating user profiles and keeping content synchronized. These processes will run in the background, ensuring everything works seamlessly without requiring manual intervention. Let's start with setting up a trigger for profile creation whenever a new user signs up.
Trigger: Create profile when user is created
Each time a new user registers, we need to automatically create a corresponding profile. This profile will store important information, like the user's email and their subscription status, which will be used throughout the app. To achieve this, we’ll create a function and a trigger in Supabase that runs whenever a user is added to the system.
Here's how to set it up:
1. Create a Function
In Supabase, go to the "Database" section and navigate to "Functions." Create a new function that will insert a row into the profiles table when a new user is created. This function will automatically handle profile creation for new users.
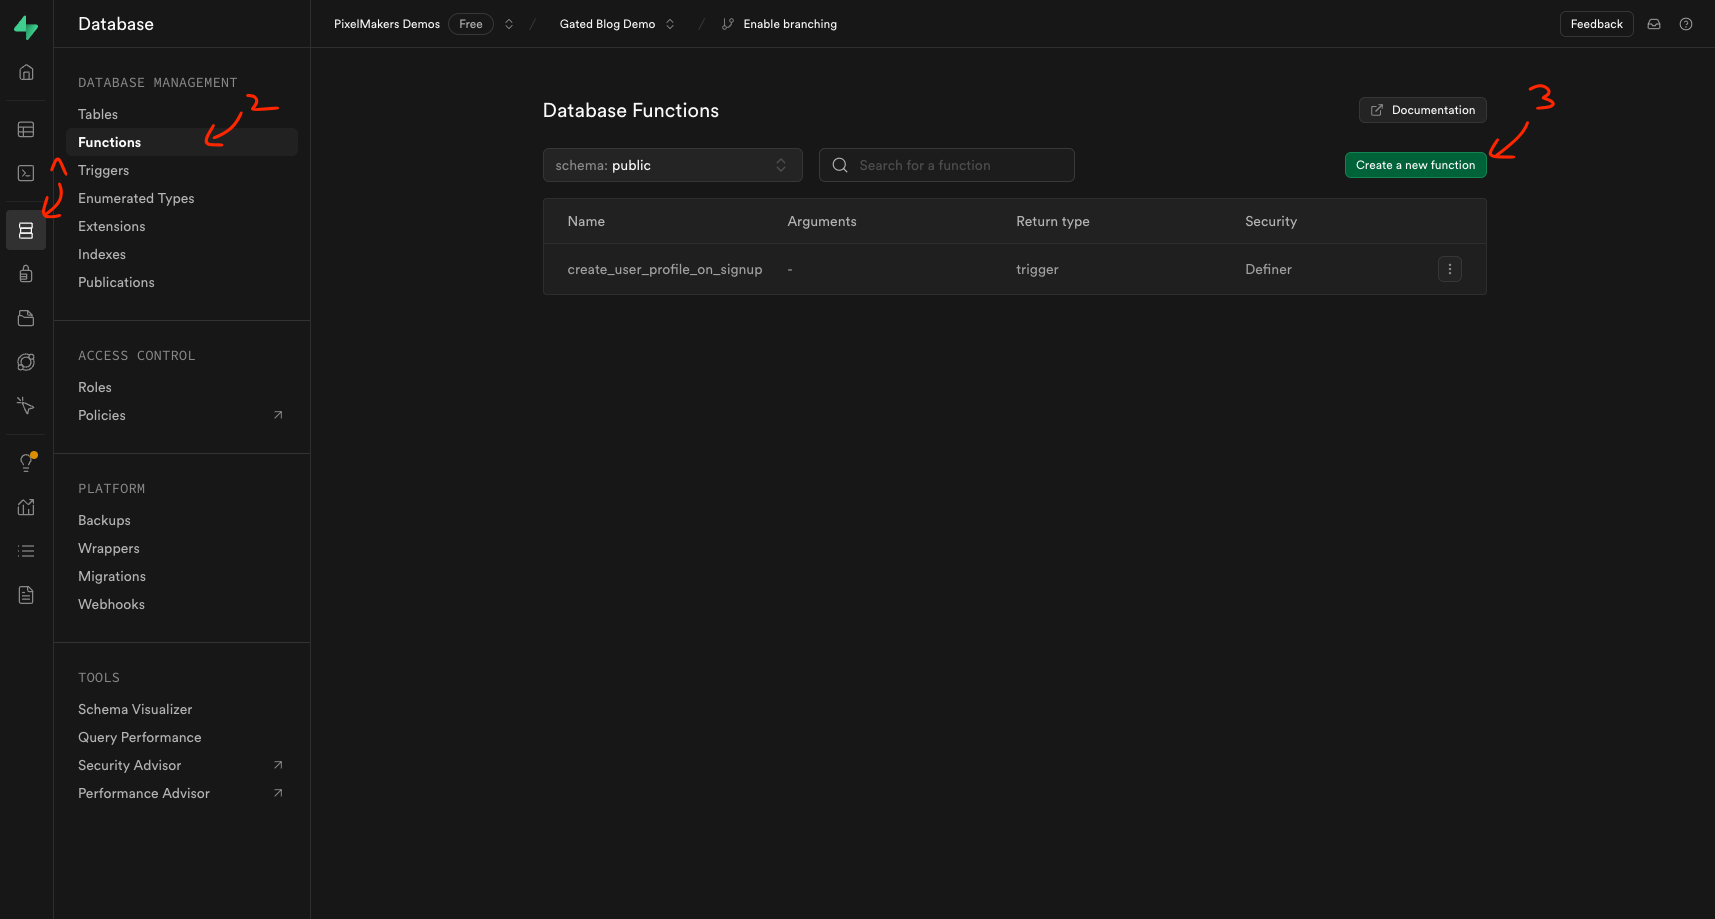
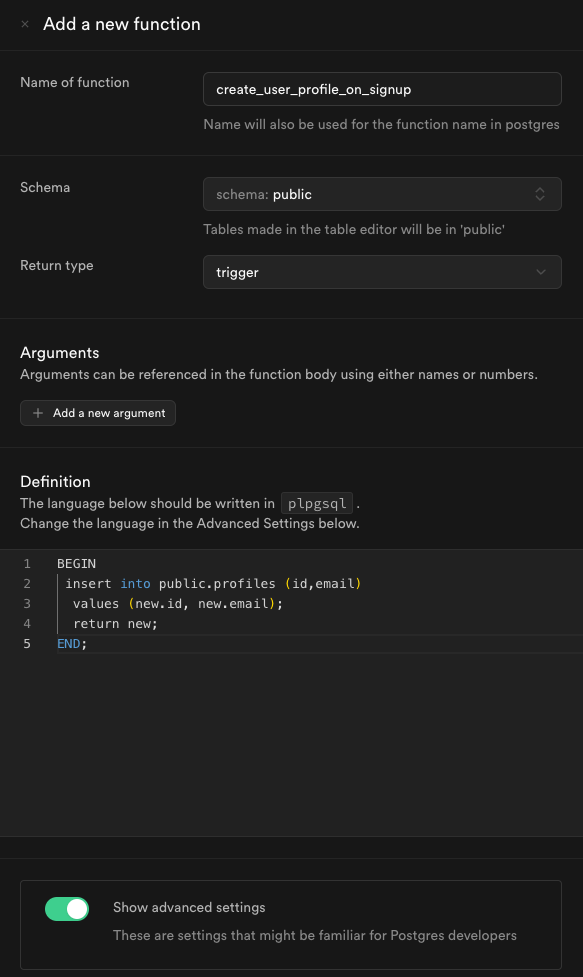
- Name of function, you can give it something like create_user_profile_on_signup.
- On schema select public
- On return type select trigger
- In the definition input you can paste:
BEGIN
 insert into public.profiles (id,email)
  values (new.id, new.email);
  return new;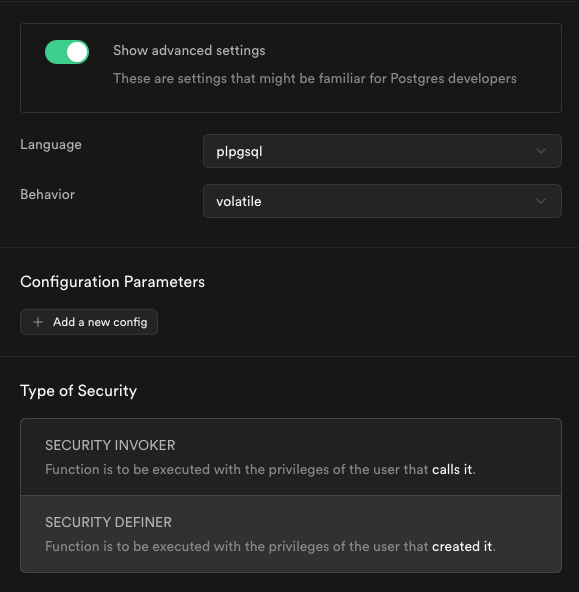
END;- Check show advanced settings and for type of security select security definer
- Once you are done, save the function.
2. Create the Trigger
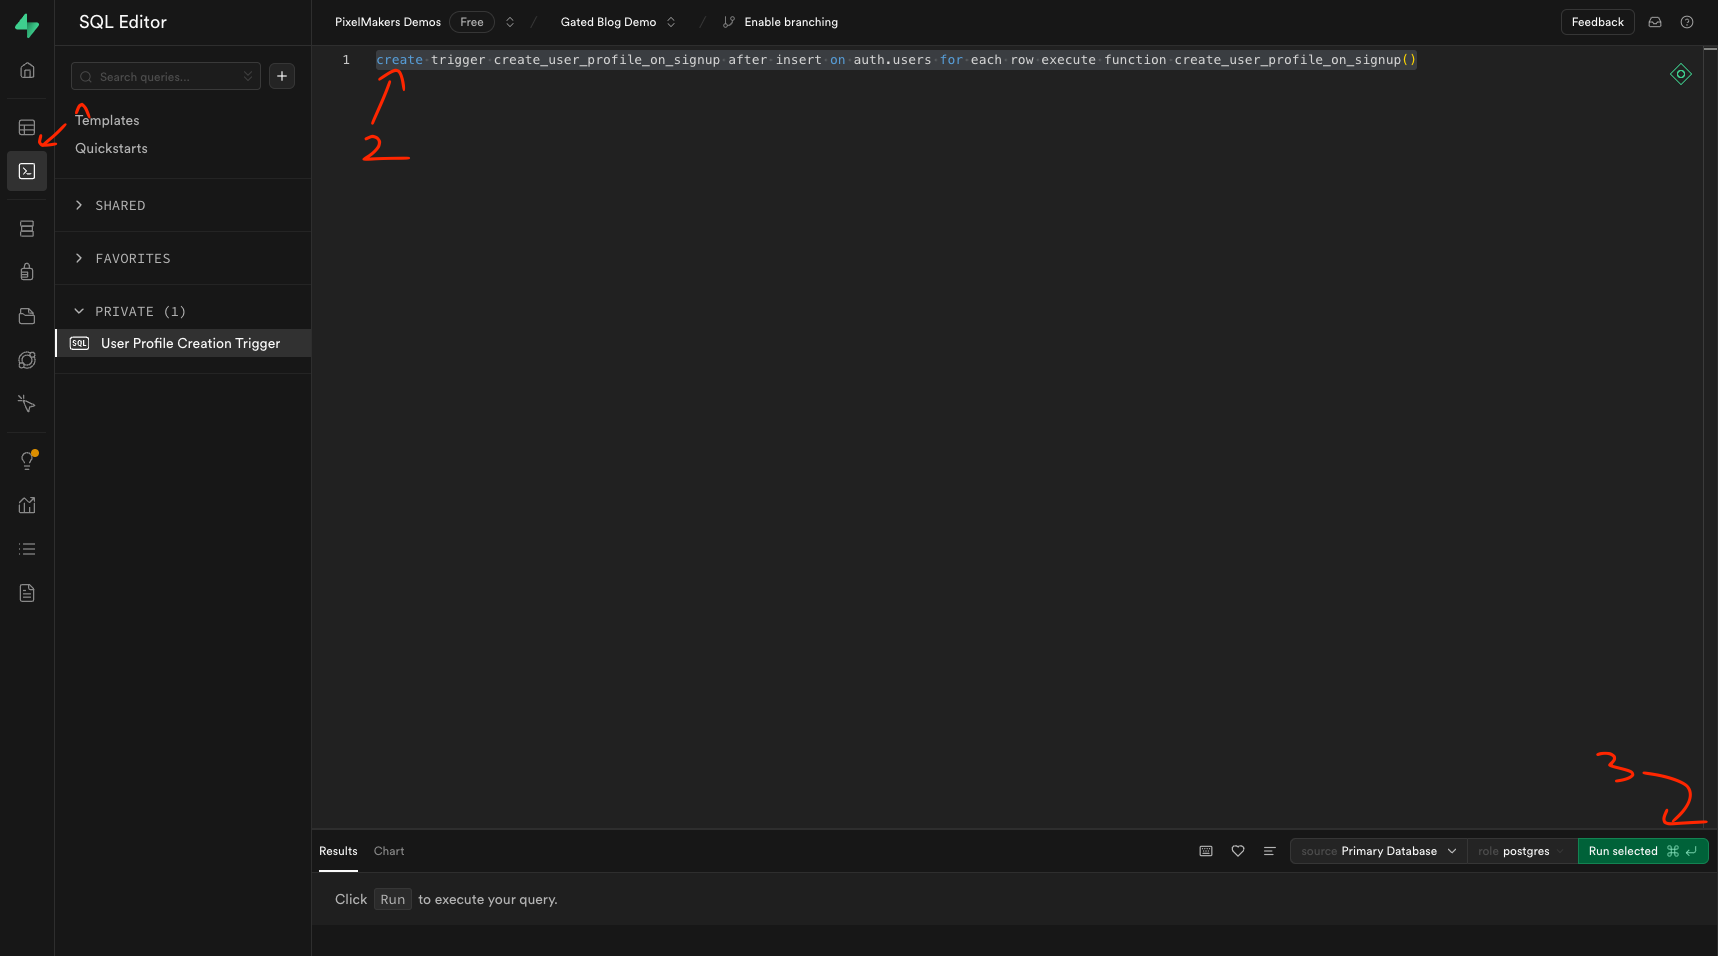
Next, we’ll need to create a trigger that will call the profile creation function whenever a new user is added to the auth.users table. This ensures that every user who signs up will have a corresponding profile generated immediately.
Open the SQL editor, paste the following code, and run it.
create trigger create_user_profile_on_signup after insert on auth.users for each row execute function create_user_profile_on_signup()
By automating this step, we guarantee that each user has a profile in place, enabling smooth subscription management and content access right from the start.
Function: Webflow webhook
To keep our database in perfect sync with the Webflow CMS, we need to ensure that every time the Webflow site is published, any new or updated blog articles are automatically reflected in our database. This synchronization is crucial for maintaining the integrity of our gated blog's content. We can achieve this using Supabase Edge Functions.
How to create it:
1. Install the Supabase CLI
You can follow this official article from Supabase to get the CLI installed on your machine.
2. Create a folder on your machine and open it using the terminal.
3. Initialize a project (you can follow this article from supabase)
supabase init4. Run the following command to add your function - I called it "webflow-webhook"
supabase functions new webflow-webhook5. In supabase > functions > webflow-webhook > index.ts, paste the following code

import { createClient } from 'jsr:@supabase/supabase-js@2'
import { WebflowClient } from "npm:webflow-api@2.4.2";
import "jsr:@supabase/functions-js/edge-runtime.d.ts"

Deno.serve(async () => {
  const supabse = createClient(Deno.env.get("SUPABASE_URL")!, Deno.env.get("SUPABASE_SERVICE_ROLE_KEY")!)

  const webflow = new WebflowClient({ accessToken: Deno.env.get("WF_ACCESS_TOKEN")! });

  const wfItemsData = await webflow.collections.items.listItems('your_id');

  if (wfItemsData.items) {
    for (const wfItem of wfItemsData.items) {
      if (wfItem.fieldData && wfItem.fieldData['post-body']) {
        const { data: sbItem, error } = await supabse.from('articles').select('*').eq('wf_id', wfItem.id).single();

        if (sbItem && !error) {
          const { error: updateError } = await supabse.from('articles').update({
            body: wfItem.fieldData['post-body']
          }).eq('id', sbItem.id);

          if (updateError) {
            console.error(updateError);
          }
        } else {
          const { error: insertError } = await supabse.from('articles').insert({
            wf_id: wfItem.id,
            wf_slug: wfItem.fieldData.slug,
            body: wfItem.fieldData['post-body']
          });

          if (insertError) {
            console.error(insertError);
          }
        }
      }
    }
  }


  const data = {
    message: `success`,
  }

  return new Response(
    JSON.stringify(data),
    { headers: { "Content-Type": "application/json" } },
  )
})
Here’s how it works:
- Every time the Webflow site is published, the webhook will trigger, checking for new or updated articles. If an article is missing in our Supabase database, it will be added. If an existing article has been updated, its content in the database will be modified accordingly.
- This ensures that the database and Webflow CMS remain fully in sync without any manual intervention. This way, the most up-to-date content is always available to your subscribed users.
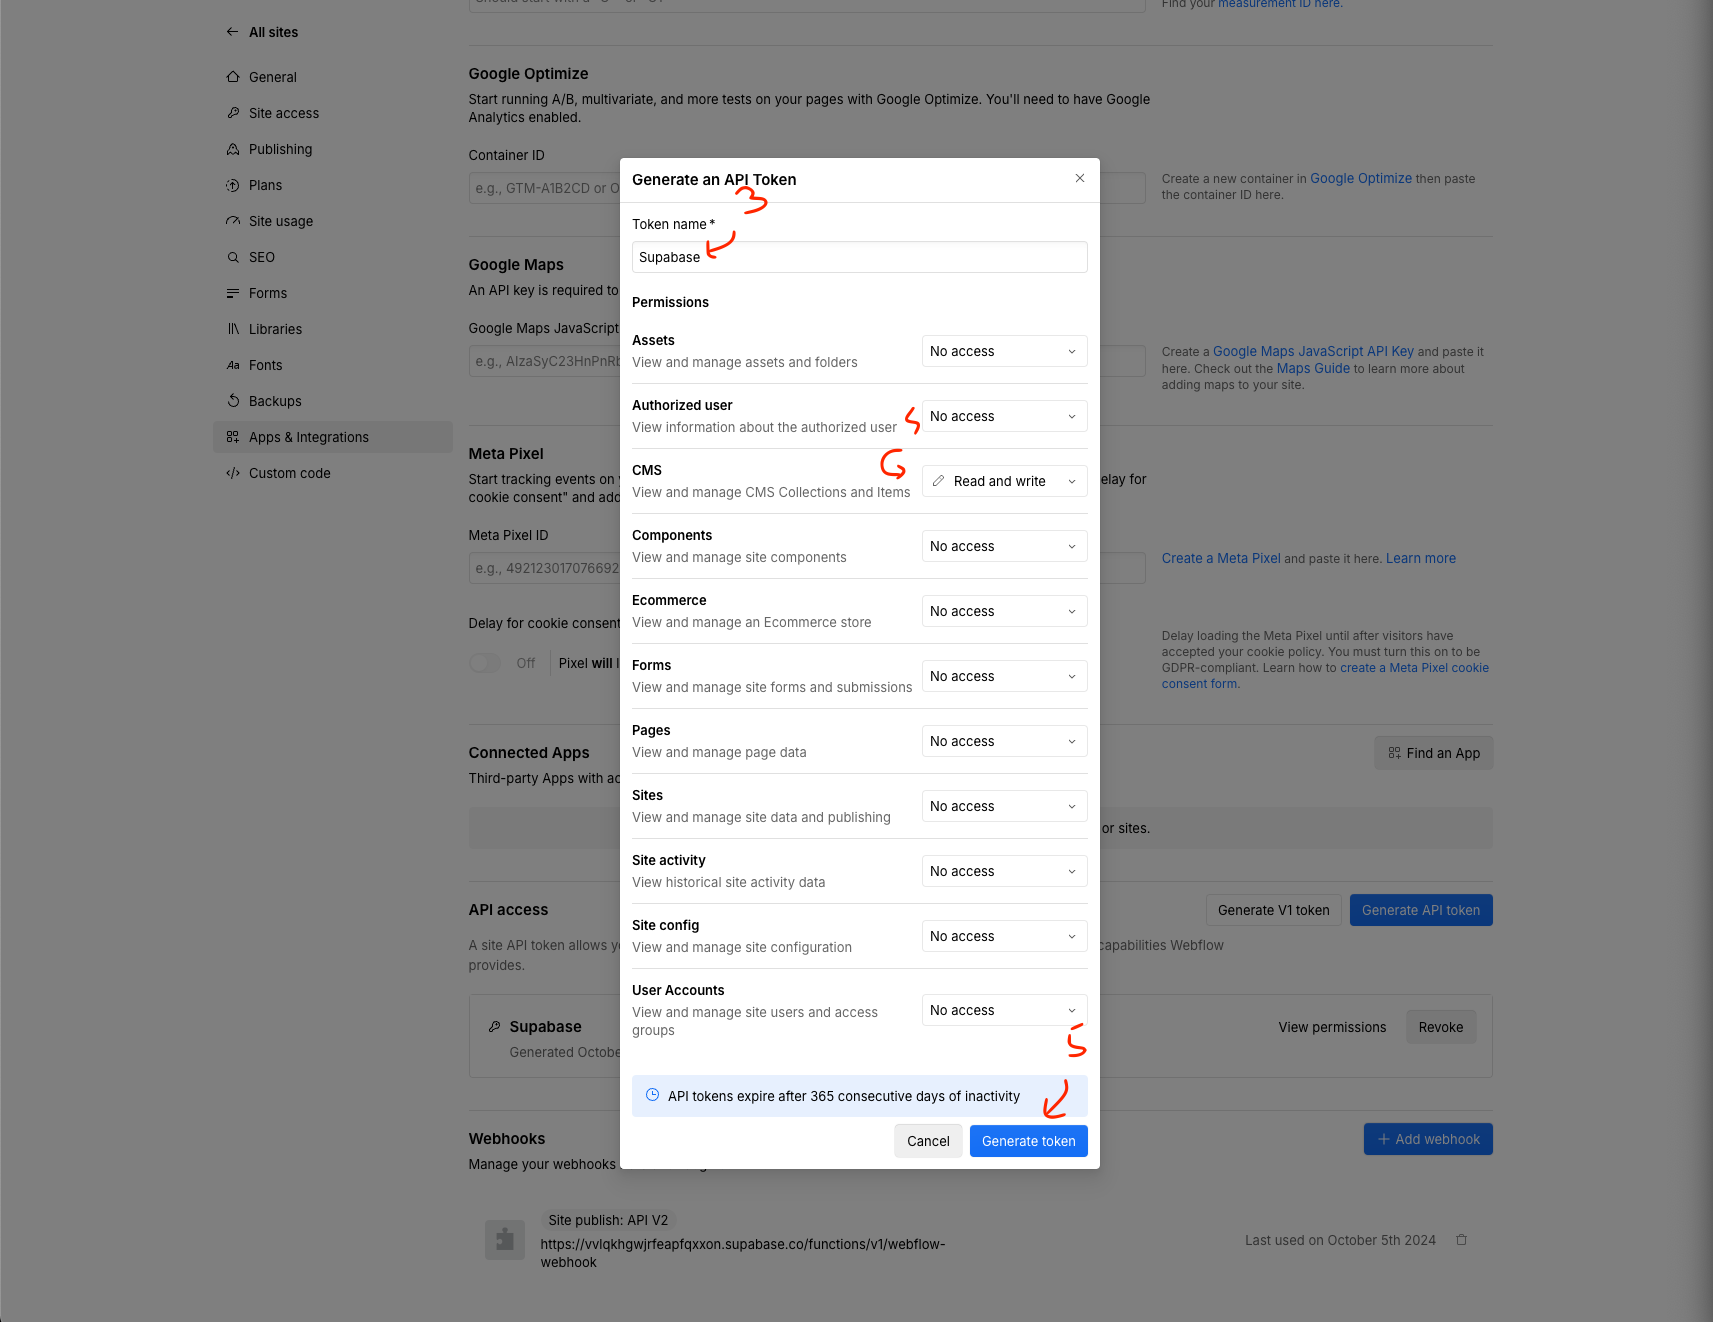
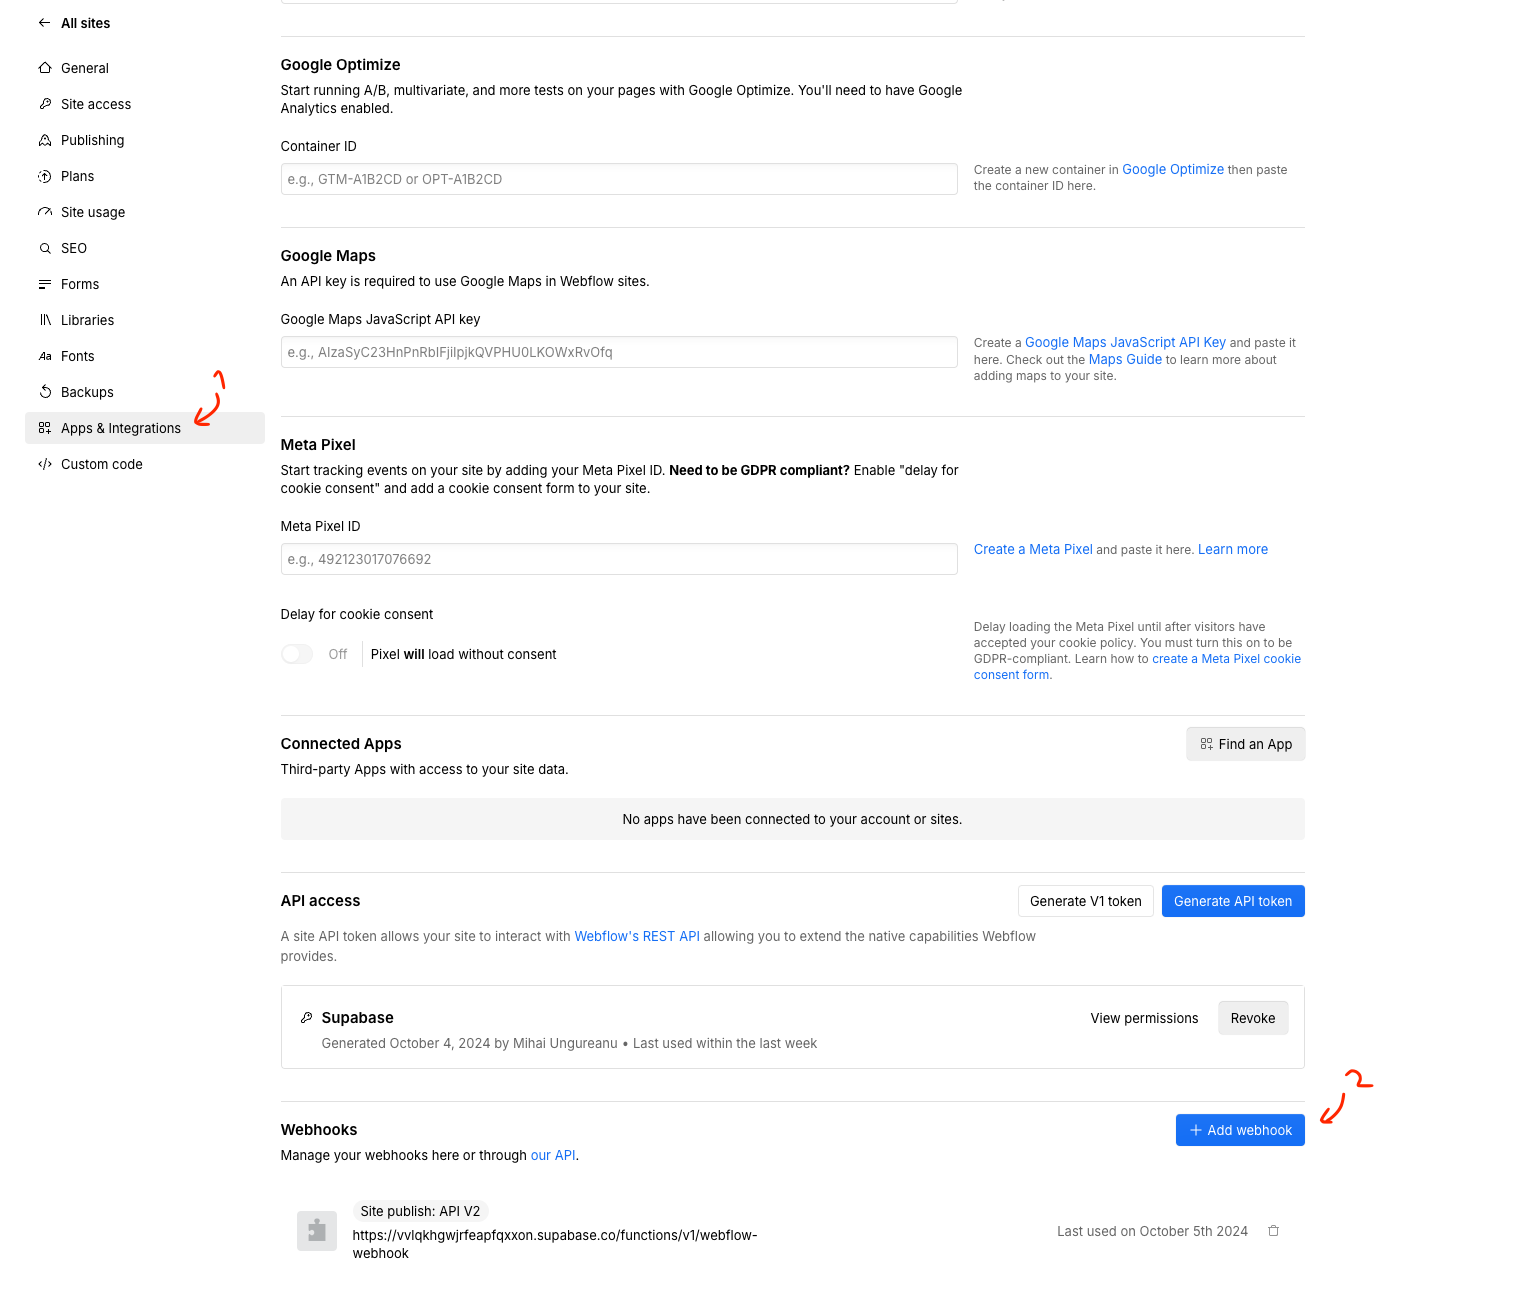
6. Get the Webflow access token
Our code uses an environment variable called WF_ACCESS_ TOKEN. We can get this access token by opening the website settings in Webflow, opening the Apps & Integrations tab and generating an API token. When generating the token, give it a descriptive name and the CMS Read and write permissions.

7. Create the WF_ACCESS_ TOKEN environment variable
To save the variable, run the following command in the terminal, replace "your_token" with the token value from Webflow.
supabase secrets set WF_ACCESS_TOKEN=your_token
8. Replace the collection id
In our code, we have the following line, where we need to replace "your_id".
const wfItemsData = await webflow.collections.items.listItems('your_id');In Webflow, we can get a collection id by opening that collection's settings. You will see that collection's id in above the collection name.

9. Deploy the function
To deploy the function, run the following function in your terminal.
supabase functions deploy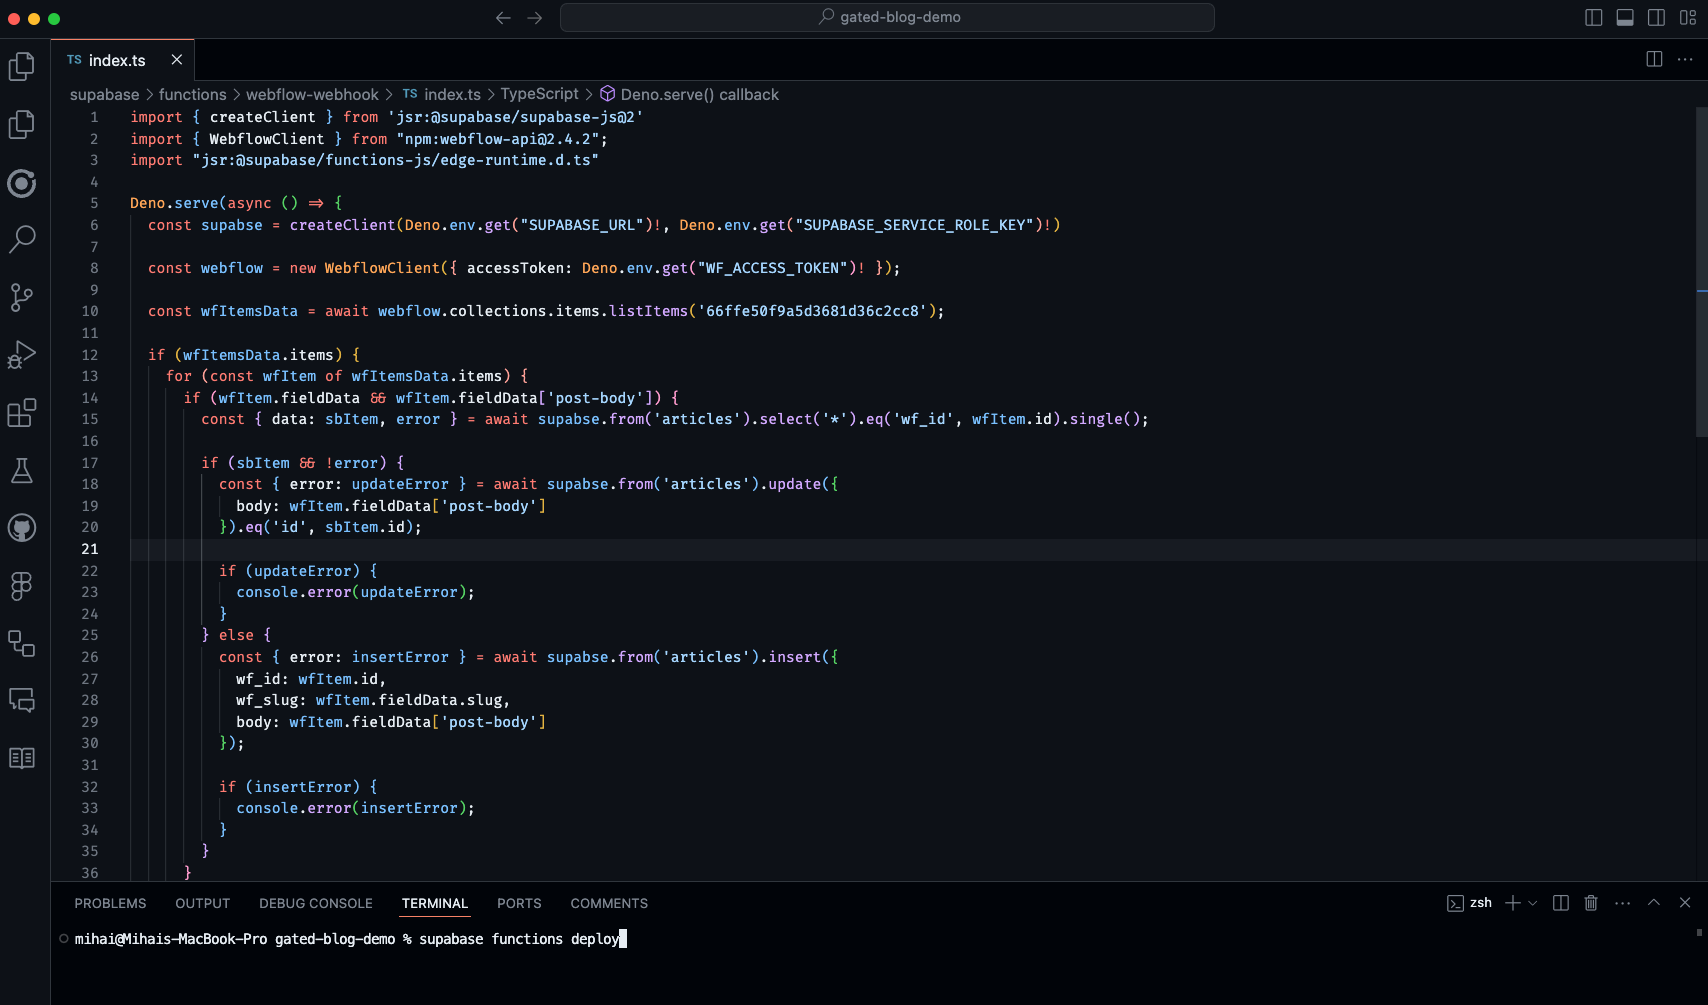
When running this command, it will ask you to select the supabase project. If you are encountering any issues, you can follow this video from Supabase to learn more about edge functions.
If it was successful, the output will show this line at the bottom:
You can inspect your deployment in the Dashboard: https://supabase.com/dashboard/project/vvlqkhgwjrfeapfqxxon/functionsClick on the link or paste it in your browser. It will display a table like this:
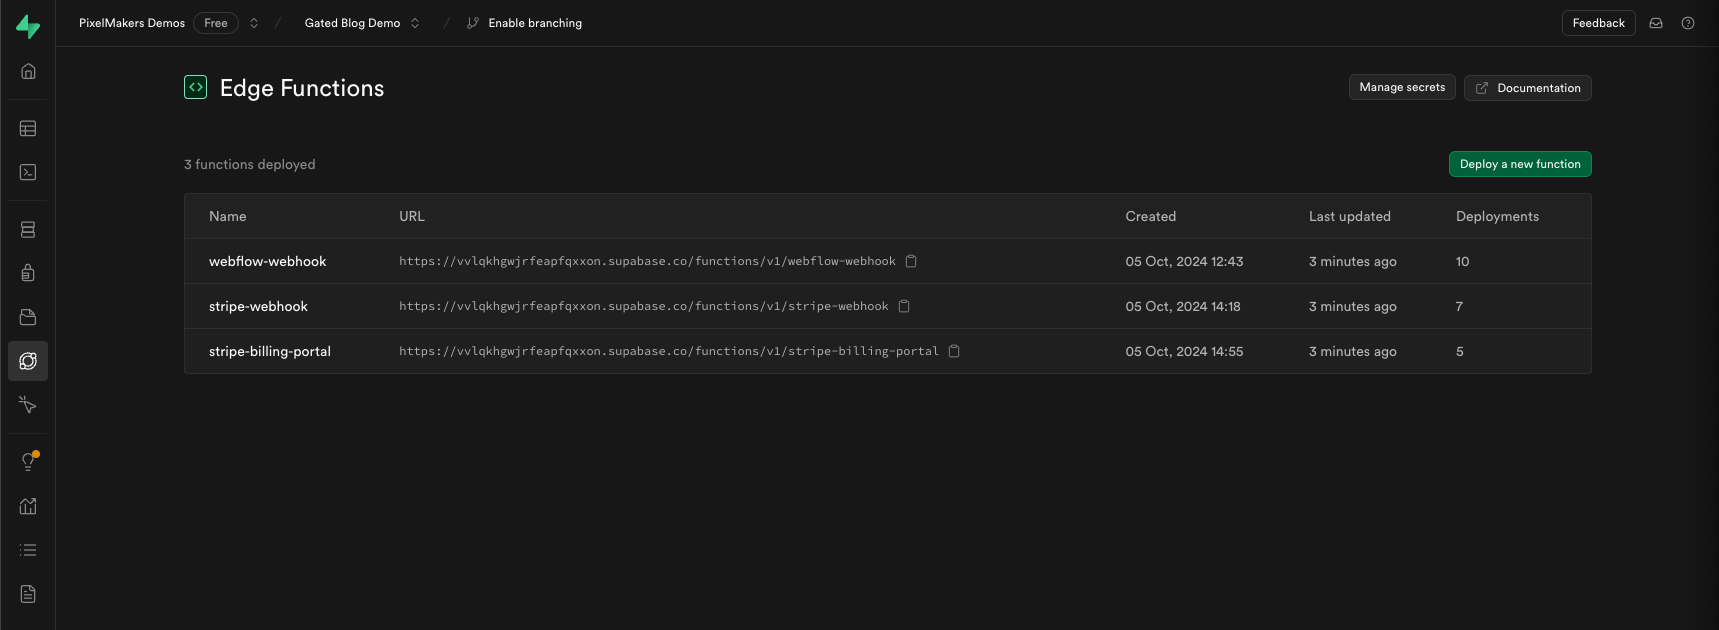
Copy the webflow-webhook url (from the URL column) and paste it in your Webflow project:

Function: Stripe webhook
To effectively manage user subscriptions, we need a system that automatically updates each user's subscription status whenever there are changes in Stripe. This ensures that users gain or lose access to premium content based on their payment status. By setting up a Stripe webhook, our server will listen for subscription events—such as new subscriptions, cancellations, or expirations—and update the corresponding user profile in real-time.
1. Run the following command in your terminal to create a new Supabase edge function. This will create another folder called "stripe-webhook"
supabase functions new stripe-webhook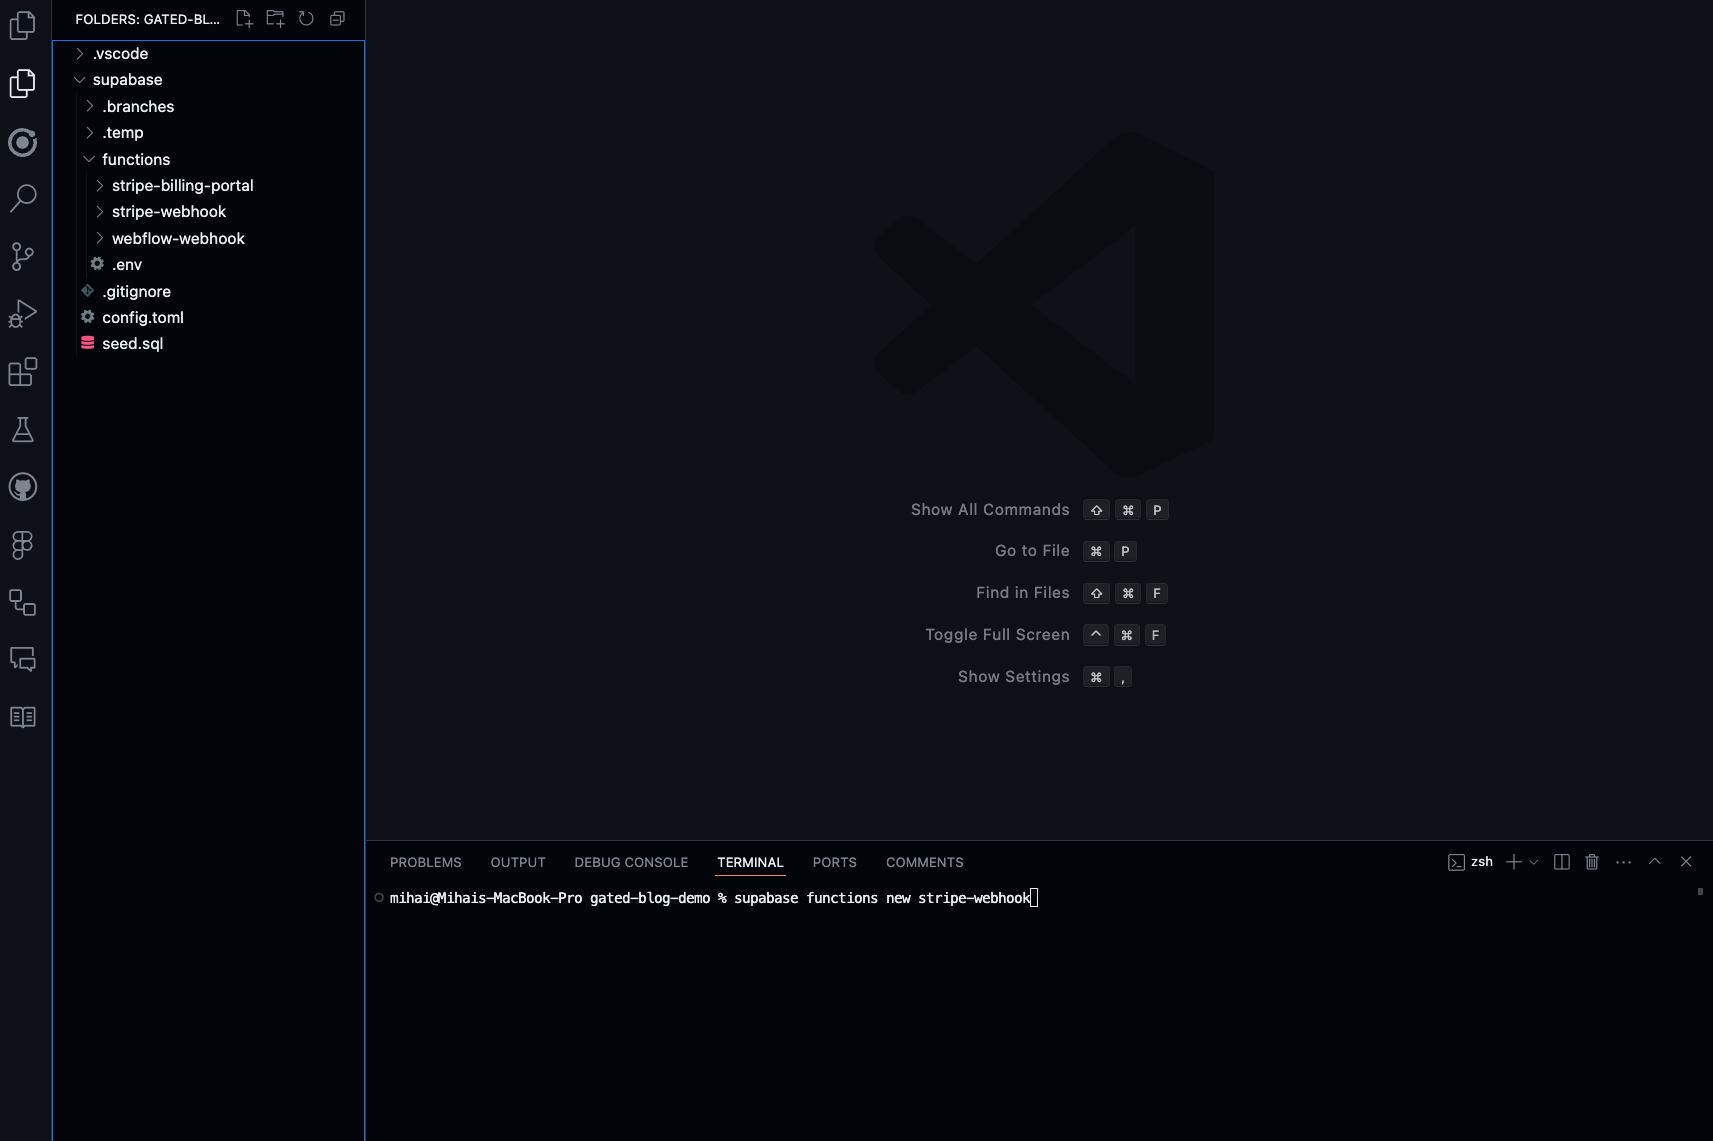
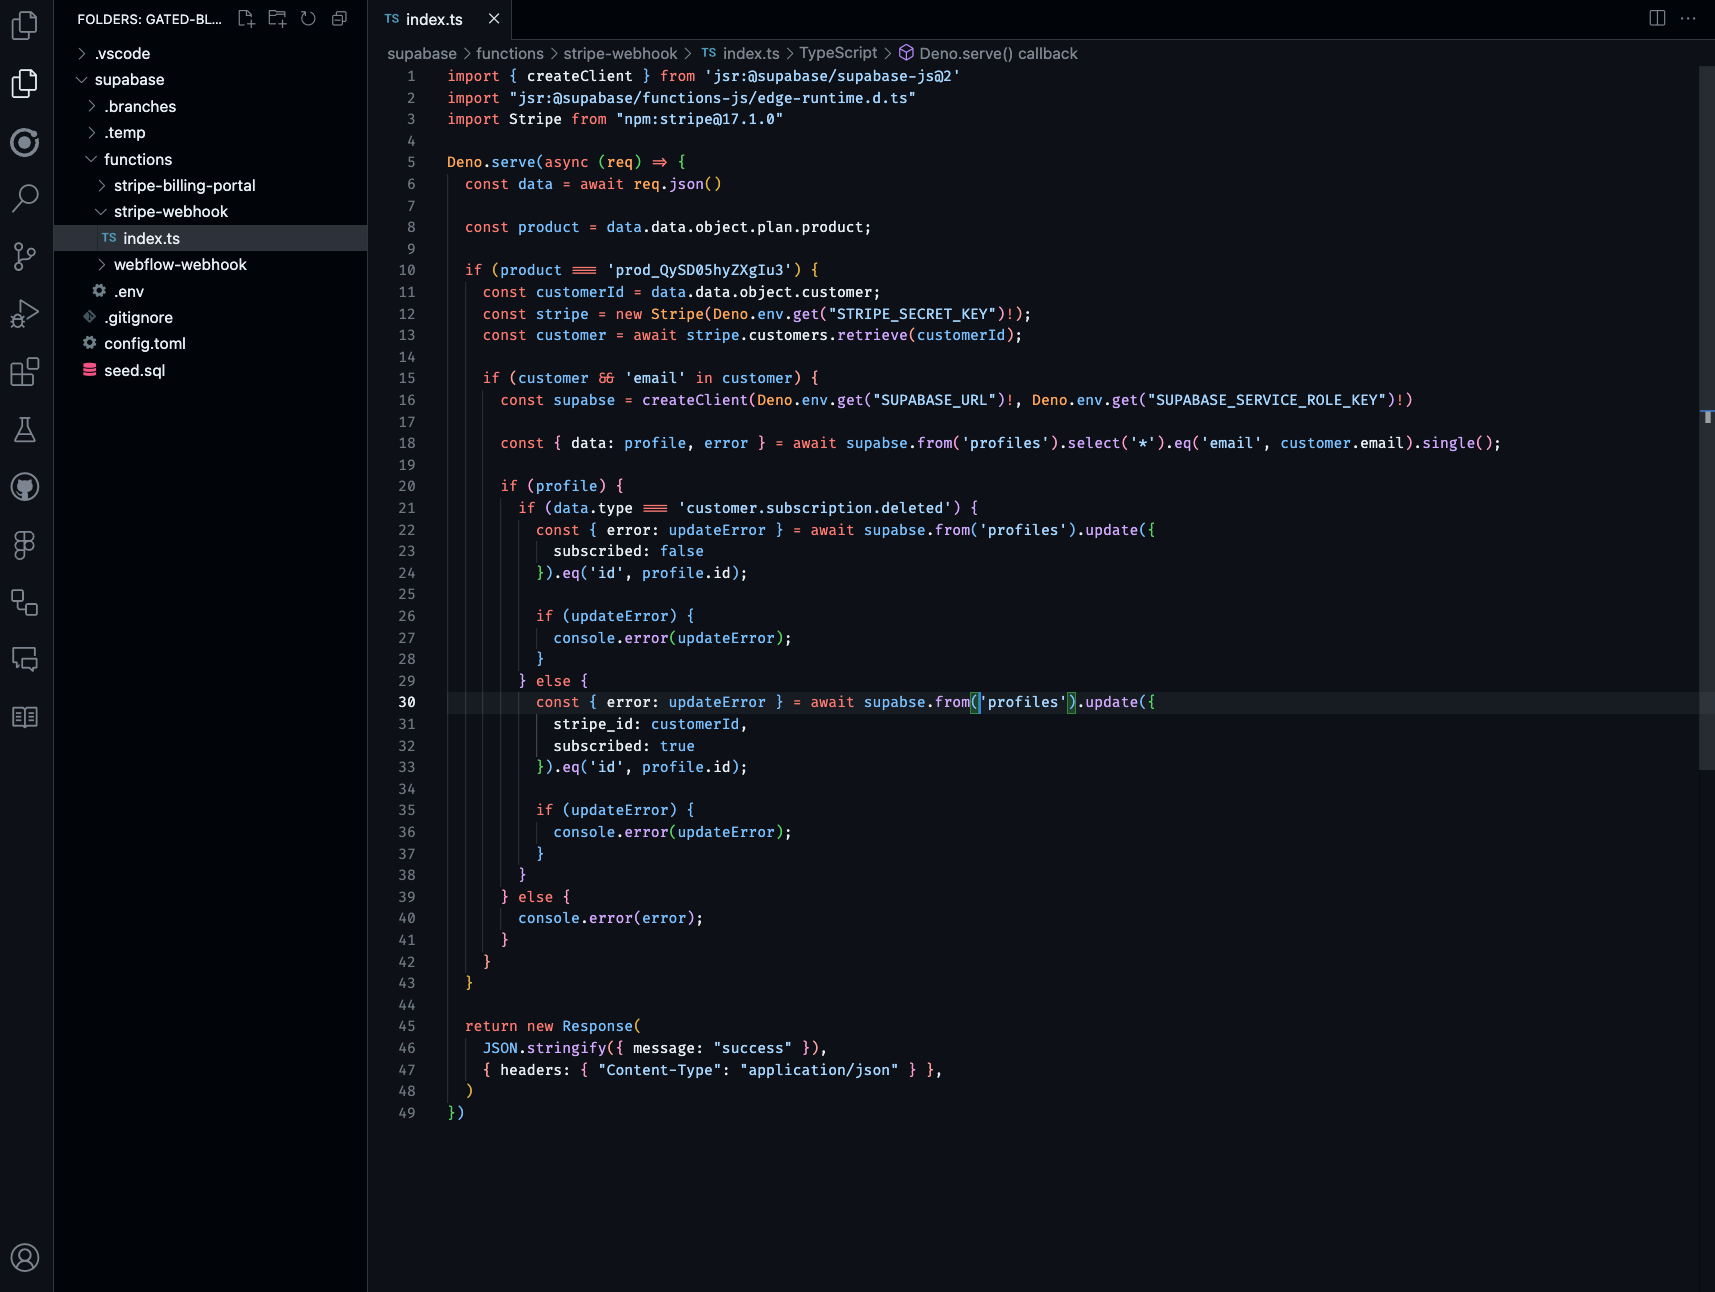
2. Paste the following code in supabase > functions > stripe-webhook > index.ts
import { createClient } from 'jsr:@supabase/supabase-js@2'
import "jsr:@supabase/functions-js/edge-runtime.d.ts"
import Stripe from "npm:stripe@17.1.0"

Deno.serve(async (req) => {
  const data = await req.json()

  const product = data.data.object.plan.product;

  if (product === 'prod_QySD05hyZXgIu3') {
    const customerId = data.data.object.customer;
    const stripe = new Stripe(Deno.env.get("STRIPE_SECRET_KEY")!);
    const customer = await stripe.customers.retrieve(customerId);

    if (customer && 'email' in customer) {
      const supabse = createClient(Deno.env.get("SUPABASE_URL")!, Deno.env.get("SUPABASE_SERVICE_ROLE_KEY")!)

      const { data: profile, error } = await supabse.from('profiles').select('*').eq('email', customer.email).single();

      if (profile) {
        if (data.type === 'customer.subscription.deleted') {
          const { error: updateError } = await supabse.from('profiles').update({
            subscribed: false
          }).eq('id', profile.id);

          if (updateError) {
            console.error(updateError);
          }
        } else {
          const { error: updateError } = await supabse.from('profiles').update({
            stripe_id: customerId,
            subscribed: true
          }).eq('id', profile.id);

          if (updateError) {
            console.error(updateError);
          }
        }
      } else {
        console.error(error);
      }
    }
  }

  return new Response(
    JSON.stringify({ message: "success" }),
    { headers: { "Content-Type": "application/json" } },
  )
})
What it does:
- It receives data from Stripe Webhooks
- It checks if the data is on the product we are interested in
- If checkes if we have a profile with the corresponding email from stripe
- If the subscription is deleted, we set subscribed to false
- Otherwise, we add the stripe_id and set subscribed to true
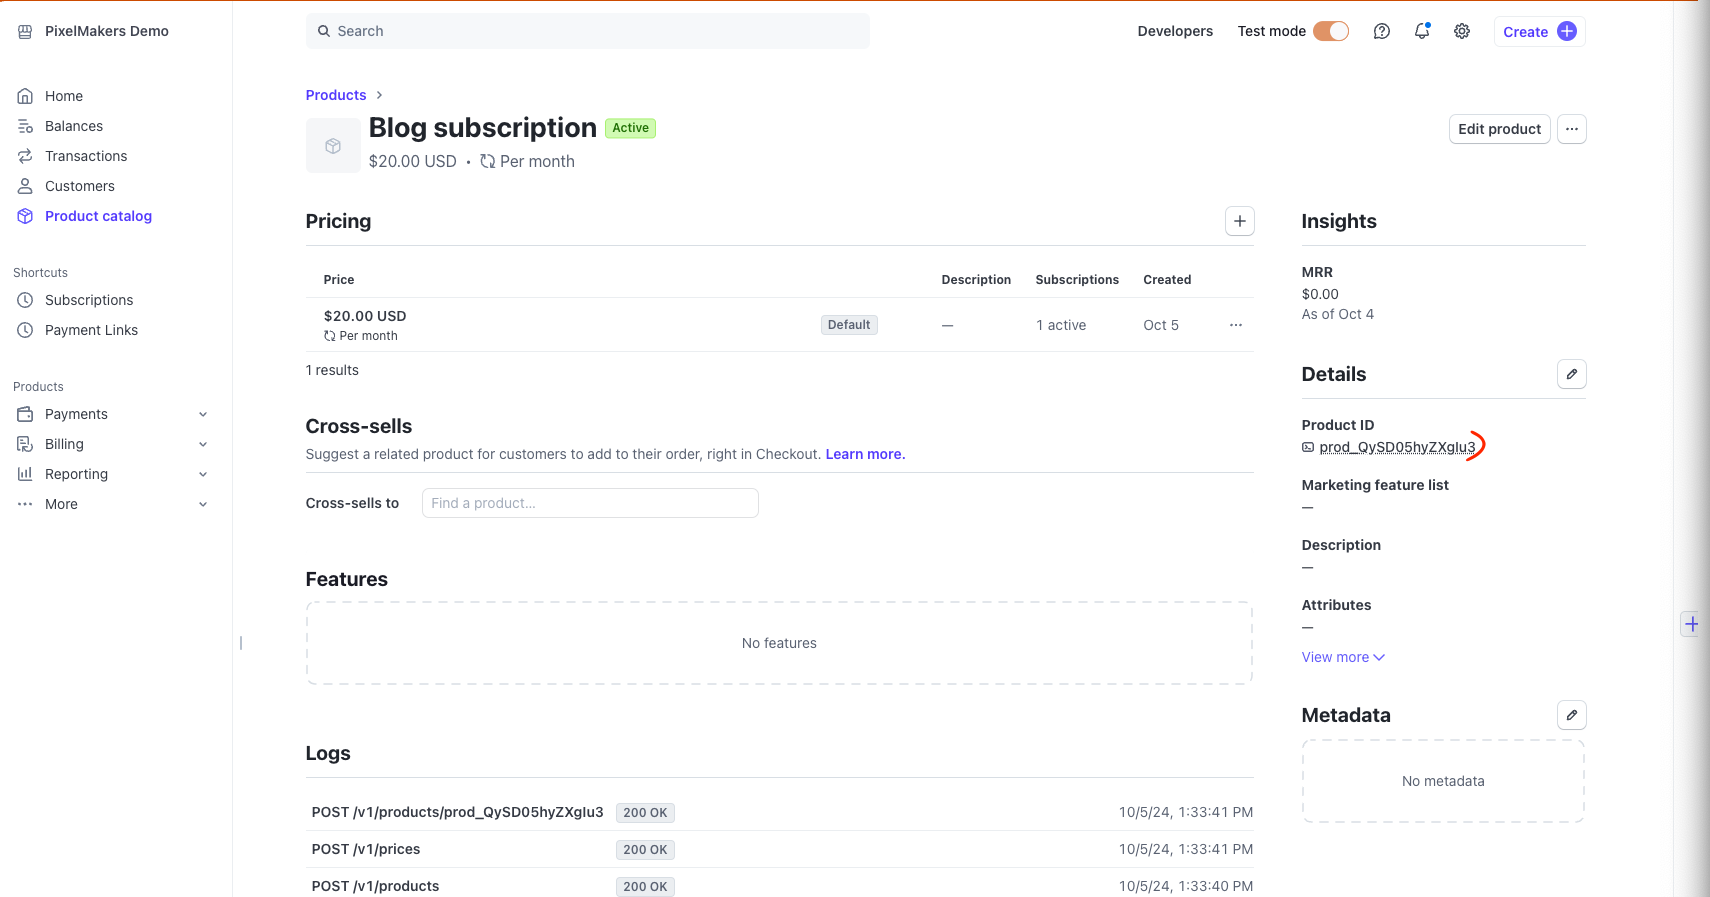
You'll need to replace "prod_QySD05hyZXgIu3" with your actual product ID from Stripe. After creating your product in Stripe, navigate to the product details page. On the right-hand side, you'll find a field labeled "Product ID." Copy this value and replace the placeholder in your code to ensure the correct product is referenced when handling subscriptions.
3. Get the Stripe Secret Key
For testing purposes, we'll be using a Stripe test account. When you're ready to go live, simply update the product ID and access token with your live production data.
Open Stripe > Developers > API keys. Reveal the test key and copy it.

4. Create the environment key in Supabase by running the following command. Replace "your_key" with your Stripe key.
supabase secrets set STRIPE_SECRET_KEY=your_key
5. Deploy the function by running the following command.
supabase functions deployIf it was successful, the output will show this line at the bottom:
You can inspect your deployment in the Dashboard: https://supabase.com/dashboard/project/vvlqkhgwjrfeapfqxxon/functionsClick on the link or paste it in your browser. It will display a table like this:

Copy the stripe webhook link.
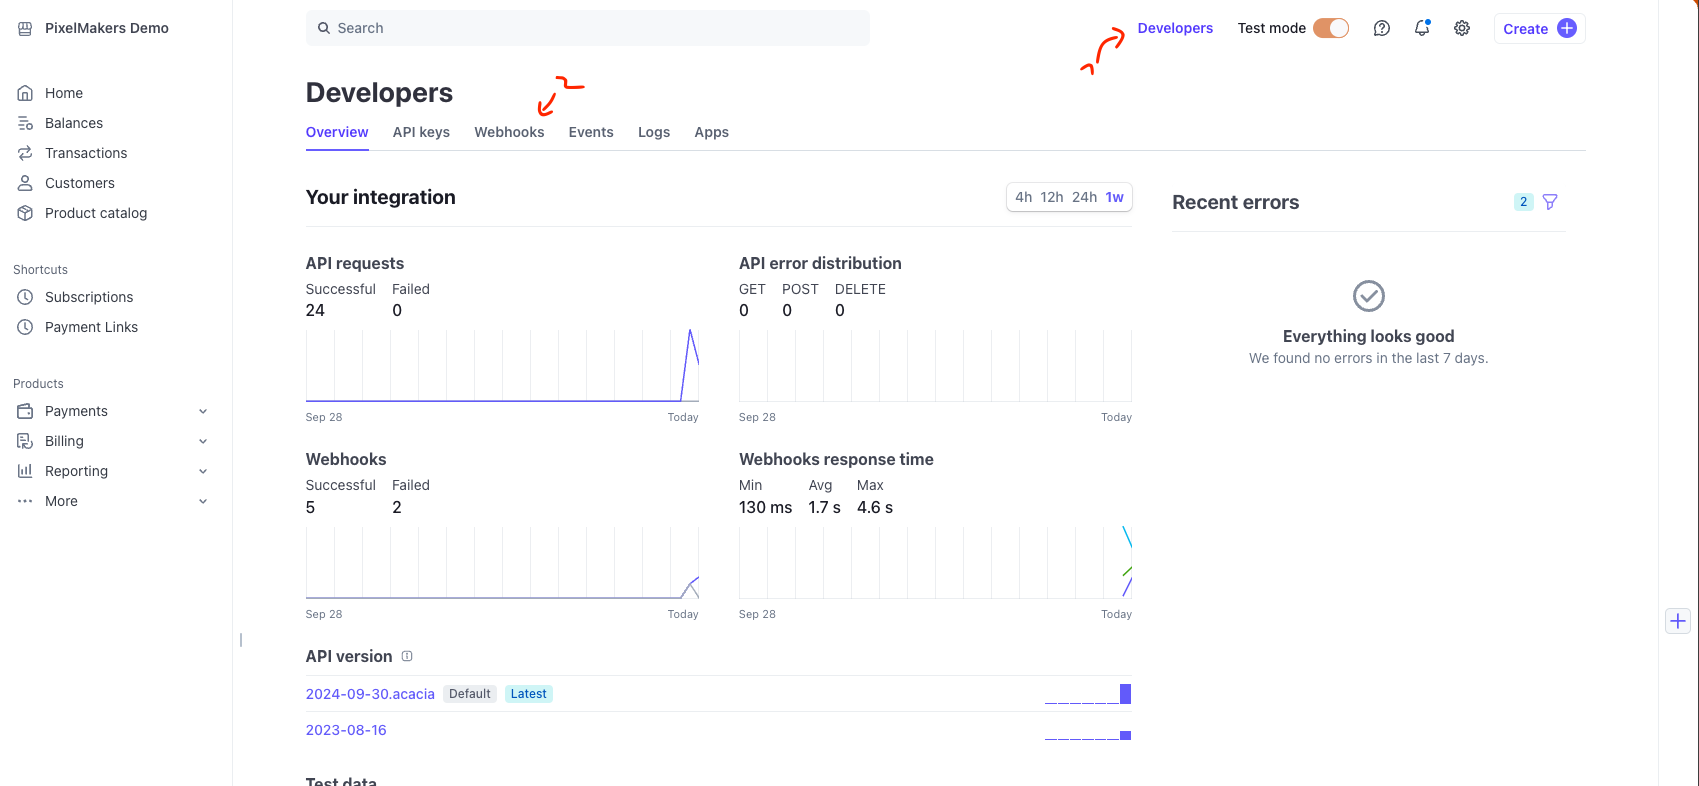
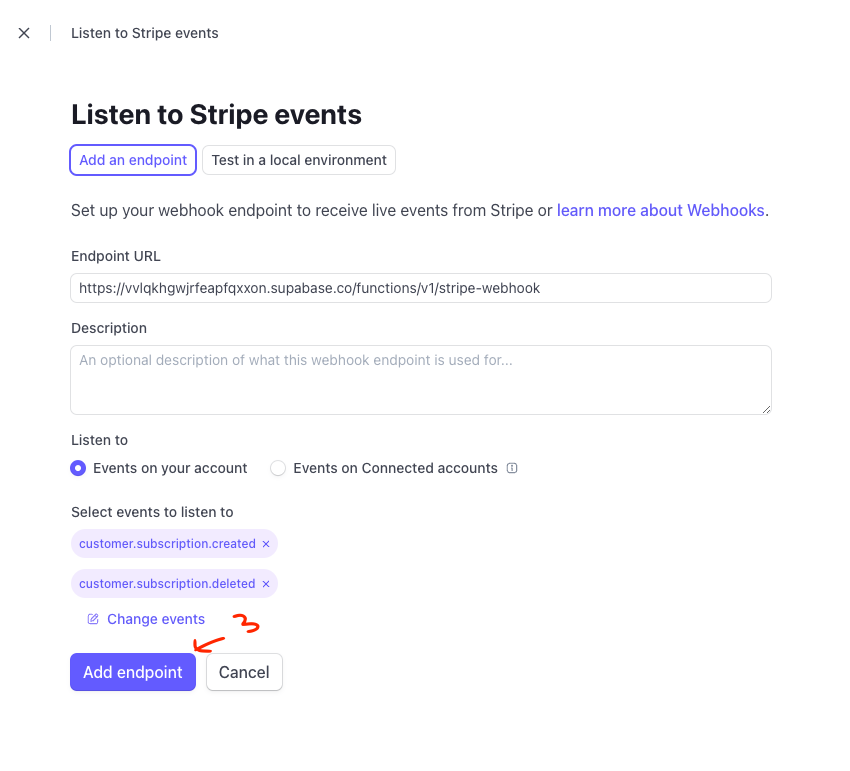
6. Go to Stripe Webhooks and add a new webhook. For endpoint URL use the copied link from Supabase.

Function: Stripe billing portal generation
To offer a seamless user experience, we need to allow logged-in users to manage their billing details directly through Stripe. By generating a unique billing portal URL for each user, we give them the ability to view invoices, update payment methods, and manage subscriptions—all from one convenient location. This functionality ensures users can easily handle their billing preferences, making the entire process smooth and user-friendly.
1. Generate a new Supabase edge function by running the following command:
supabase functions new stripe-billing-portal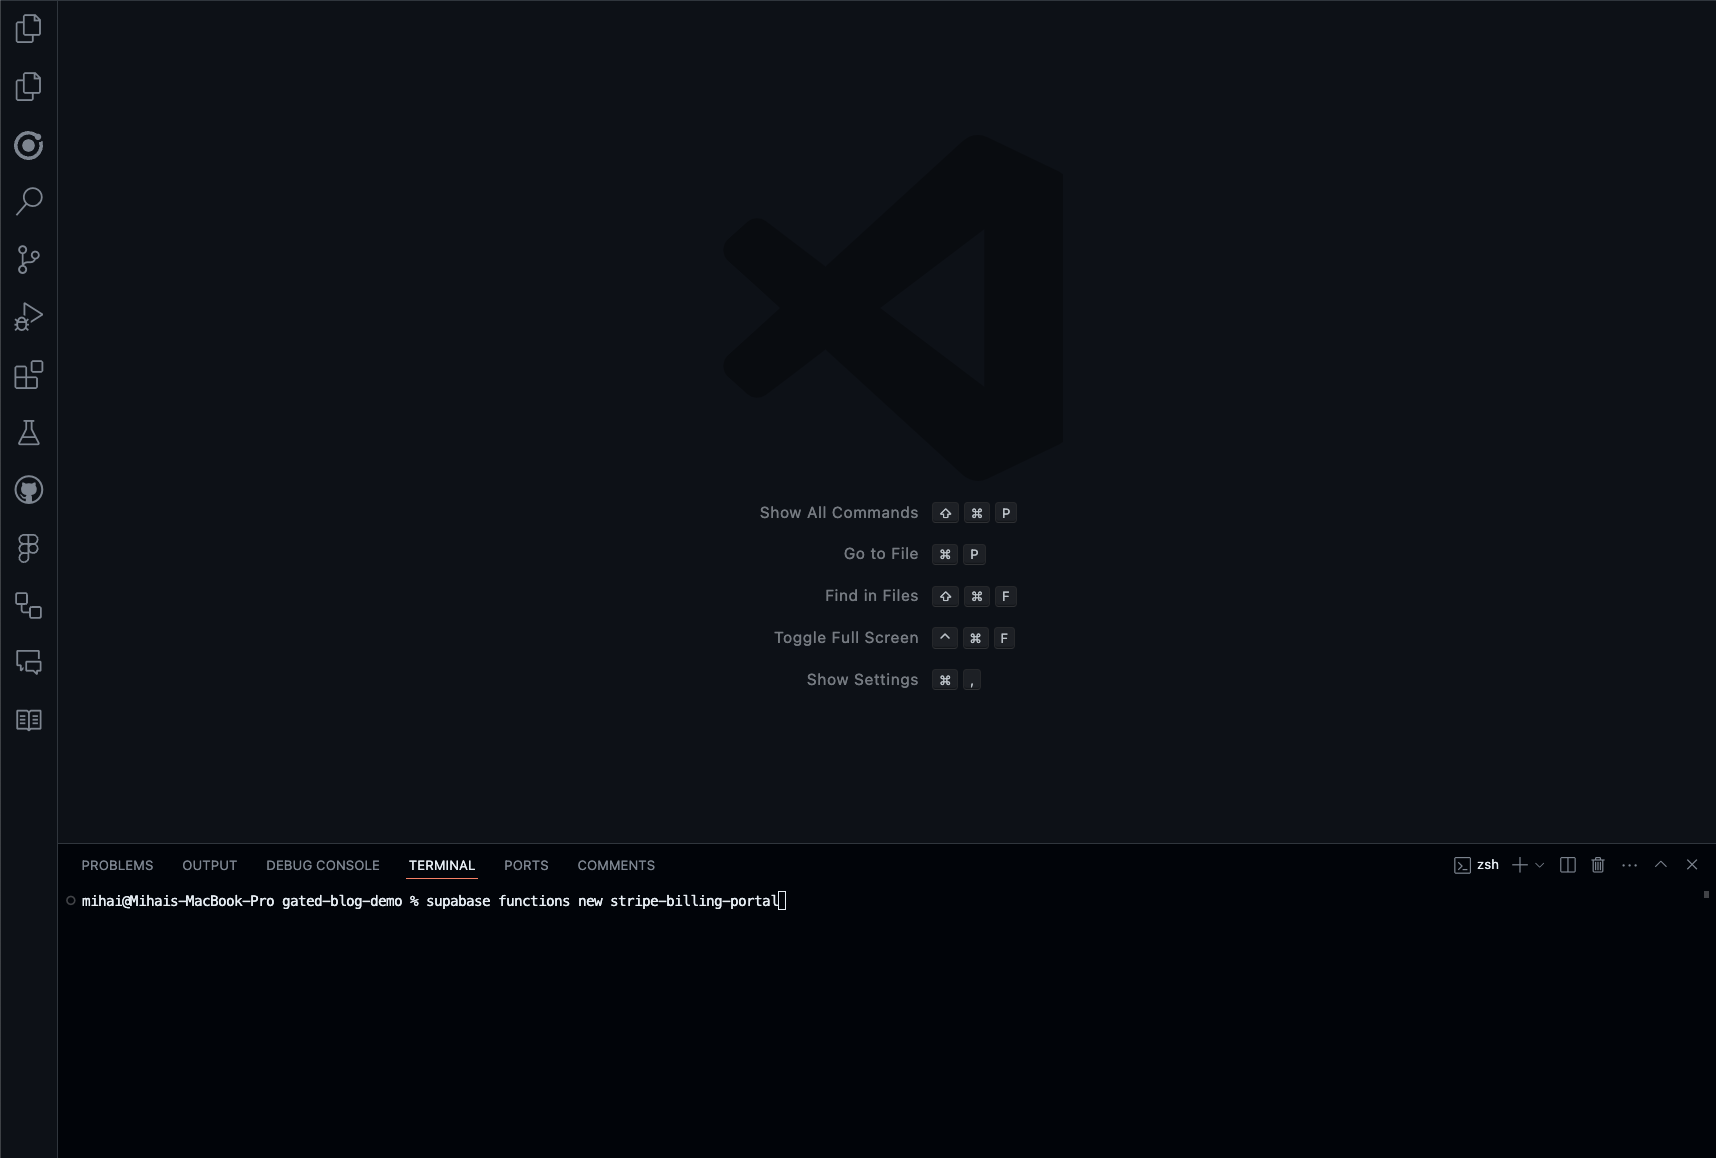
2. Paste the following code in supabase > functions > stripe-billing-portal
import { createClient } from 'jsr:@supabase/supabase-js@2'
import "jsr:@supabase/functions-js/edge-runtime.d.ts"
import Stripe from "npm:stripe@17.1.0"

const corsHeaders = {
  'Access-Control-Allow-Origin': 'https://gated-blog-demo.webflow.io',
  'Access-Control-Allow-Headers': 'authorization, x-client-info, apikey',
  'Access-Control-Allow-Methods': 'POST, GET, OPTIONS, PUT, DELETE',
}

Deno.serve(async (req) => {
  const { url, method } = req

  if (method === 'OPTIONS') {
    return new Response('ok', { headers: corsHeaders })
  }

  const requestUrl = new URL(url);
  const userId = requestUrl.searchParams.get('userId');

  if (!userId) {
    return new Response(
      JSON.stringify({ message: "Missing userId" }),
      { headers: { ...corsHeaders, 'Content-Type': 'application/json' }, status: 400 }
    );
  }

  try {
    const stripe = new Stripe(Deno.env.get("STRIPE_SECRET_KEY")!);
    const supabaseClient = createClient(
      Deno.env.get('SUPABASE_URL') ?? '',
      Deno.env.get('SUPABASE_ANON_KEY') ?? '',
      {
        global: {
          headers: { Authorization: req.headers.get('Authorization')! },
        },
      }
    )

    const { data: profile, error } = await supabaseClient.from('profiles').select('*').eq('id', userId).single()

    if (error || !profile || !profile.stripe_id) {
      return new Response(
        JSON.stringify({ message: "No profile found" }),
        { headers: { ...corsHeaders, 'Content-Type': 'application/json' }, status: 404 }
      );
    }

    const session = await stripe.billingPortal.sessions.create({
      customer: profile.stripe_id,
      return_url: 'https://gated-blog-demo.webflow.io',
    })

    return new Response(
      JSON.stringify({ url: session.url }),
      { headers: { ...corsHeaders, 'Content-Type': 'application/json' }, status: 200 }
    );
  } catch (error) {
    return new Response(
      JSON.stringify({ message: "Internal Server Error", error: JSON.stringify(error) }),
      { headers: { ...corsHeaders, 'Content-Type': 'application/json' }, status: 500 }
    );
  }
})
Replace "https://gated-blog-demo.webflow.io" with your webflow link.
What it does:
- Checks if the request is comming from the right url.
- It extracts the userId from the link.
- It gets the profile stripe customer id.
- It generates the billing portal url and returns it.
3. Deploy the function by running the following command in your terminal.
supabase functions deploy
Enable authentication
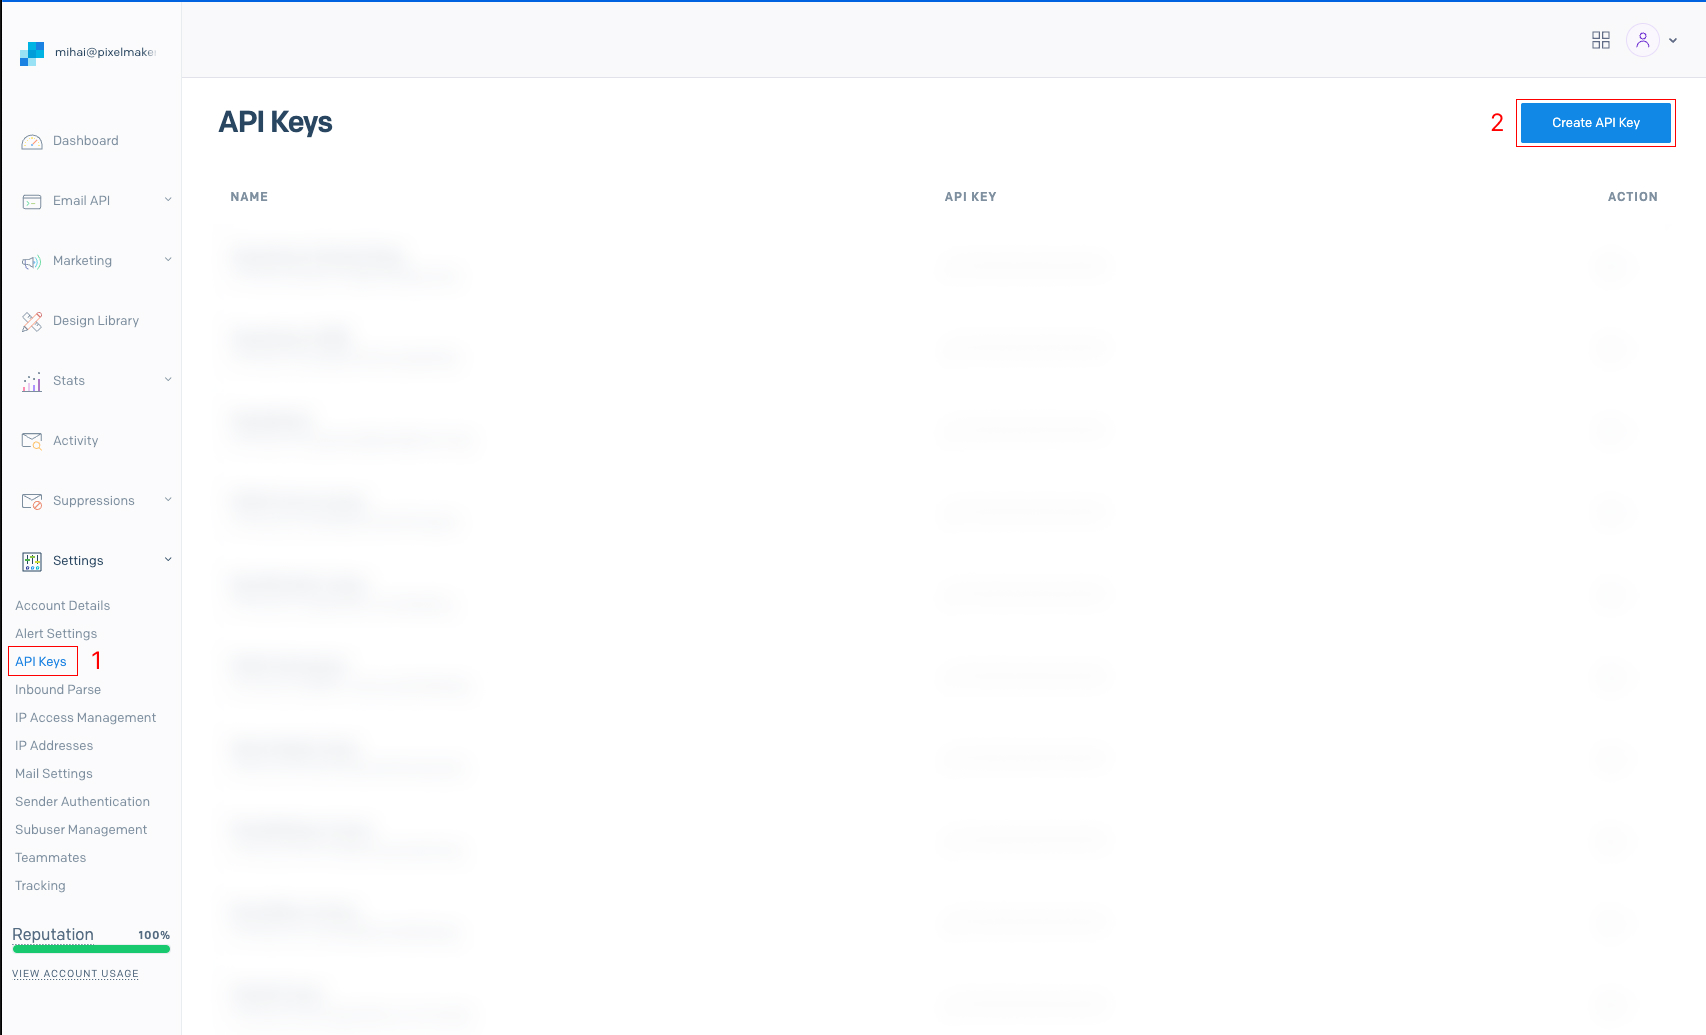
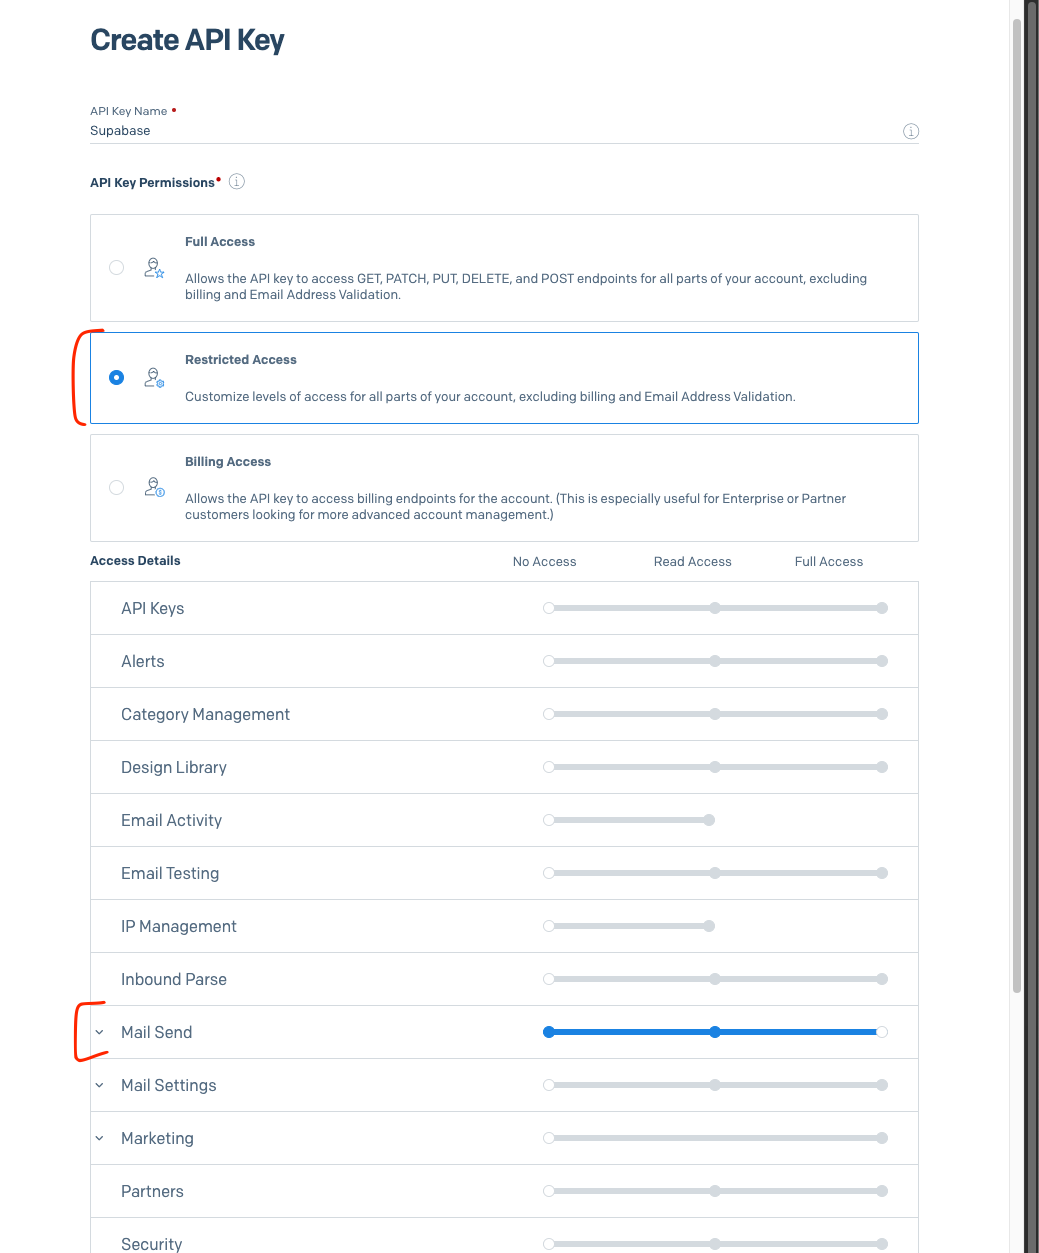
To make authentication work with Supabase and Sendgrid, you will need to create an account on sendgrid.com and configure it (just follow the guide from onboarding to add an email and verify domain). After your sendgrid account is set-up, you will need to create an API key.
1. Go to Sendgrid > Settings > API keys > Create API key. You can give it the mail send permissions.
2. Go to Supabase > Project Settings > Authentication > SMTP Settings.
Configure it as follows:
Sender email: the sender configured in Sendgrid
Sender name: the desired sender name
SMTP provider settings: smtp.sendgrid.net
Port number: 465
Username: apikey
Password: the API key you copied from SendGrid
Save and refresh your supabase window.
RLS Policies
Security is very important in supabase. We want to ensure 2 things: 1. Only subscribed users can get the articles and 2. A user can view only it's own profile.
Articles Table
1. Go to Supabase > Articles. Click on "Add RLS policy" button.


2. Click on "Create policy" and add the following code. For target role ensure it's "authenticated"
  (EXISTS ( SELECT 1
   FROM profiles
  WHERE ((profiles.id = auth.uid()) AND (profiles.subscribed = true))))
3. Save once you did the settings.
Profiles Table
1. Go to Supabase > Profiles. Click on "Add RLS policy" button.
2. Click on "Create policy" and add the following code. For target role ensure it's "authenticated"
(( SELECT auth.uid() AS uid) = id)
3. Save once you are done.
Webflow Development
Auth Page
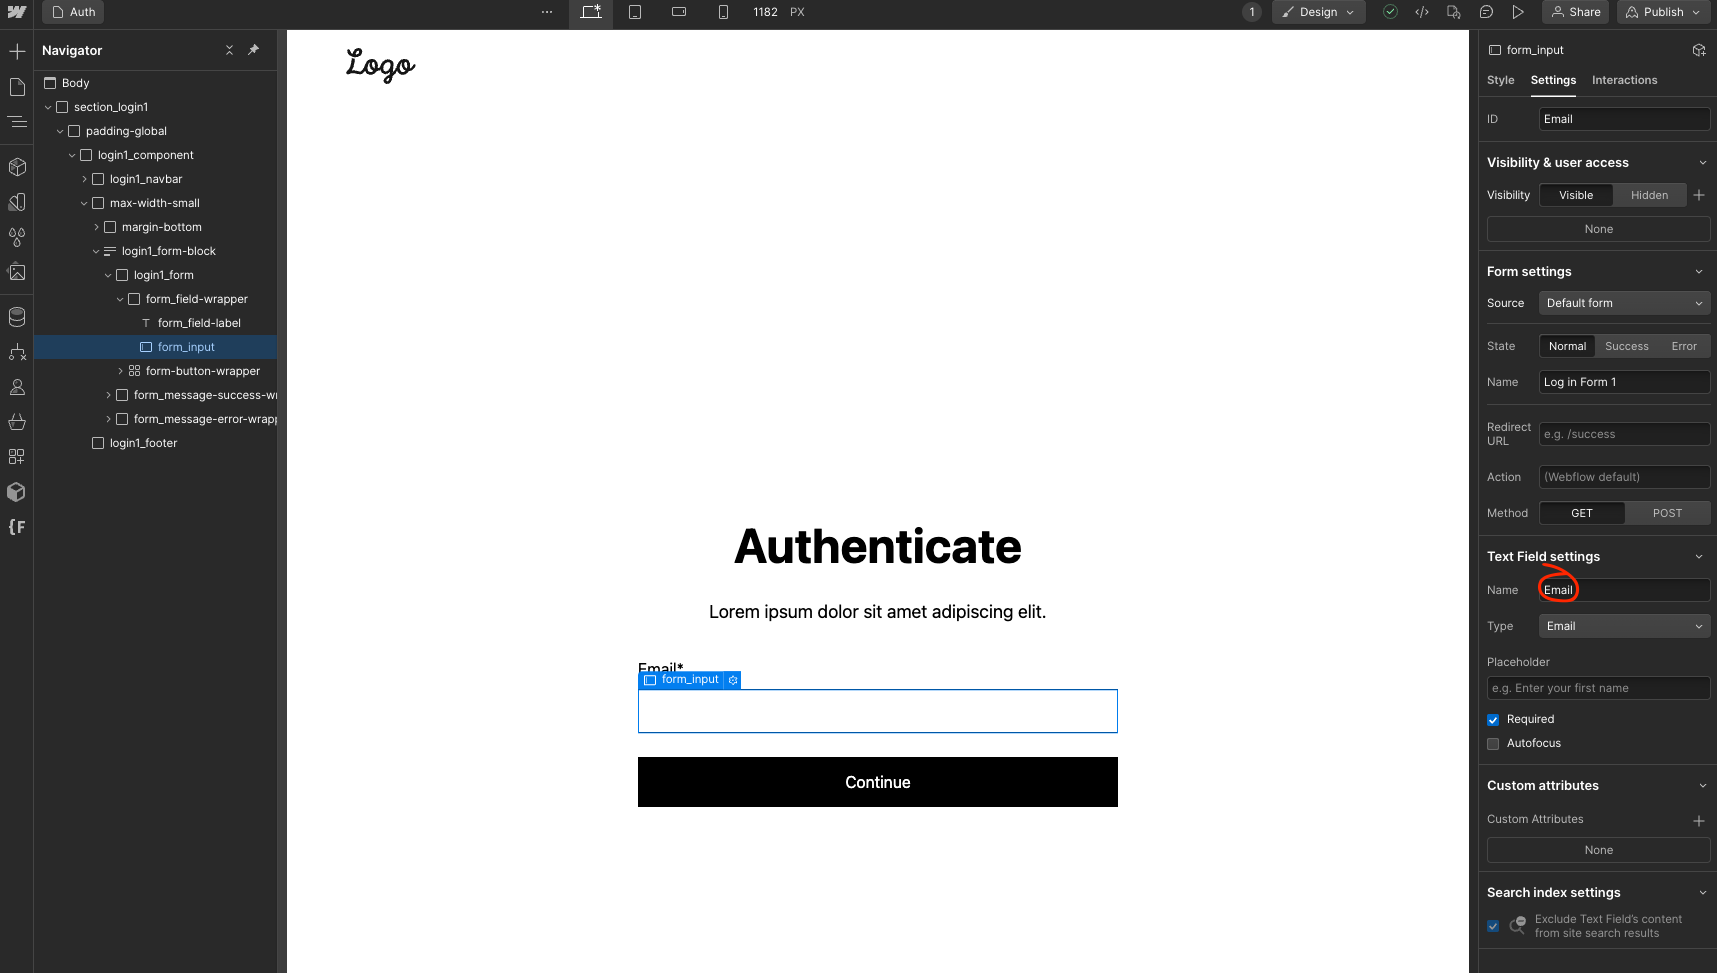
Appart from the regular pages, we created an additional page called Auth which we can use for the user signup & login process.
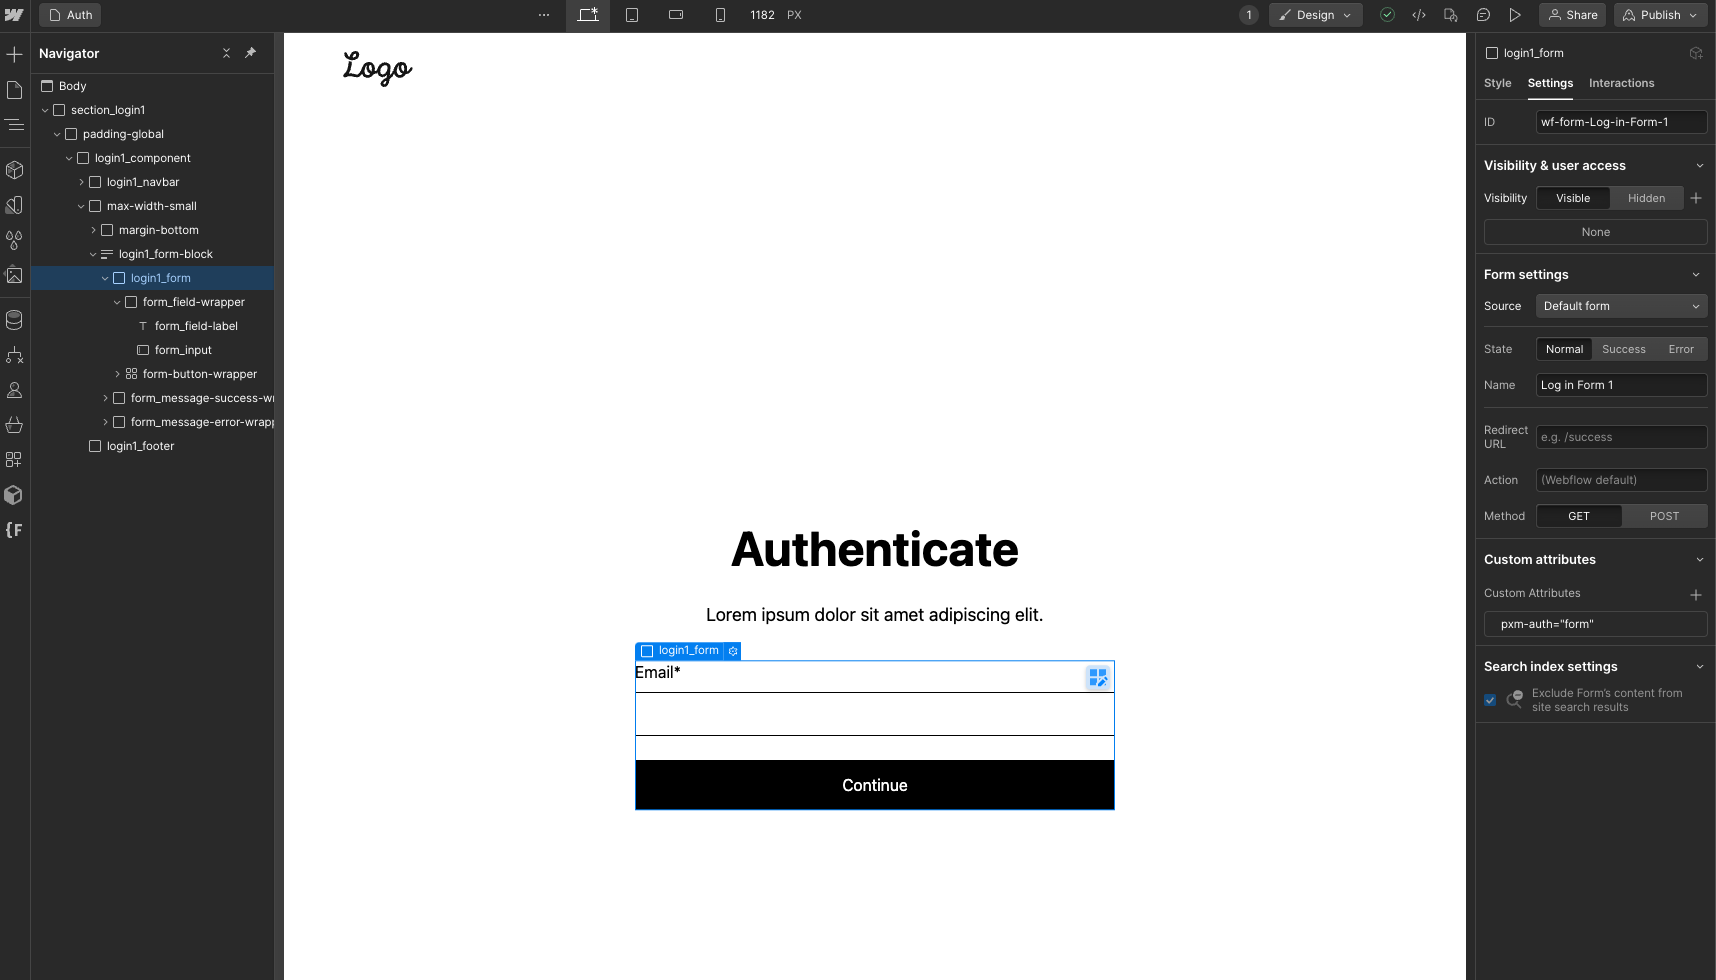
On the form element we added pxm-auth="form". We will target this attribute later, using JS.
Notice: On the email input we put "Email" as a name. We will use this exact text when extracting the data in JS.
Navigation

On navigation, we've added pxm-nav="billing" on the billing link.

pxm-nav="logout" - on the logout link
pxm-nav="join" - on the join / authentication link
Blog page
On the blog page, we created 2 call to actions:
- For authentication - if the user is not logged in, to encourage it to create an account.
- For subscribe - if the user is logged in, but not subscribe - to encourage it to subscribe.
Attributes:
pxm-article="auth" - on the auth cta component
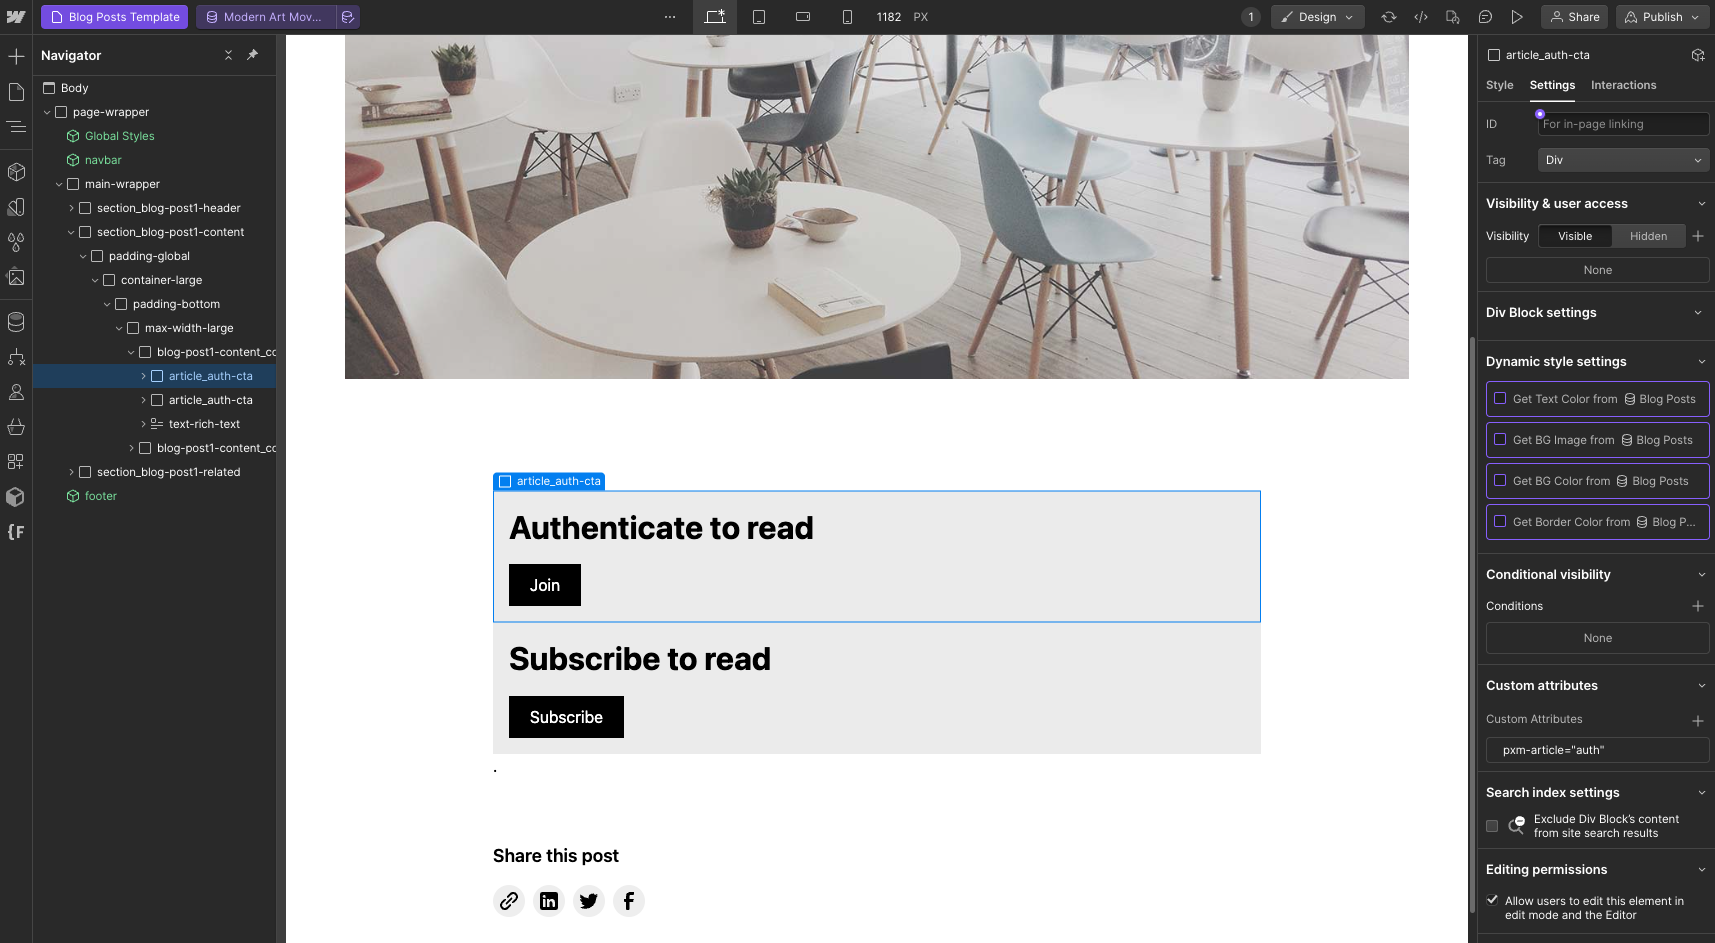
pxm-article="subscribe" - on the subscribe component
pxm-article="subscribe-btn" - on the subscribe btn
pxm-article="body" - on the rich text where the article gets injected.
JavaScript Code
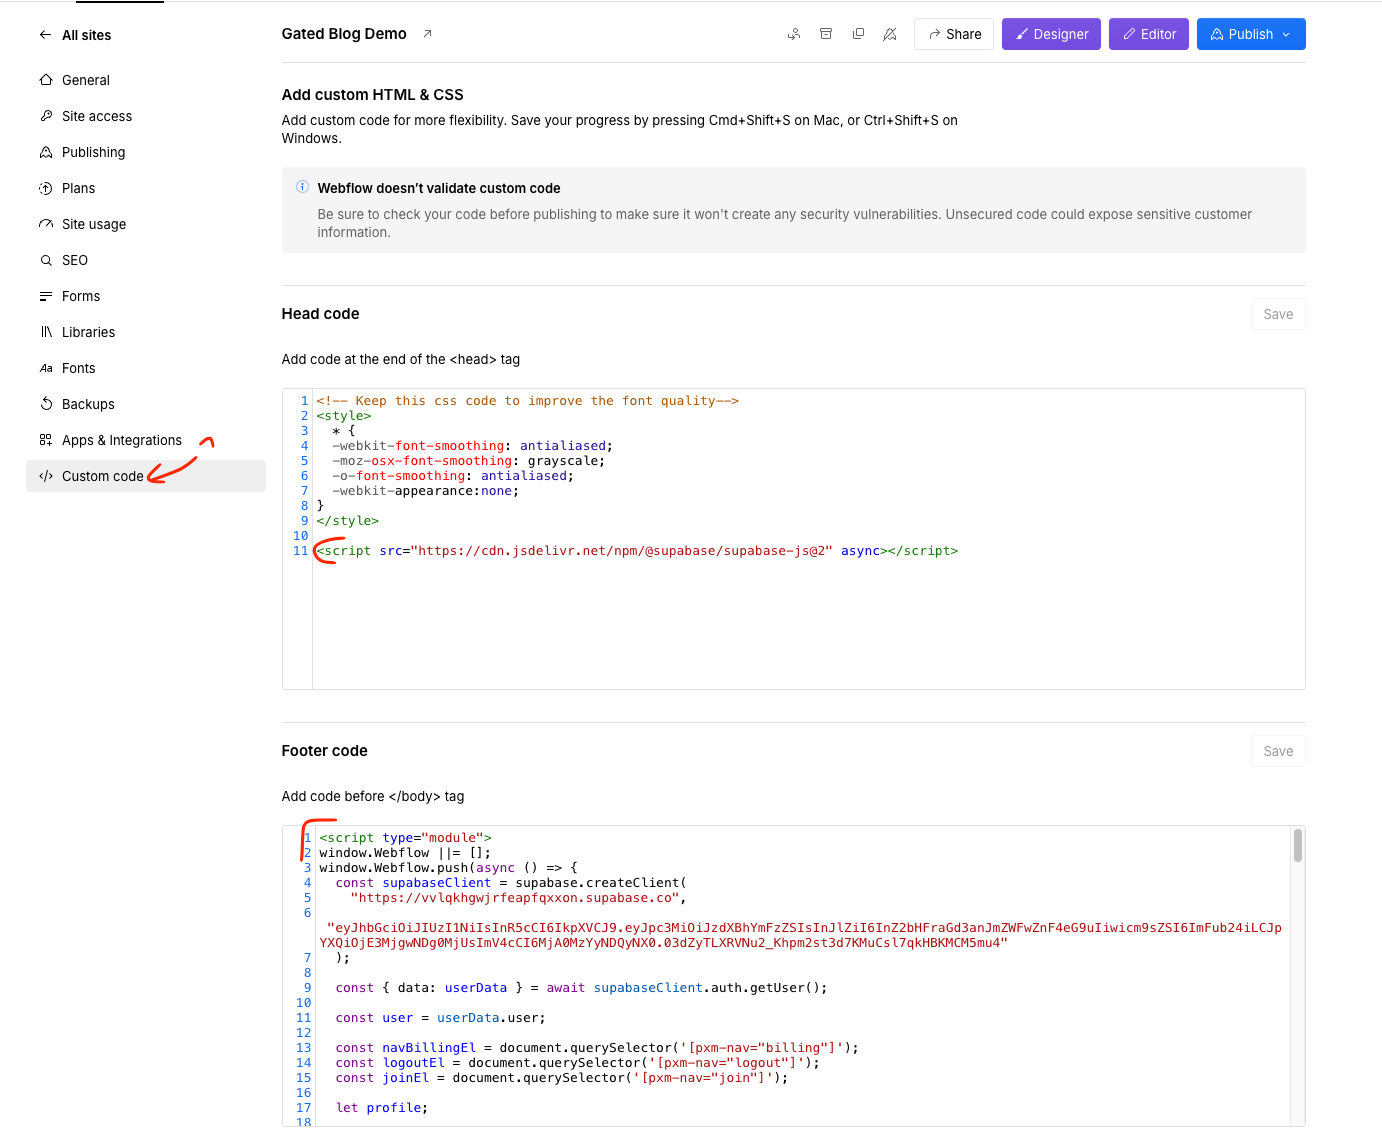
In the global settings, paste the following code in head. This will inject the Supabase JS SDK code.
<script src="https://cdn.jsdelivr.net/npm/@supabase/supabase-js@2" async></script>
In the footer code, paste the following:
<script type="module">
window.Webflow ||= [];
window.Webflow.push(async () => {
  const supabaseClient = supabase.createClient(
    "https://your_project.supabase.co",
    "supabase_anon_key"
  );

  const { data: userData } = await supabaseClient.auth.getUser();

  const user = userData.user;

  const navBillingEl = document.querySelector('[pxm-nav="billing"]');
  const logoutEl = document.querySelector('[pxm-nav="logout"]');
  const joinEl = document.querySelector('[pxm-nav="join"]');

  let profile;

  if (!user) {
    if (navBillingEl) navBillingEl.style.display = "none";
    if (logoutEl) logoutEl.style.display = "none";
  } else {
    if (joinEl) joinEl.style.display = "none";

    const { data: profileData } = await supabaseClient
      .from("profiles")
      .select()
      .eq("id", user.id)
      .single();

    if (profileData) {
      profile = profileData;

      if (profile.stripe_id) {
        if (navBillingEl) navBillingEl.style.display = "block";

        const { data: sessionData } = await supabaseClient.auth.getSession();
        const token = sessionData.session.access_token;

        try {
          const res = await fetch(
            `https://your_project.supabase.co/functions/v1/stripe-billing-portal?userId=${profile.id}`,
            {
              headers: {
                Authorization: `Bearer ${token}`,
              },
            }
          );

          const data = await res.json();

          navBillingEl.href = data.url;
        } catch (error) {
          console.error(error);
        }
      } else {
        if (navBillingEl) navBillingEl.style.display = "none";
      }
    }

    logoutEl.addEventListener("click", async () => {
      await supabaseClient.auth.signOut();
      window.location.reload();
    });
  }

  const articleAuthEl = document.querySelector('[pxm-article="auth"]');
  const articleSubscribeEl = document.querySelector(
    '[pxm-article="subscribe"]'
  );
  const articleSubscribeBtn = document.querySelector(
    '[pxm-article="subscribe-btn"]'
  );
  const articleBodyEl = document.querySelector('[pxm-article="body"]');

  if (articleAuthEl && articleBodyEl) {
    if (!user) {
      articleAuthEl.style.display = "block";
    } else {
      articleAuthEl.style.display = "none";
    }
  }

  if (articleSubscribeBtn && articleSubscribeEl) {
    if (!user) {
      articleSubscribeEl.style.display = "none";
    } else {
      if (profile && profile.subscribed === false) {
        articleSubscribeEl.style.display = "block";

        articleSubscribeBtn.href = `https://buy.stripe.com/stripe_id?prefilled_email=${user.email}`;
      } else {
        articleSubscribeEl.style.display = "none";
      }
    }
  }

  if (articleBodyEl) {
    if (!user || (profile && profile.subscribed === false)) {
      articleBodyEl.style.display = "none";
    } else {
      articleBodyEl.style.display = "block";

      const { data: article } = await supabaseClient
        .from("articles")
        .select("body")
        .eq("wf_slug", window.location.pathname.split("blog/")[1])
        .single();

      if (article) {
        articleBodyEl.innerHTML = article.body;
      }
    }
  }

  const authForm = document.querySelector('[pxm-auth="form"]');

  if (authForm) {
    const doneEl = authForm.parentElement.querySelector(".w-form-done");
    const failEl = authForm.parentElement.querySelector(".w-form-fail");

    authForm.addEventListener("submit", async (e) => {
      e.preventDefault();
      e.stopImmediatePropagation();

      const target = e.target;
      const formData = new FormData(target);
      const email = formData.get("Email");

      if (!email) return;

      const { error } = await supabaseClient.auth.signInWithOtp({
        email: email,
        options: {
          emailRedirectTo: "https://your_domain",
        },
      });

      if (!error) {
        target.style.display = "none";
        doneEl.style.display = "block";
      } else {
        target.style.display = "none";
        failEl.style.display = "block";

        console.error(error);
      }
    });
  }
});
</script>
We need to replace several variables:
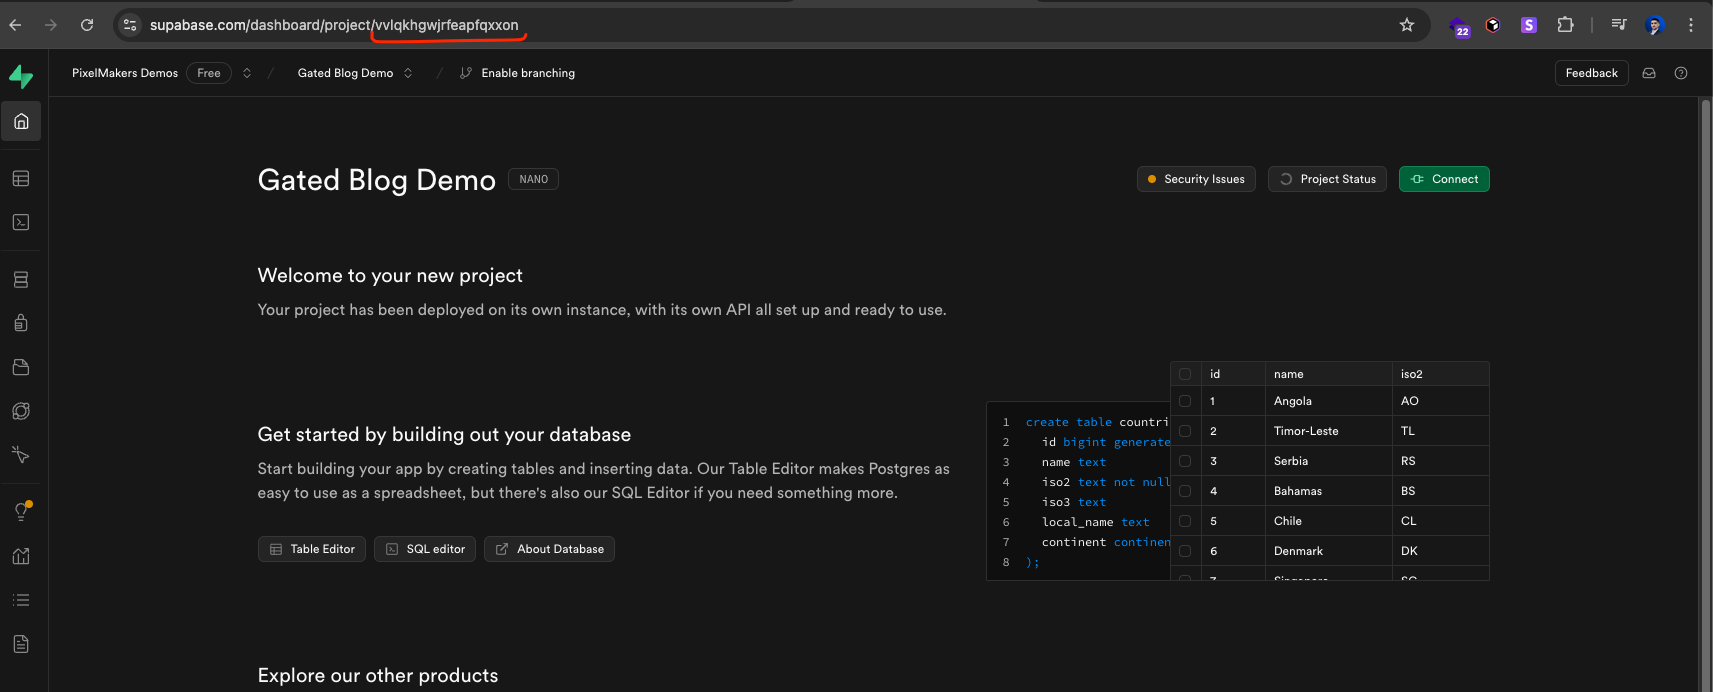
- https://your_project.supabase.co - you can replace your_ project with your Supabase project id. To find it, go to supabase.com, open your project and copy the id from the link.
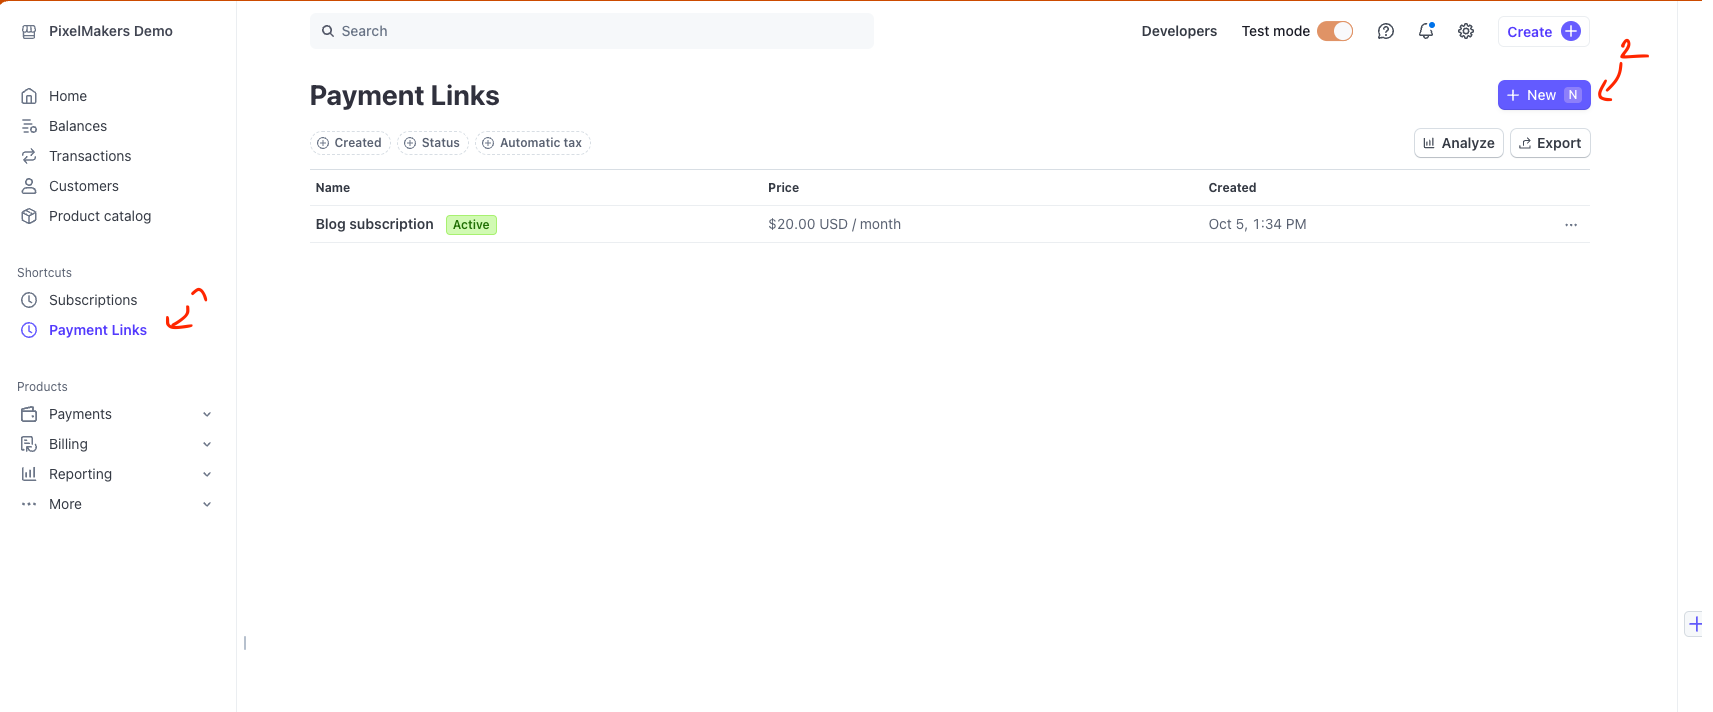
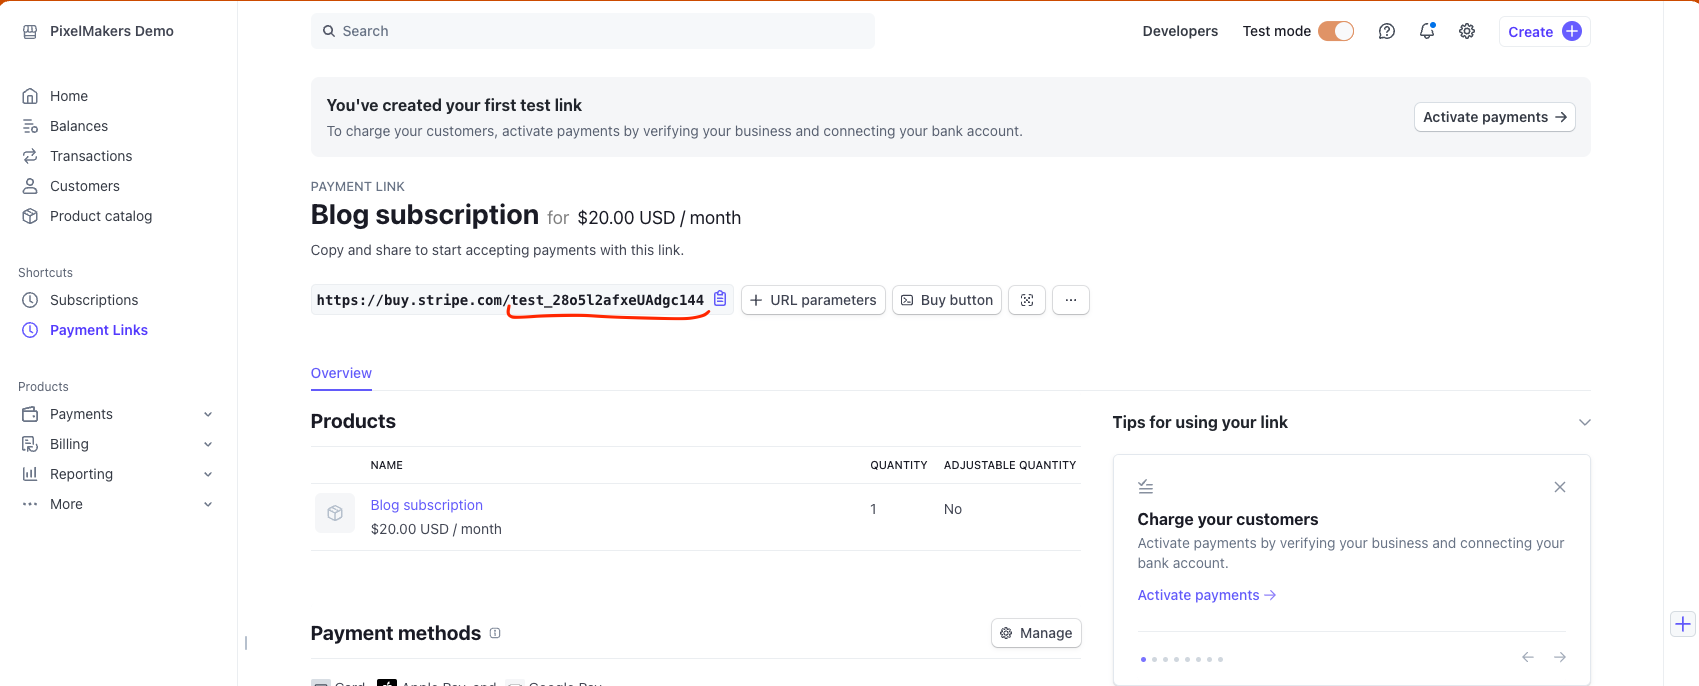
- https://buy.stripe.com/stripe_id - go to stripe.com and create a new payment link (if you don't already have one). Once created, click on the payment link and replace this with yours.
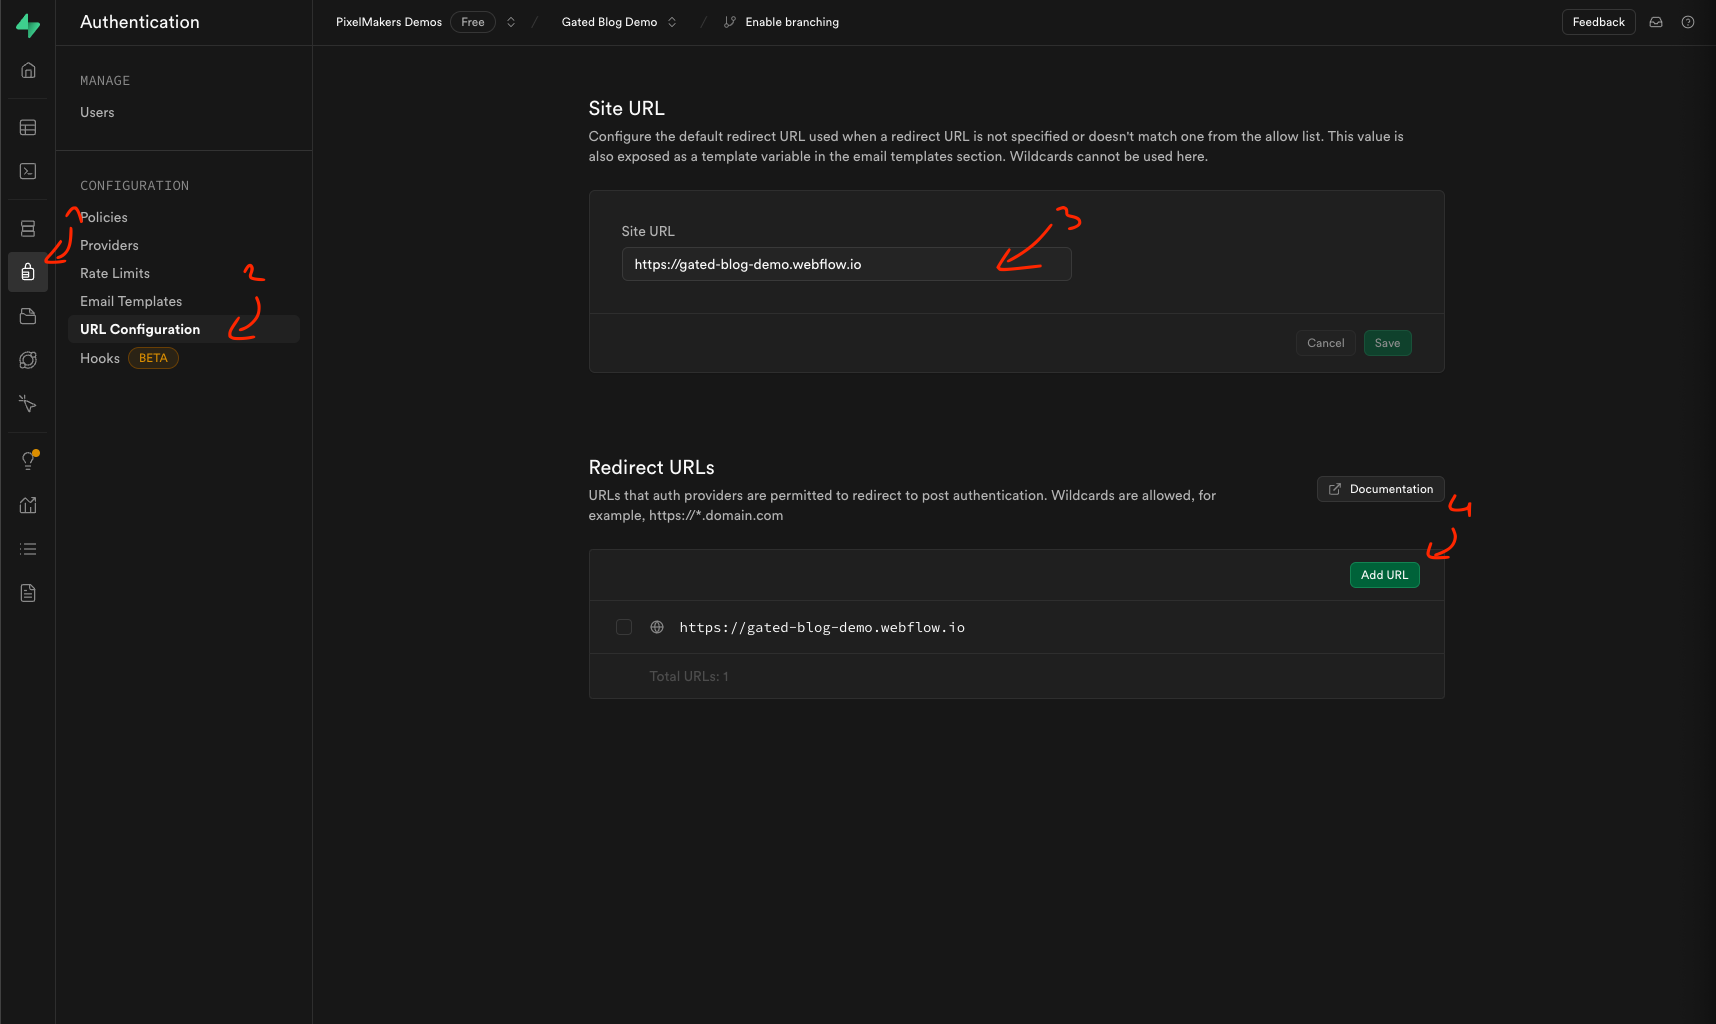
- https://your_domain - this will need to be replaced with your website's project url. You will also need to add this link to supabase. Otherwise, the authentication will not work.
And there you have it—a fully functional gated blog using Webflow, Supabase, Stripe, and SendGrid. From setting up user authentication to integrating payment processing and sending passwordless login emails, this solution covers everything you need to start monetizing your content. With this foundation in place, you can easily expand and customize your platform as your audience grows. Happy building, and may your content unlock new opportunities!